Introduction
Whether you’re preparing for an exam, memorizing key concepts, or reinforcing important information, StudyFetch flashcards help make studying smarter and more efficient. Flashcards are one of the most effective tools for active recall and knowledge retention. With StudyFetch, you can automatically generate flashcards from your study materials or create them manually using an intuitive interface — streamlining your workflow and enhancing long-term retention.Accessing Flashcards
-
On the left-hand side of your Dashboard click Practice and then select Flashcards
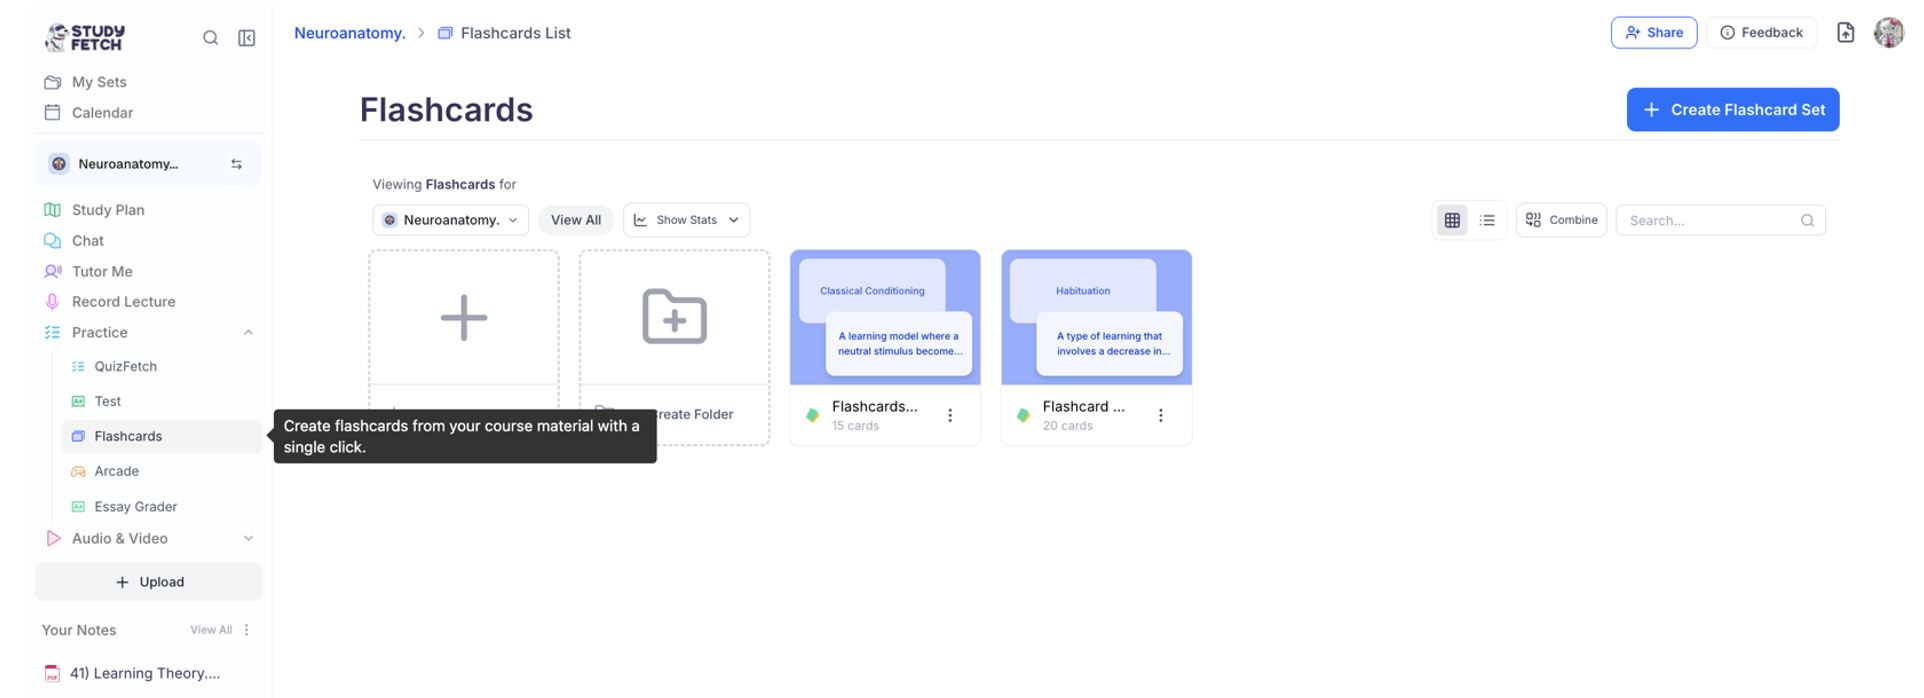
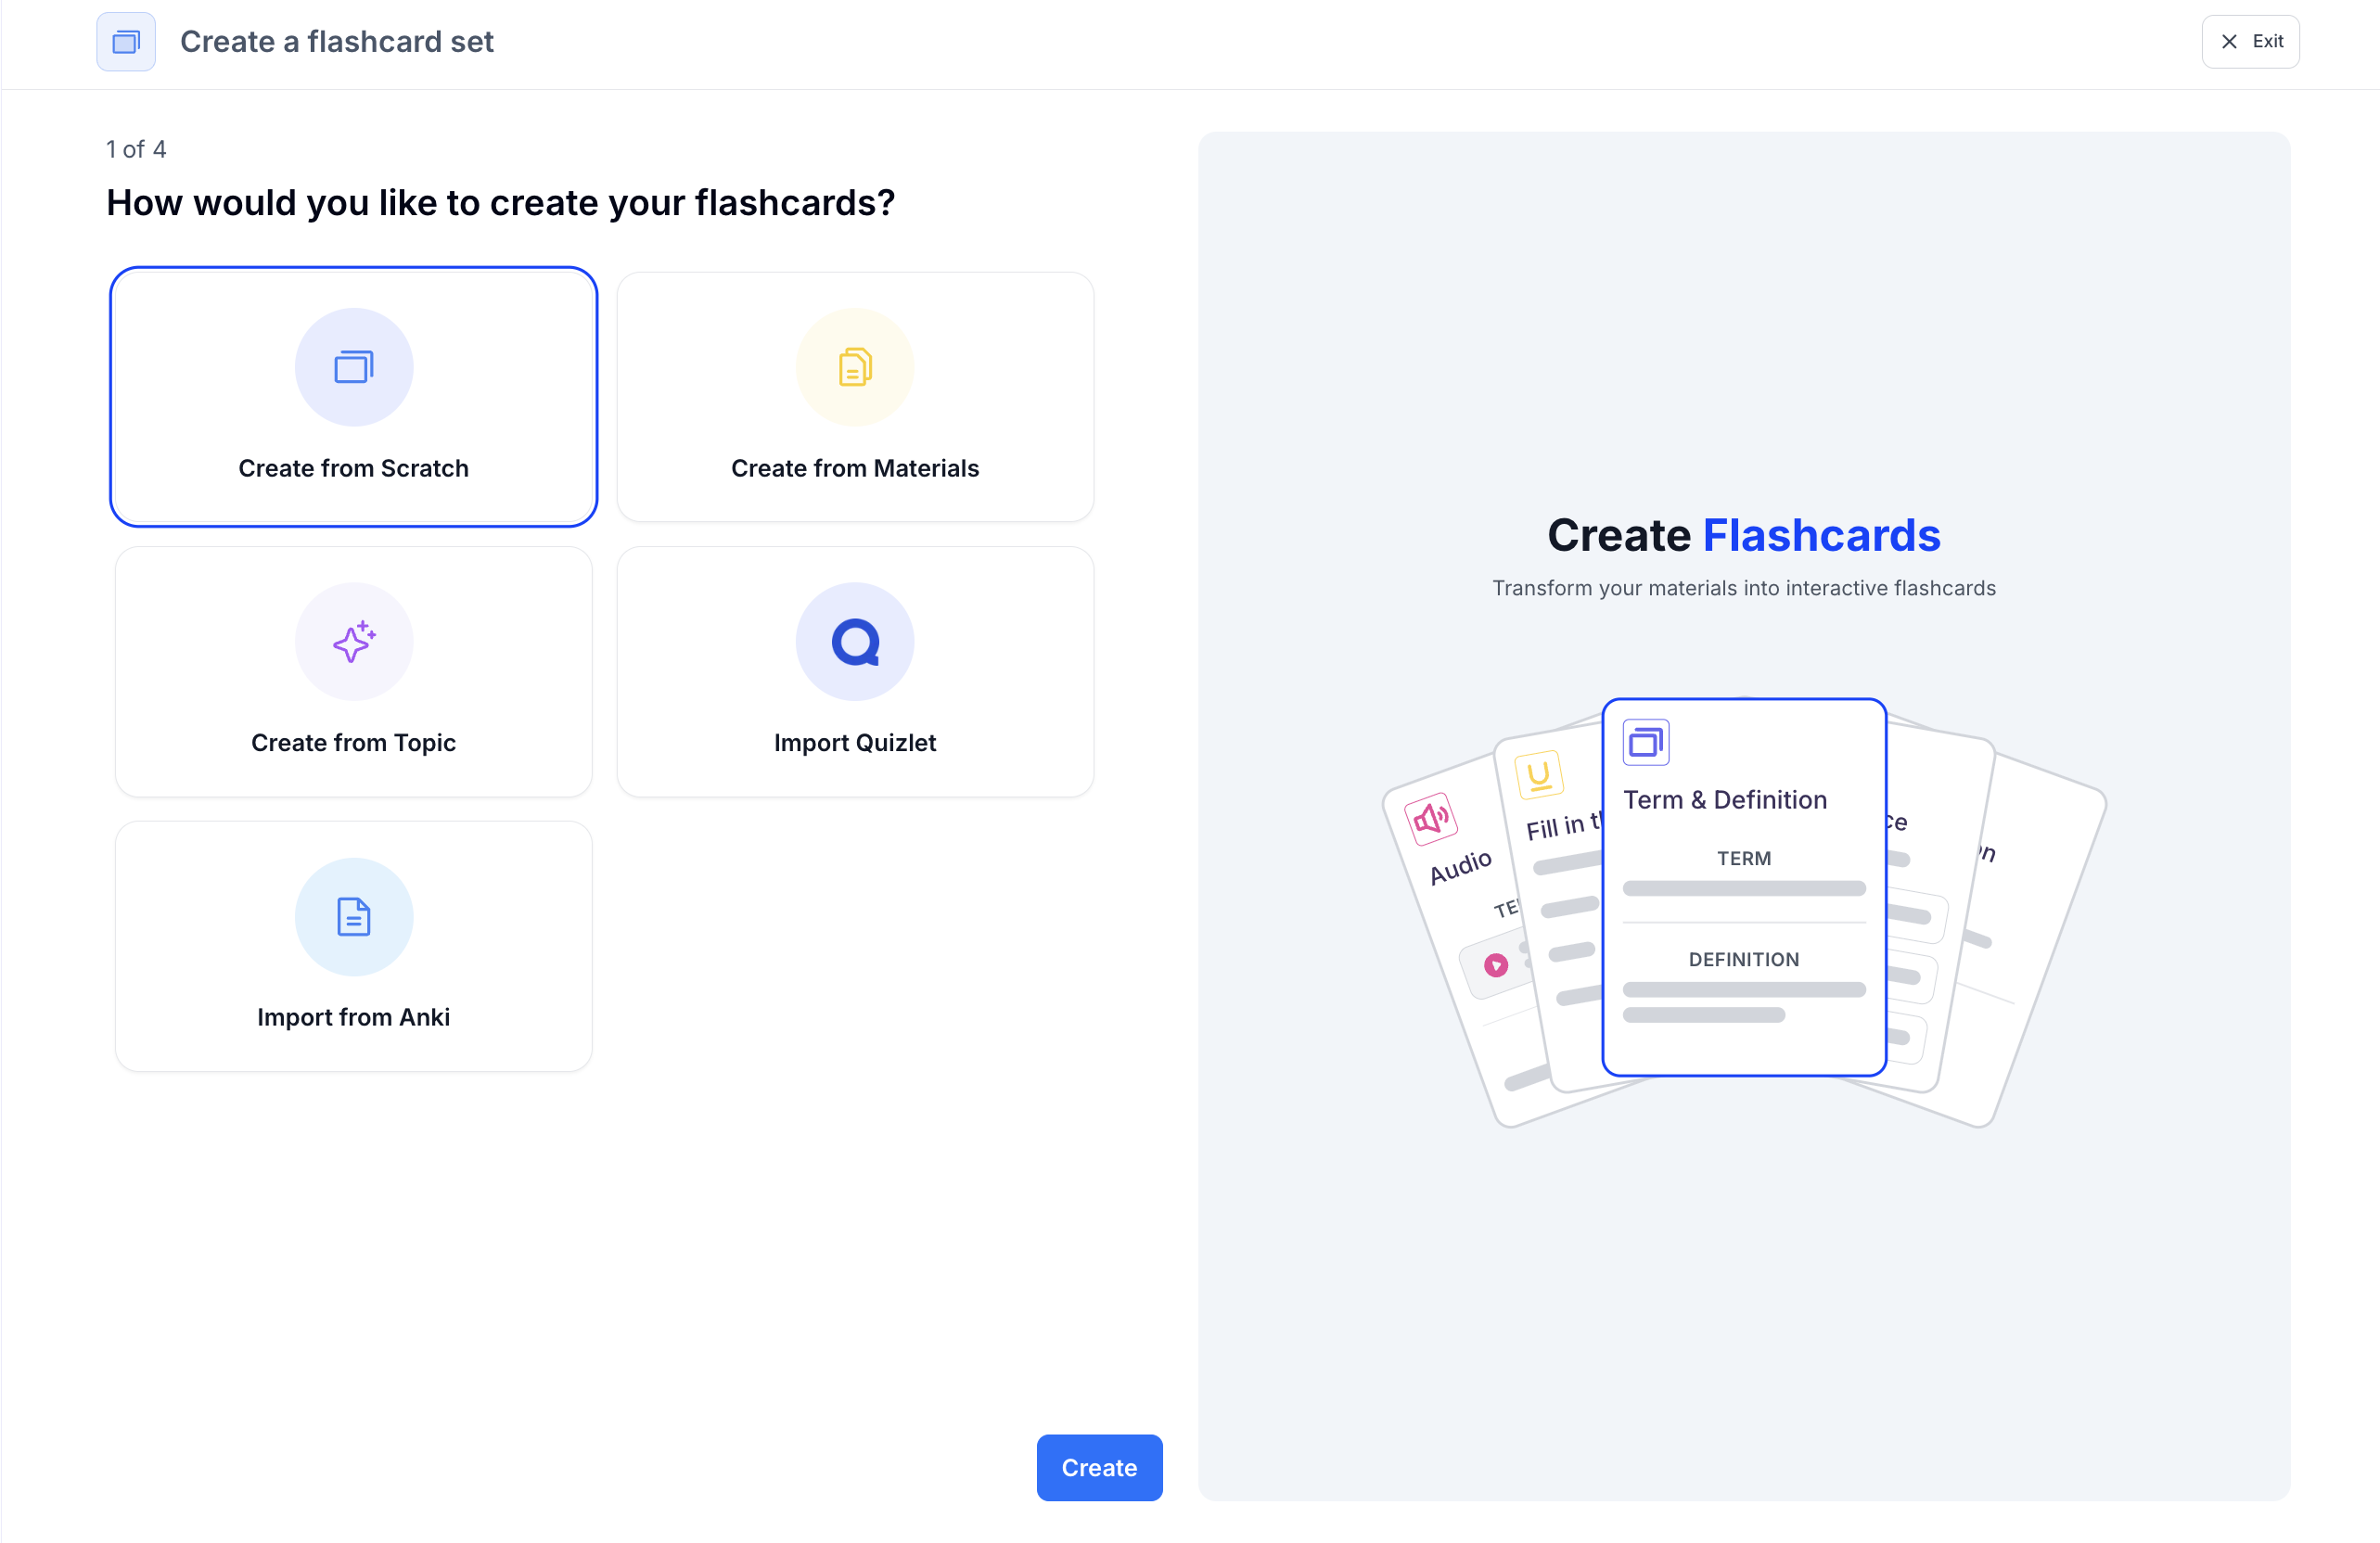
Generate Flashcards
First select + Create Flashcard Set and proceed via your preferred method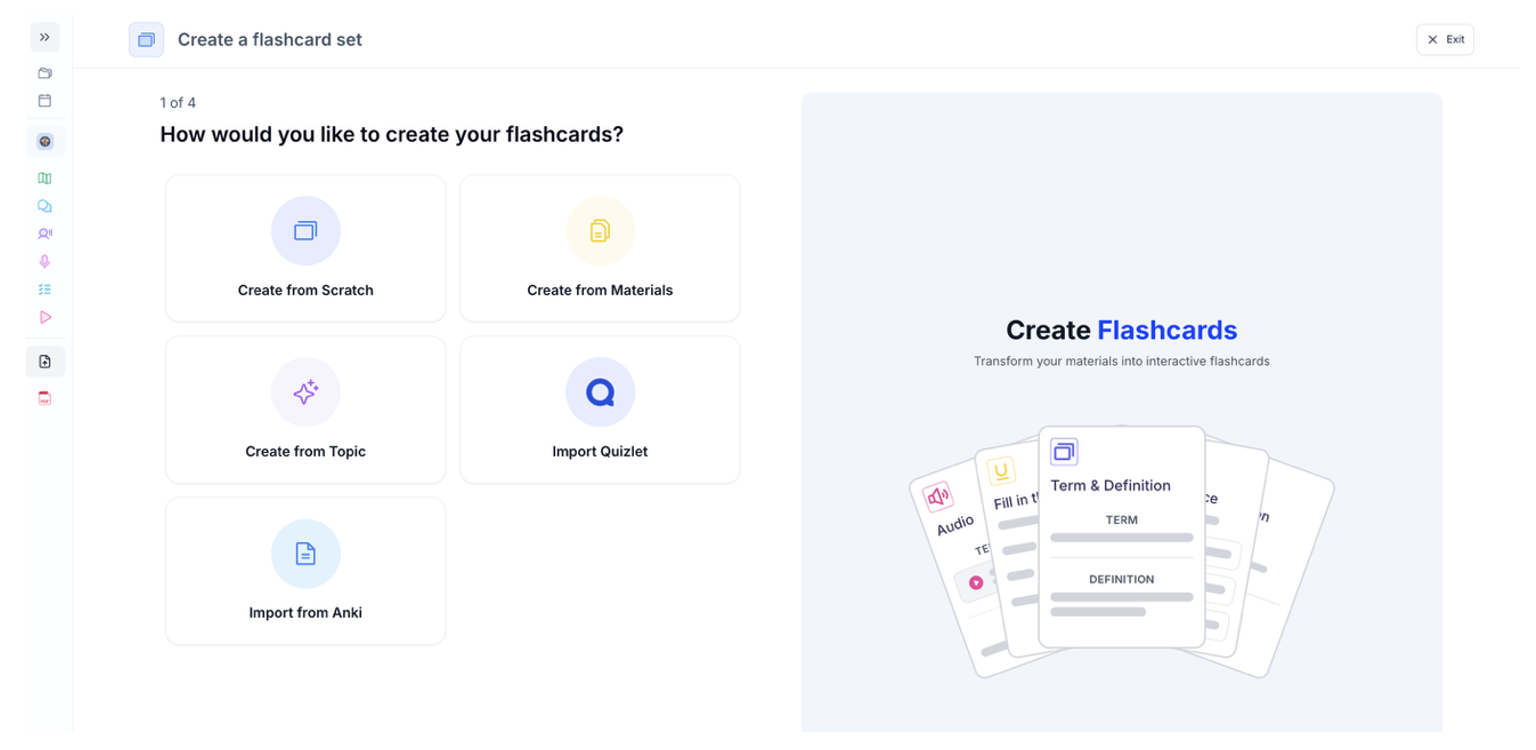
Method 1: From Materials
- Select Create from Materials if you want to create flashcards from your materials
-
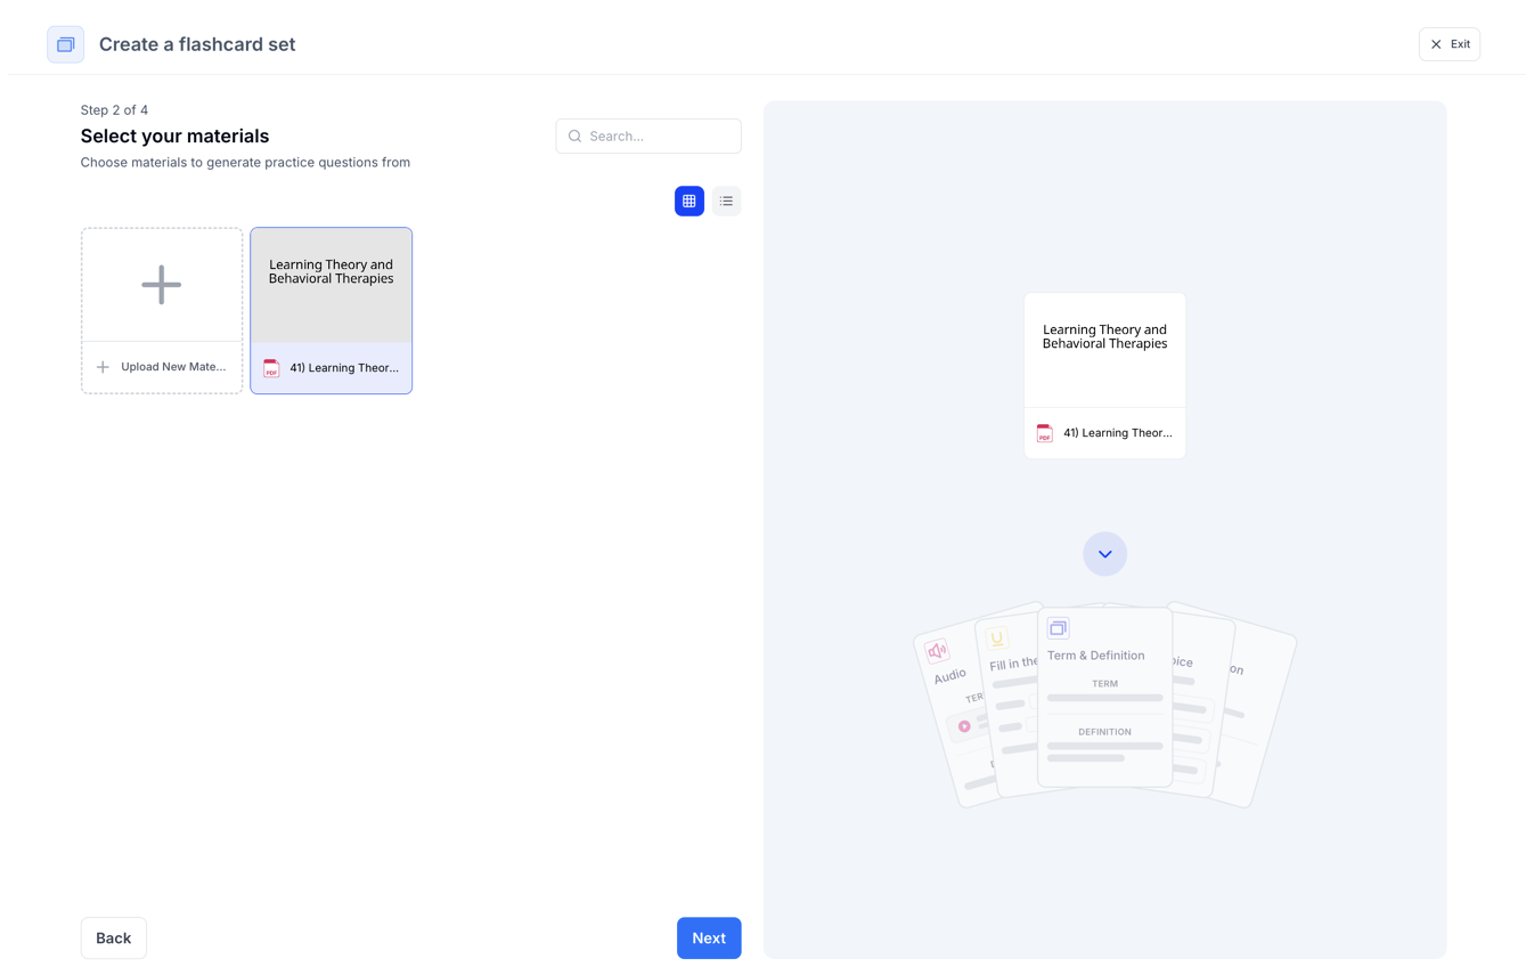
Choose which previously uploaded materials you would like to create flashcards from or select Upload New Material to import material you haven’t uploaded, and click Next
-
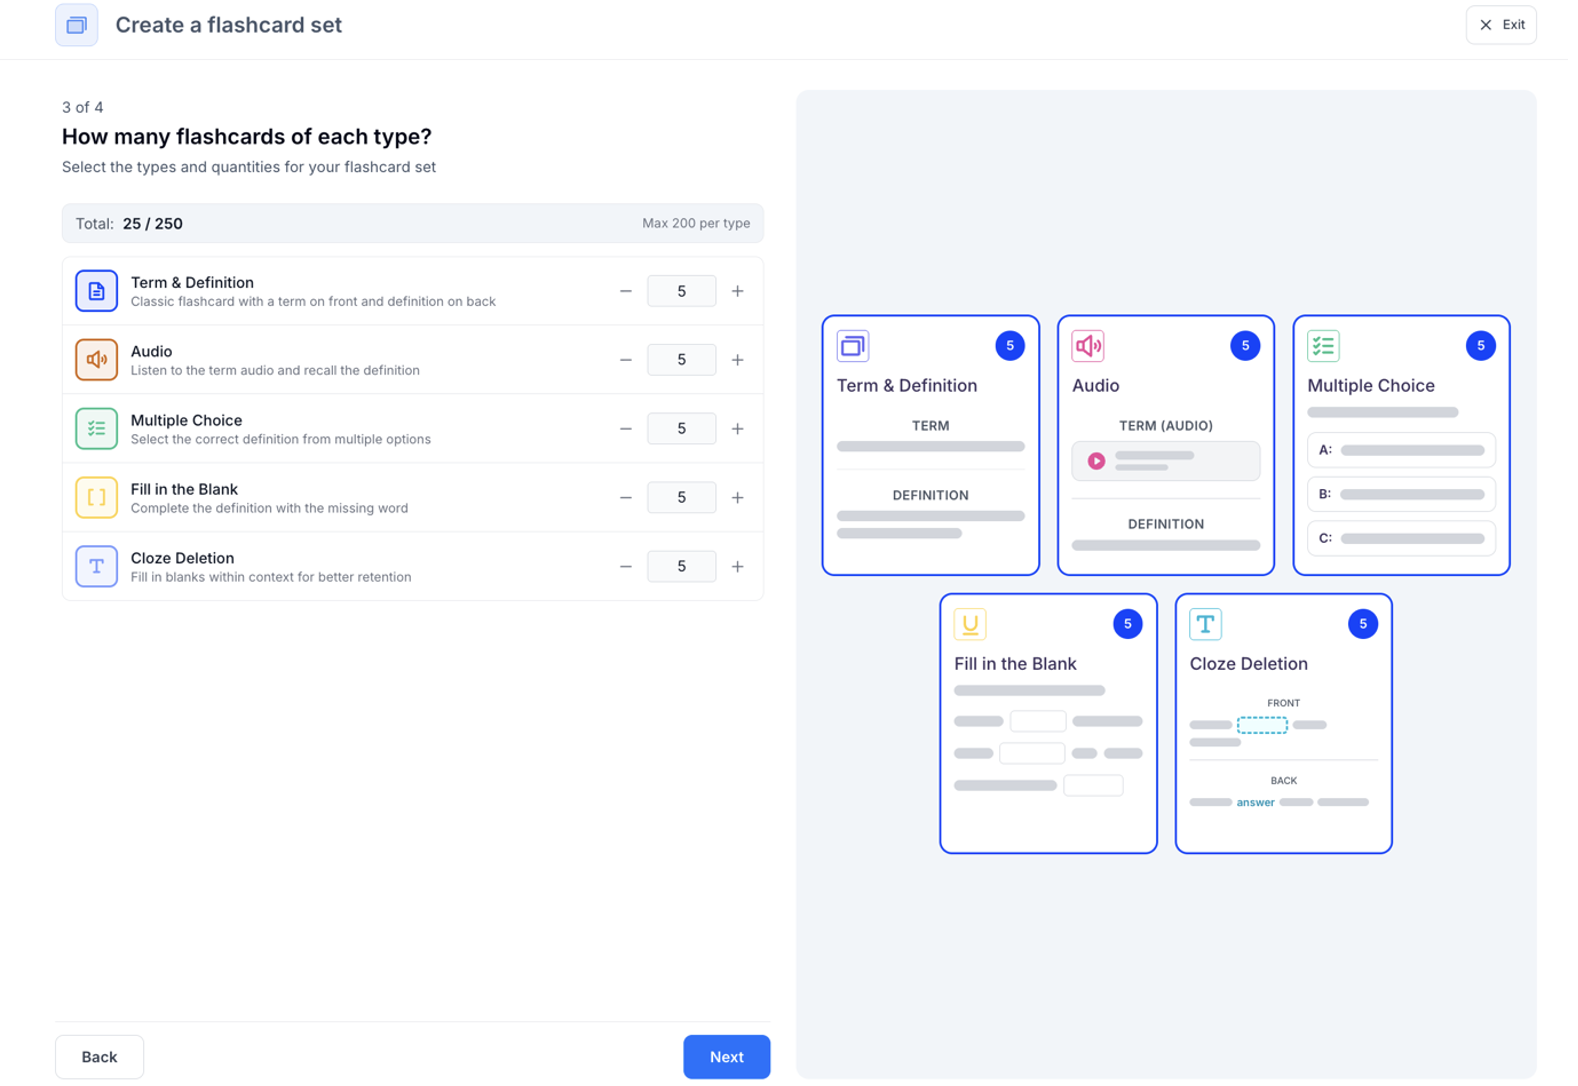
Next, customize your generation settings by selecting the type of flashcards and amount of each type of flashcard that you want generated. When you’re done click Next
-
Now you can add additional optional settings:
a. Name your flashcard set by typing in the box under What would you like to name your flashcards? If you leave this blank, don’t worry, we will name your flashcard set for you
b. Choose the language you want your flashcards to be in by clicking the box under What language would you like your flashcards to be in? and selecting your preferred language from the list.
c. Select a customization plugin by selecting one from the list under Customize your flashcards with a Plugin or click Explore Plugins to use a plugin not listed or create your own
d. To ensure your flashcards are tailored to your learning goals, specify a focus topic in the box under Focus Topic (optional)
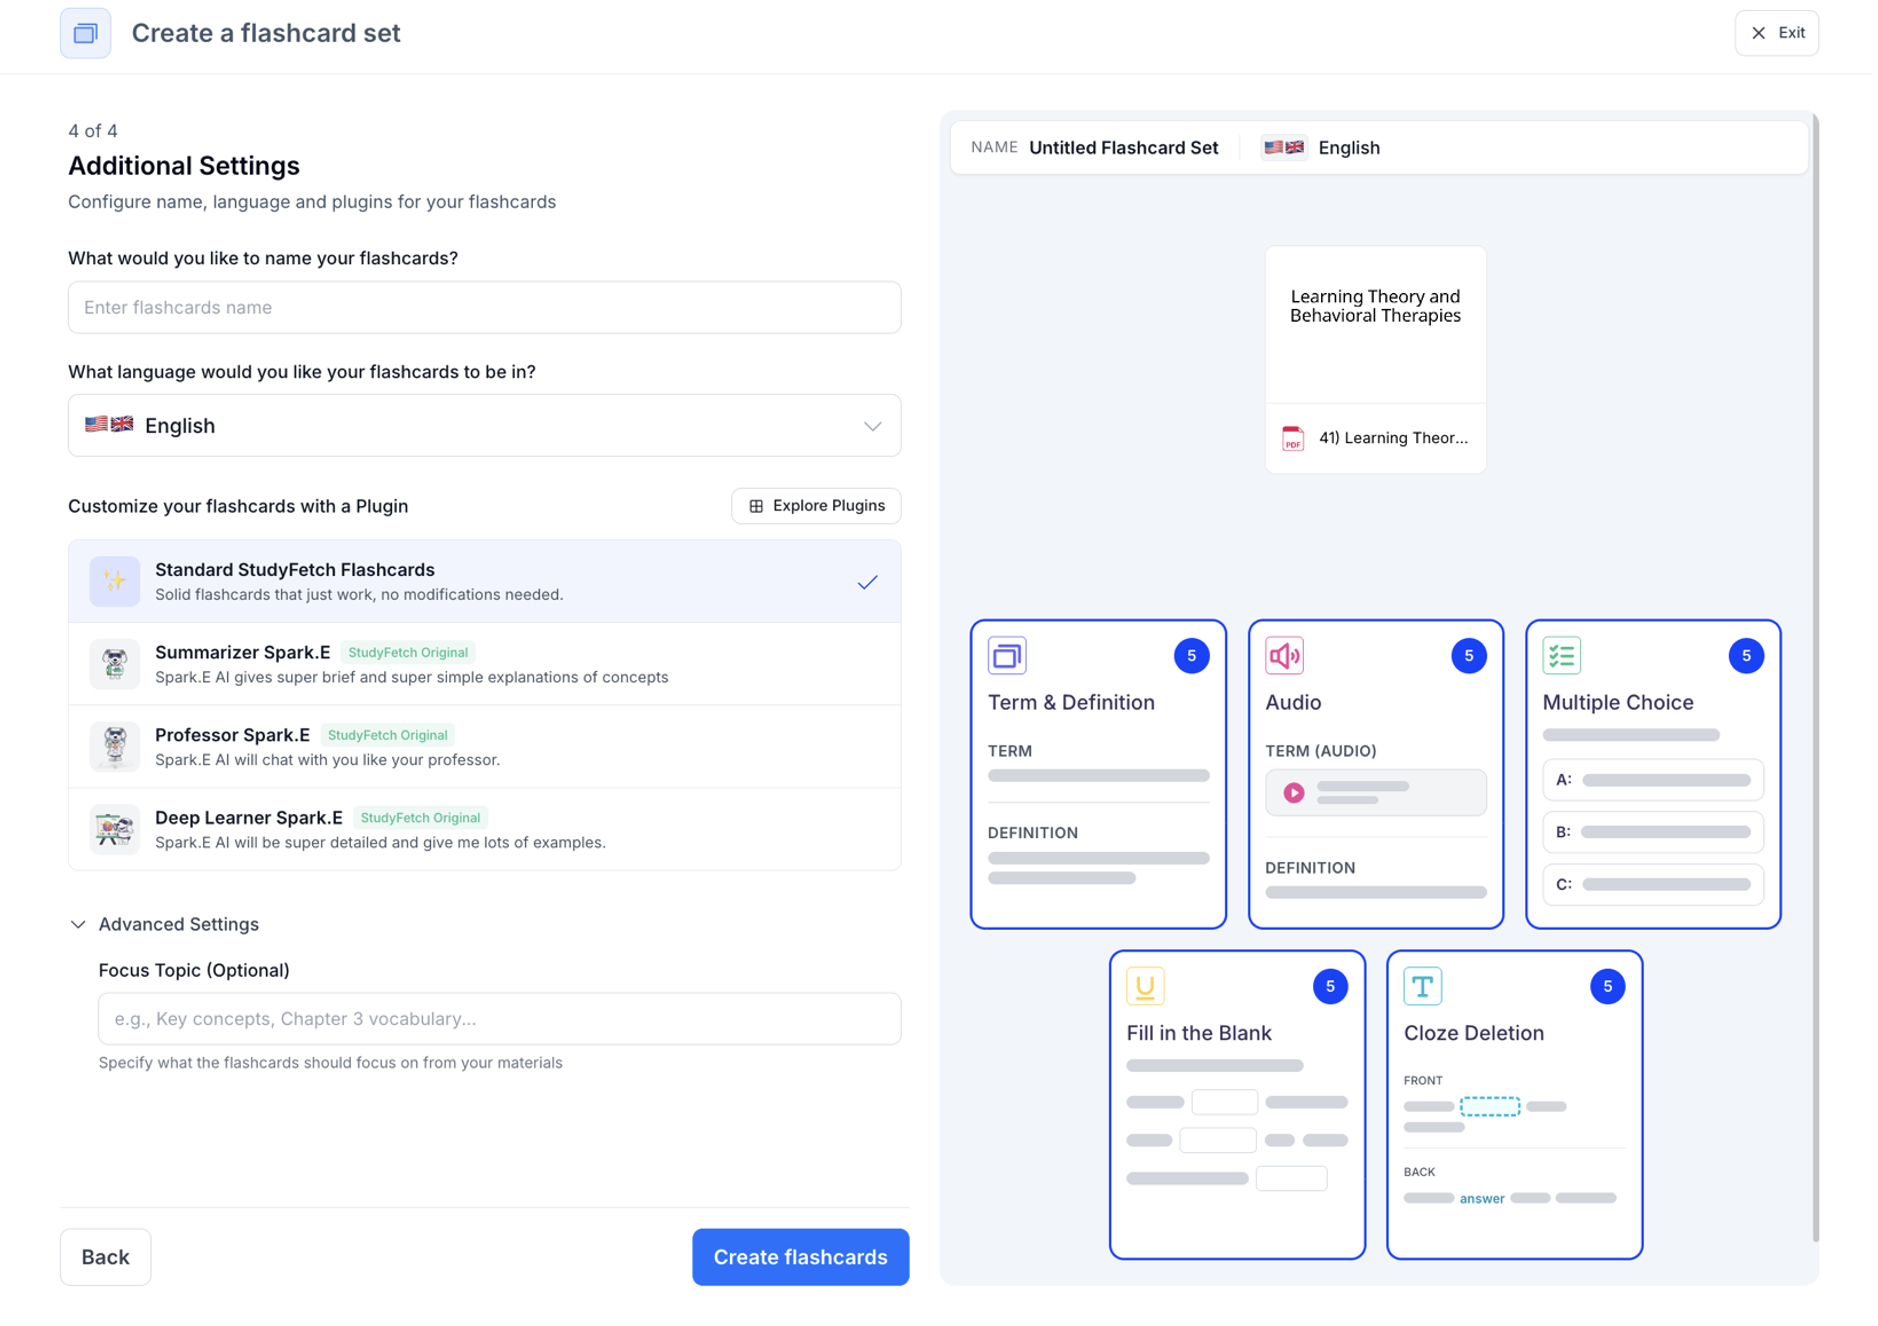
- Lastly, select Create flashcards and StudyFetch will automatically generate your customized flashcards
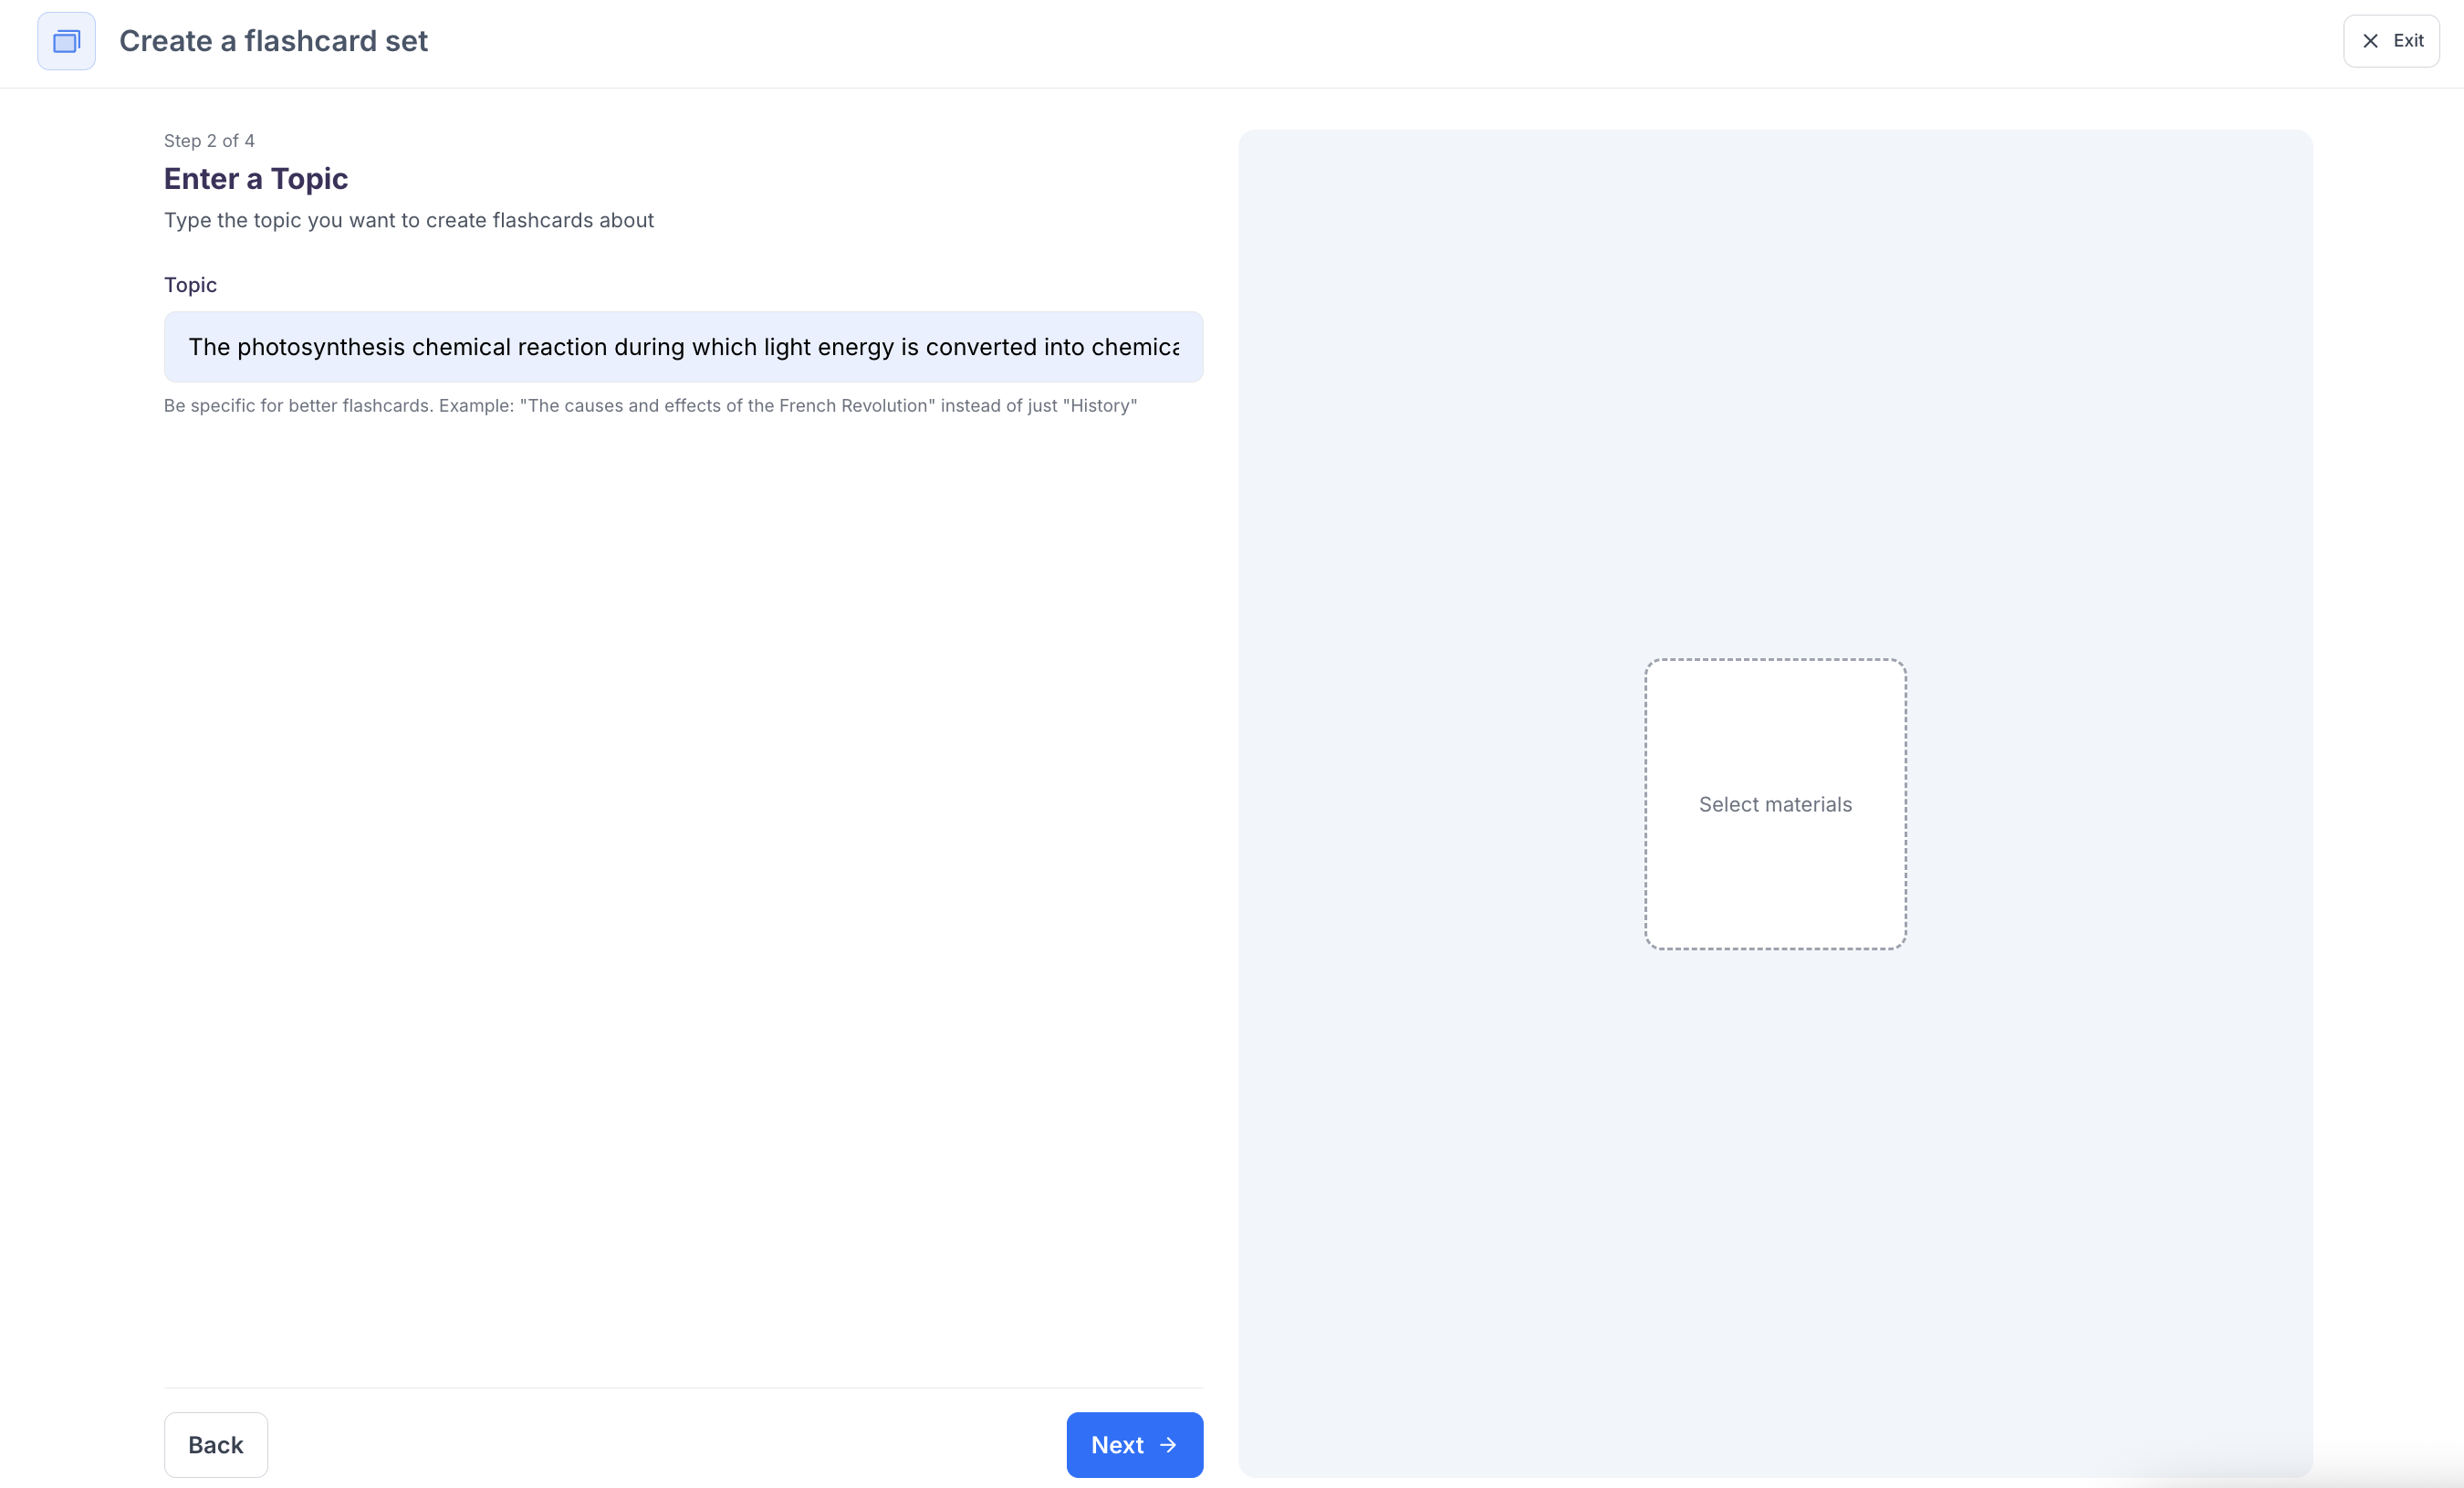
Method 2: From Topic
- Select Create from Topic if you want to create flashcards from any topic you want to learn about
-
Type the topic you want to create flashcards about in the box under Topic, then click Next
- Next, Follow steps 3-5 from Method 1 above
Method 3: From Quizlet
- Select Import Quizlet to turn your quizlet into flashcards
-
Go to quizlet and copy the URL for the Quizlet set you want to import, then paste it into the box under Quizlet Set URL

-
When you are ready to import, click Import, and StudyFetch will turn your Quizlet set into AI powered flashcards
Quizlet import will create flashcards with basic (Term & Definition) format. You can edit and enhance them after import.
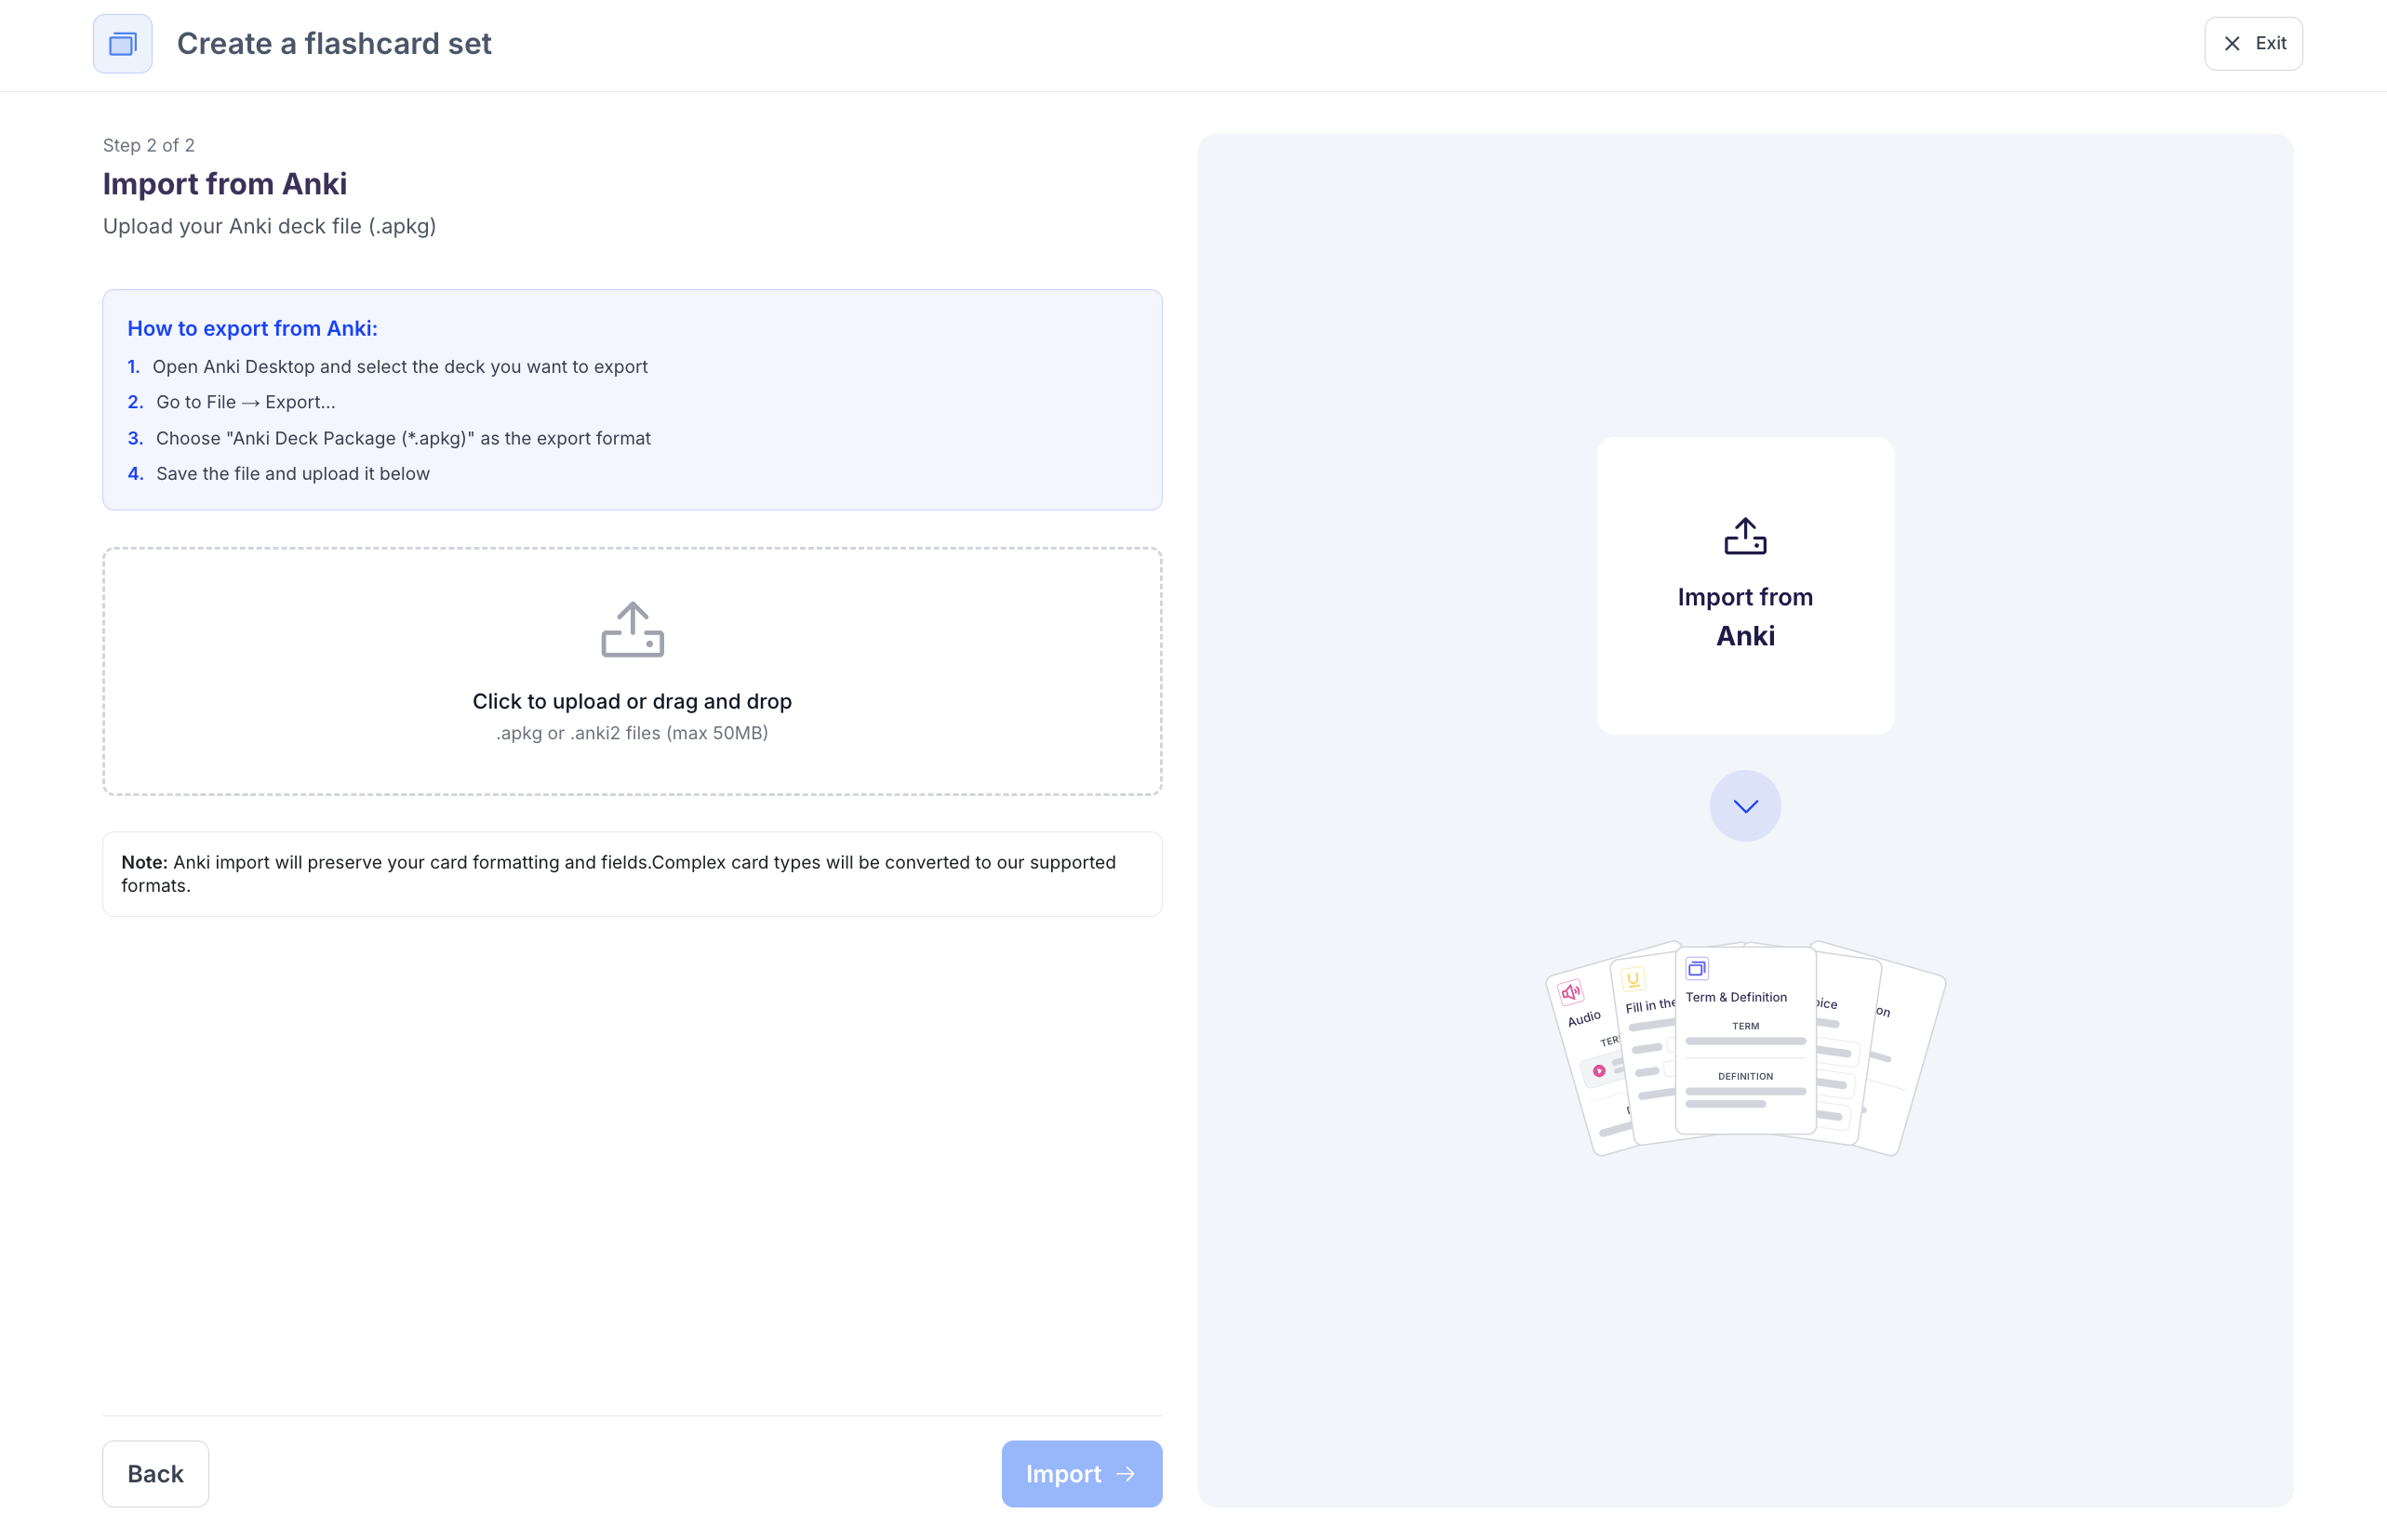
Method 4: From Anki
-
Select Import from Anki to turn your Anki deck into flashcards.
How To Export your Anki Deck to upload to StudyFetch:
- Open Anki Desktop and select the deck you want to export
- Go to File>Notes and then select Export Notes…
 3. Choose Anki Deck Package (*.apkg) as the export format, and then select Export
 4. Your file is now saved to your device and ready to be imported to StudyFetch.
 -
Next click the box where it says Click to upload or drag and drop to open your devices file finder and select the Anki file you want to import, or simply drag and drop the file into the box
-
After selecting your Anki file, click Import and StudyFetch will automatically turn your Anki deck into AI powered flashcards
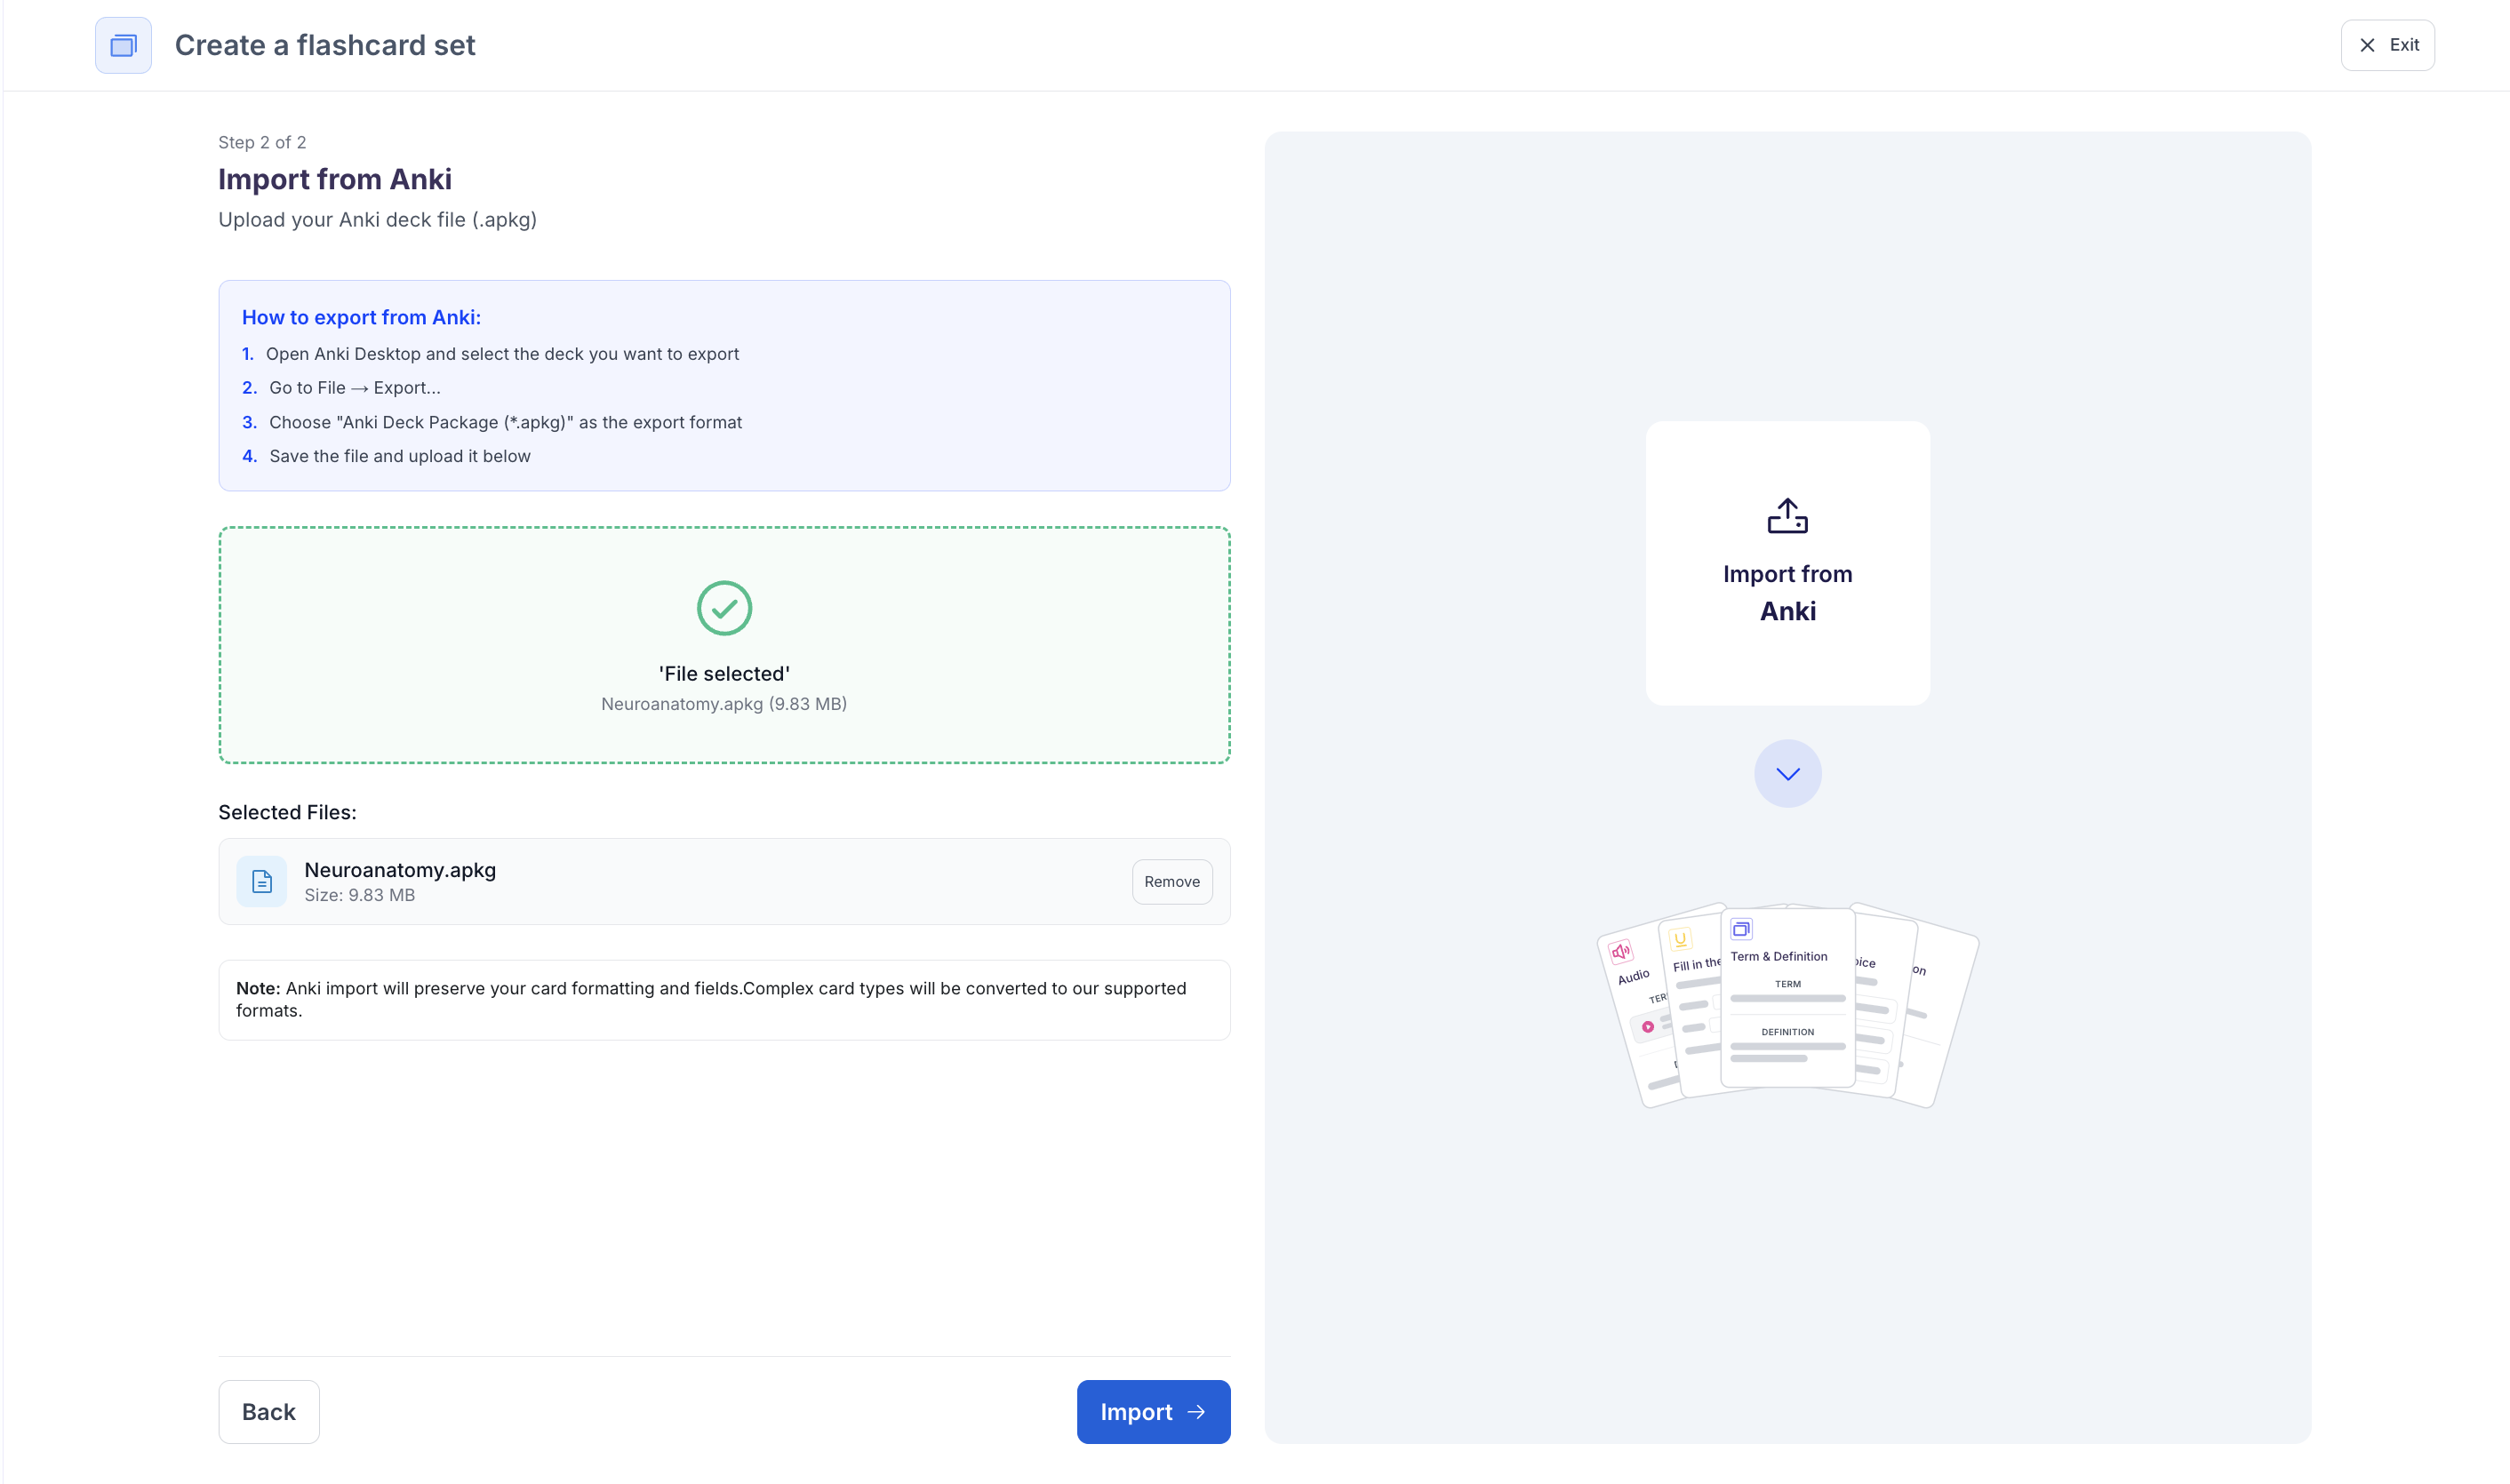
Anki import will preserve your card formatting and fields. Complex card types will be converted to our supported formats.
Method 5: From Scratch
-
If you want to manually create your own flashcards, choose Start from Scratch, and click Create
-
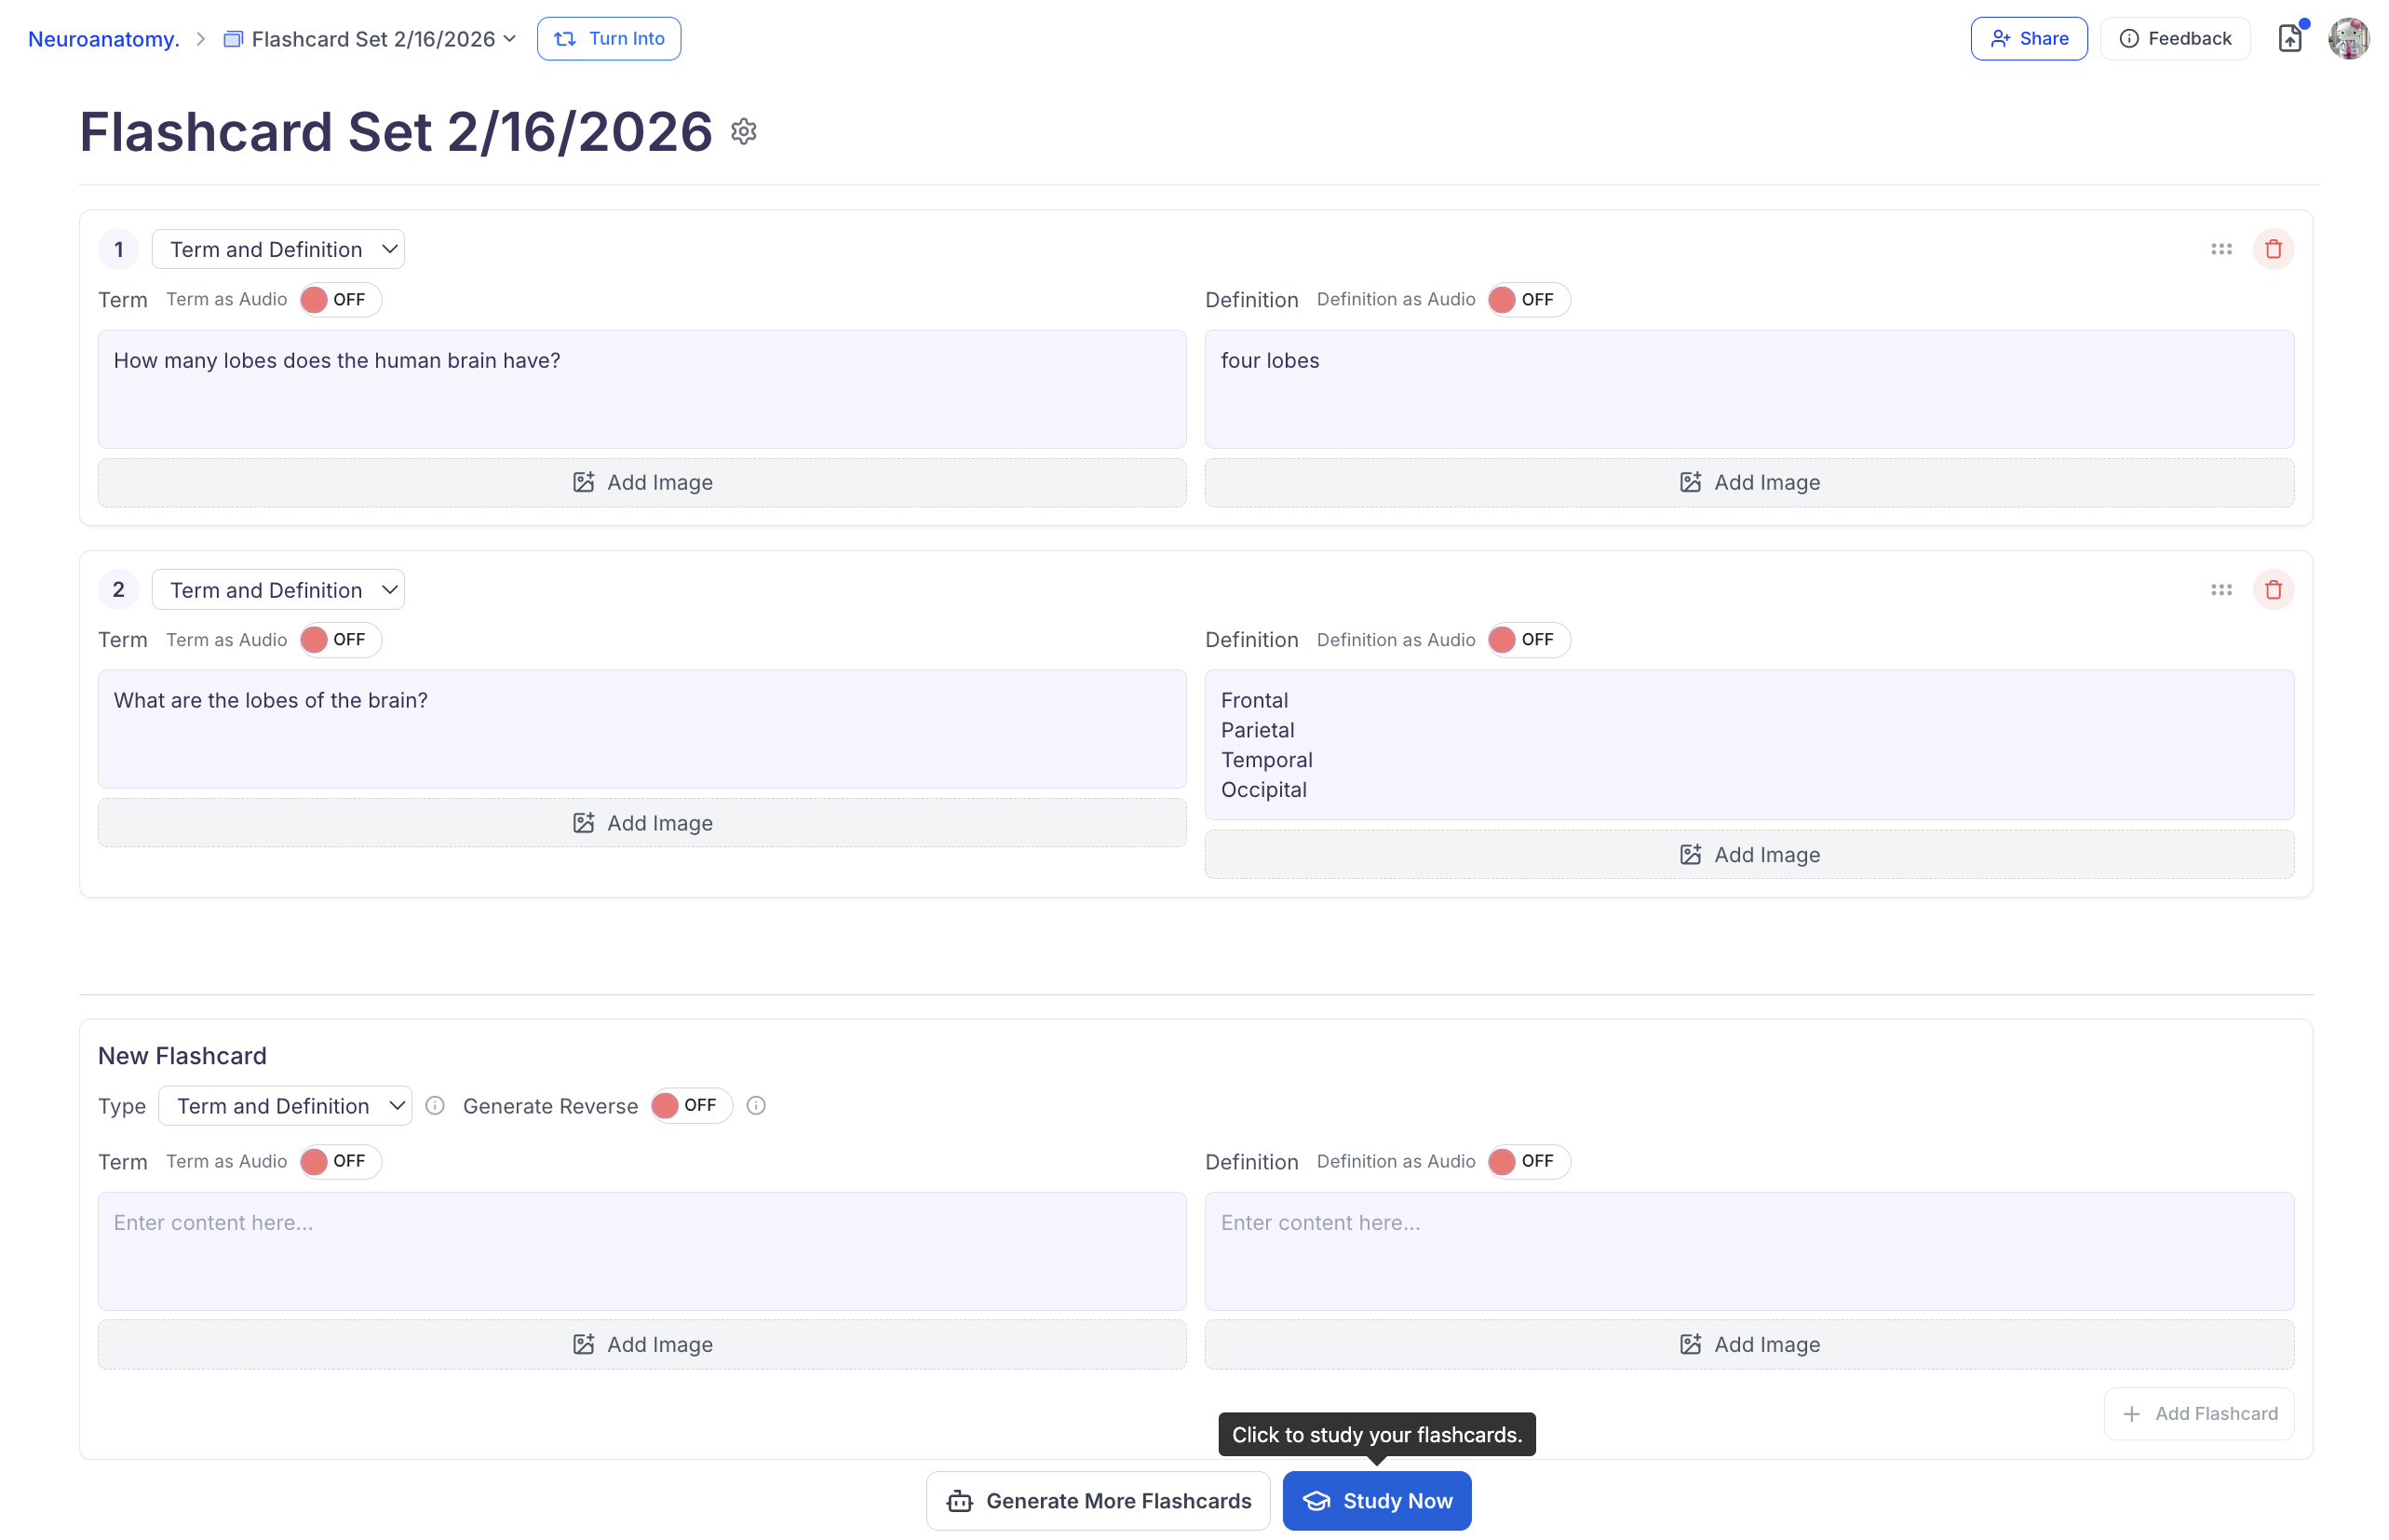
Now you can create as many flashcards as you’d like. The default setting will populate a blank Term and Definition card. You may proceed to add the term and definitions on the text boxes provided, optionally, you may also add images to each text box. For step by step instructions on creating each type of flashcard, see Creating Specific Types of Flashcards
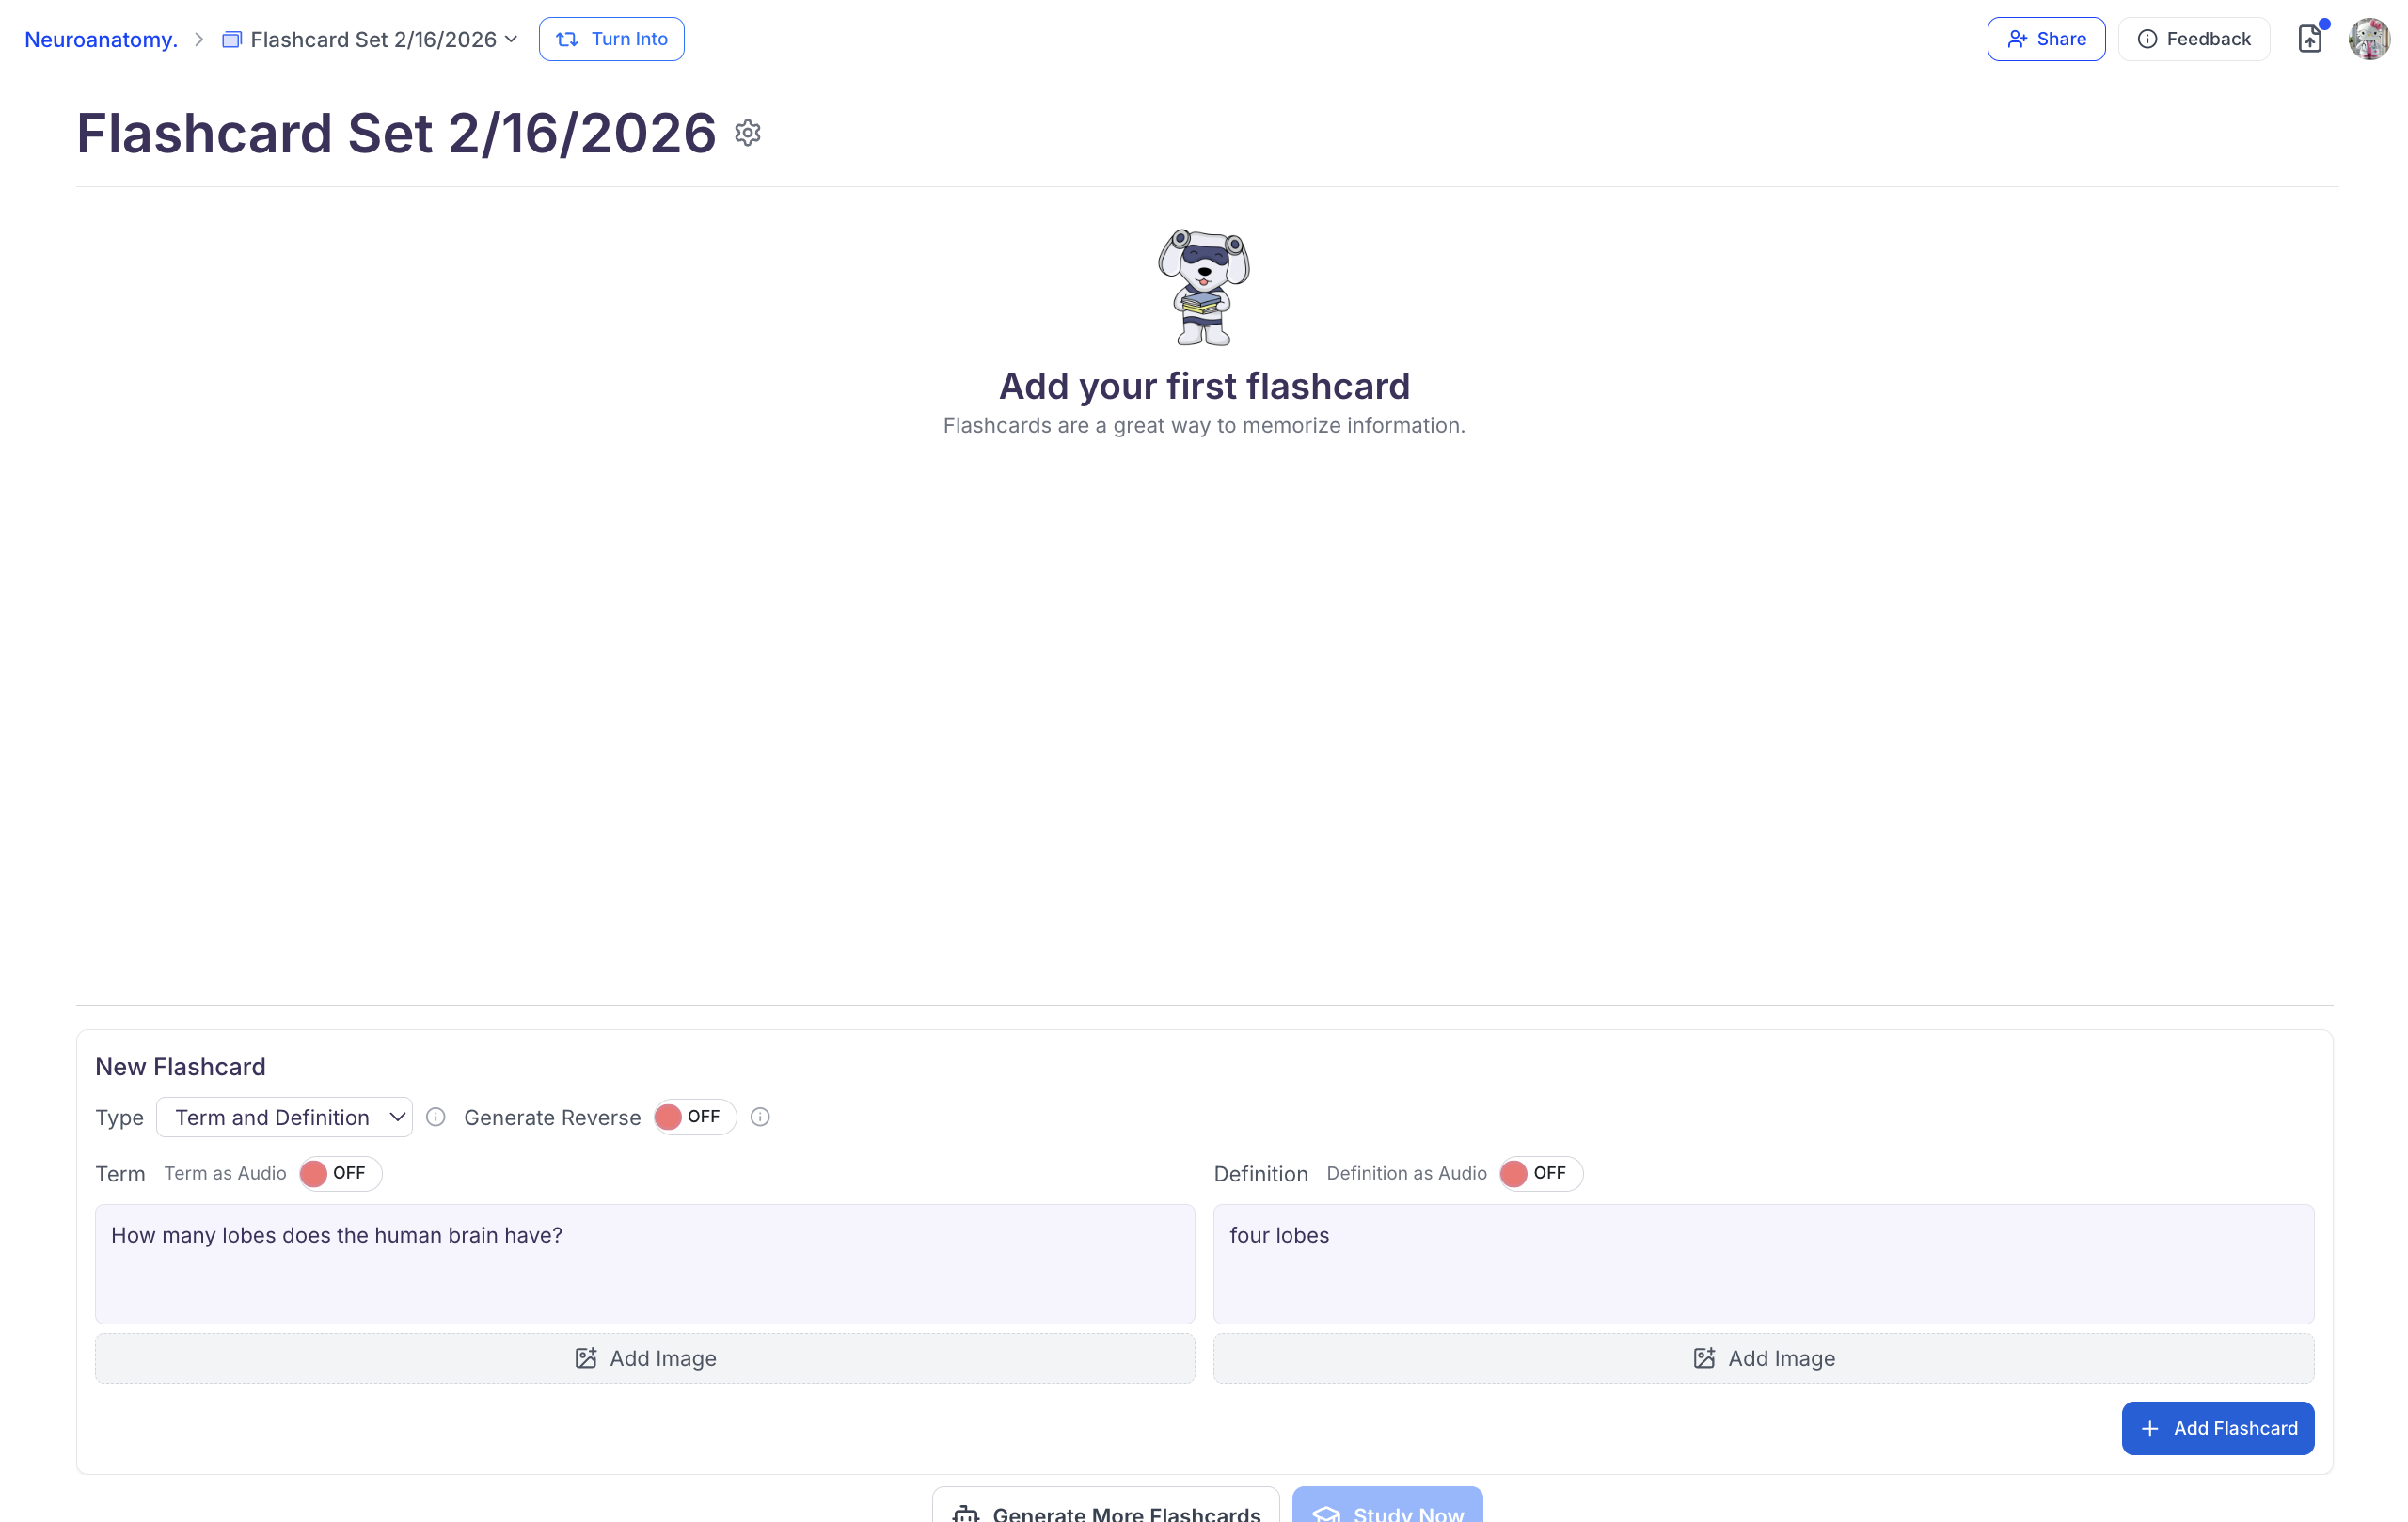
- When you are done making each flashcard, click + Add Flashcard
- After making all of your flashcards from scratch, click Study Now to start studying
Managing your Flashcards
Combining Flashcard Sets
Combining flashcard sets allows you to merge multiple sets into one, making it easier to review related topics together.-
After accesing your flashcards, click Combine.
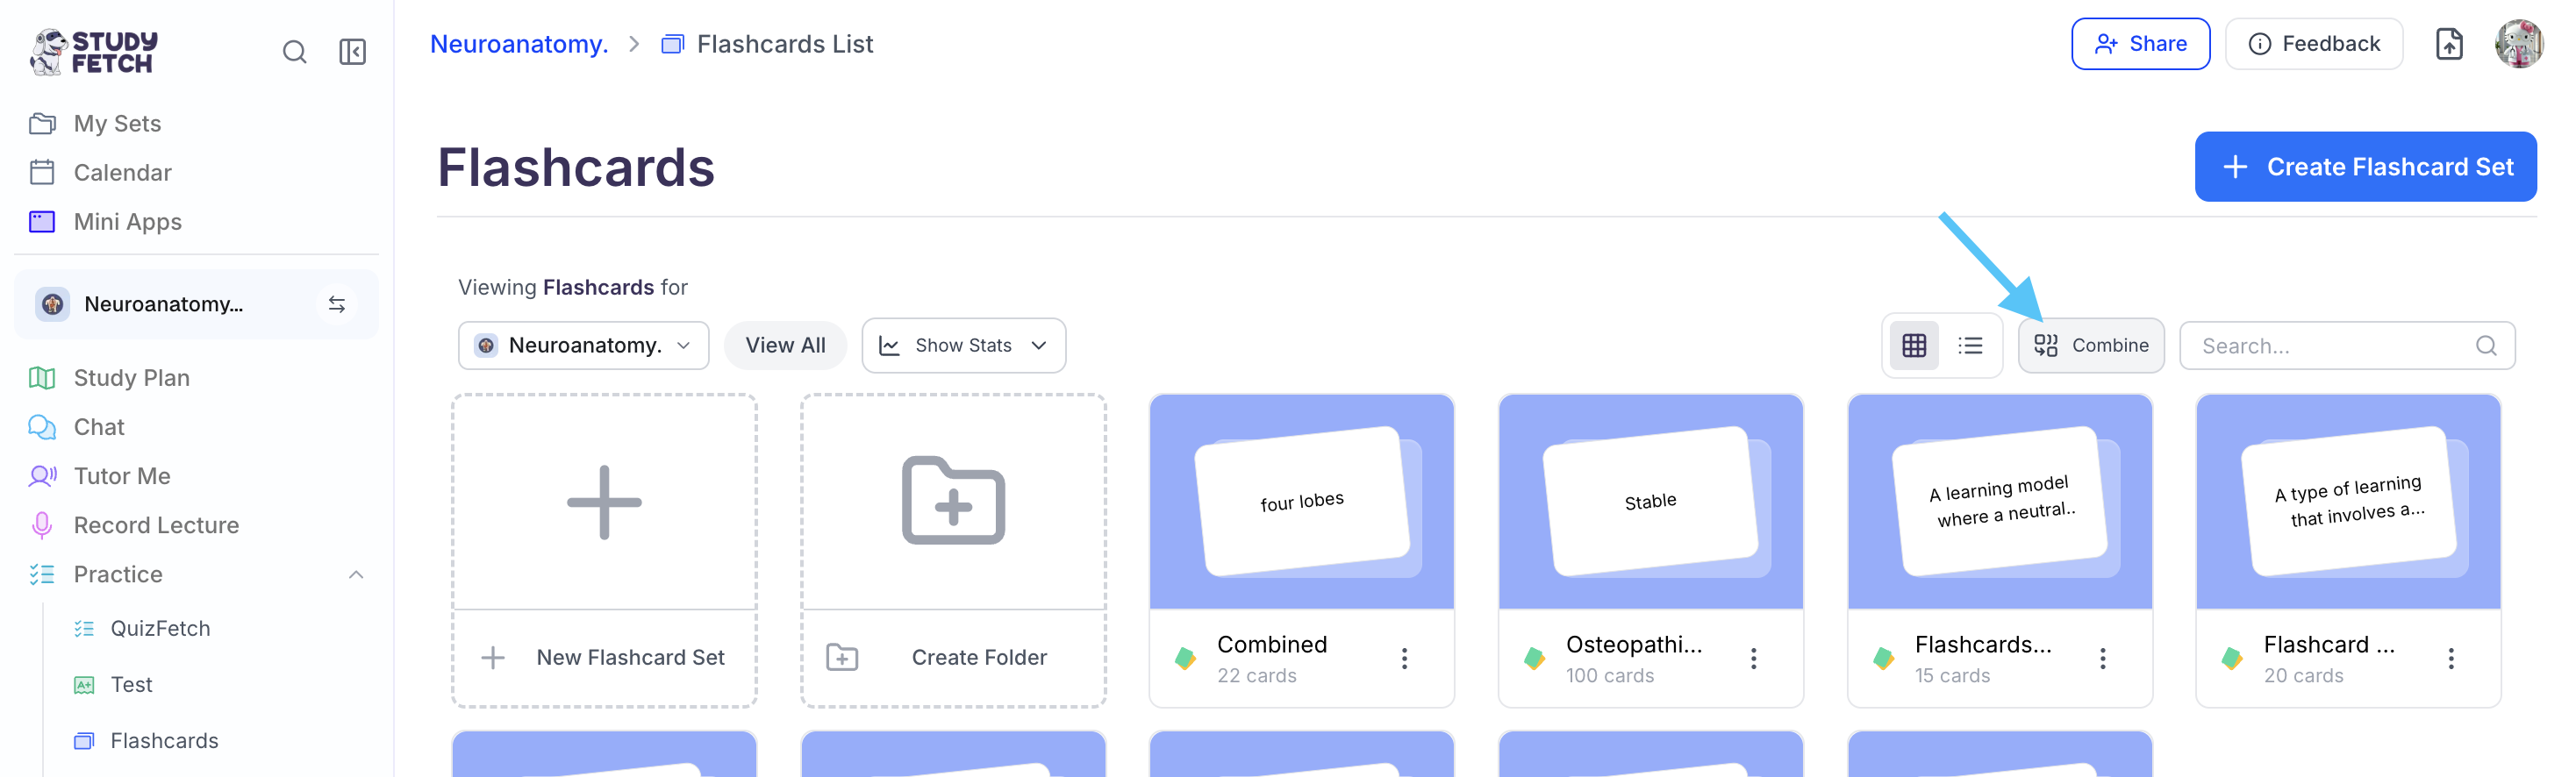
-
Select the flashcard sets you want to combine, then choose Re-order Flashcards to continue.

-
Reorder the selected sets by clicking and dragging each one into your preferred order.


-
By default, the system combines your original flashcard set names into one. To customize the name, enter a new title in the New Flashcard Set Name field.

- The Keep original flashcard sets option is selected by default. If you do not want to keep the individual original sets, click the checkbox to remove the checkmark.
-
Finally, select Create Combined Set to combine your selected flashcards.

Opening the Editing View
There are several ways to access the editing page for your flashcard set, just follow the steps that best fit your needs:-
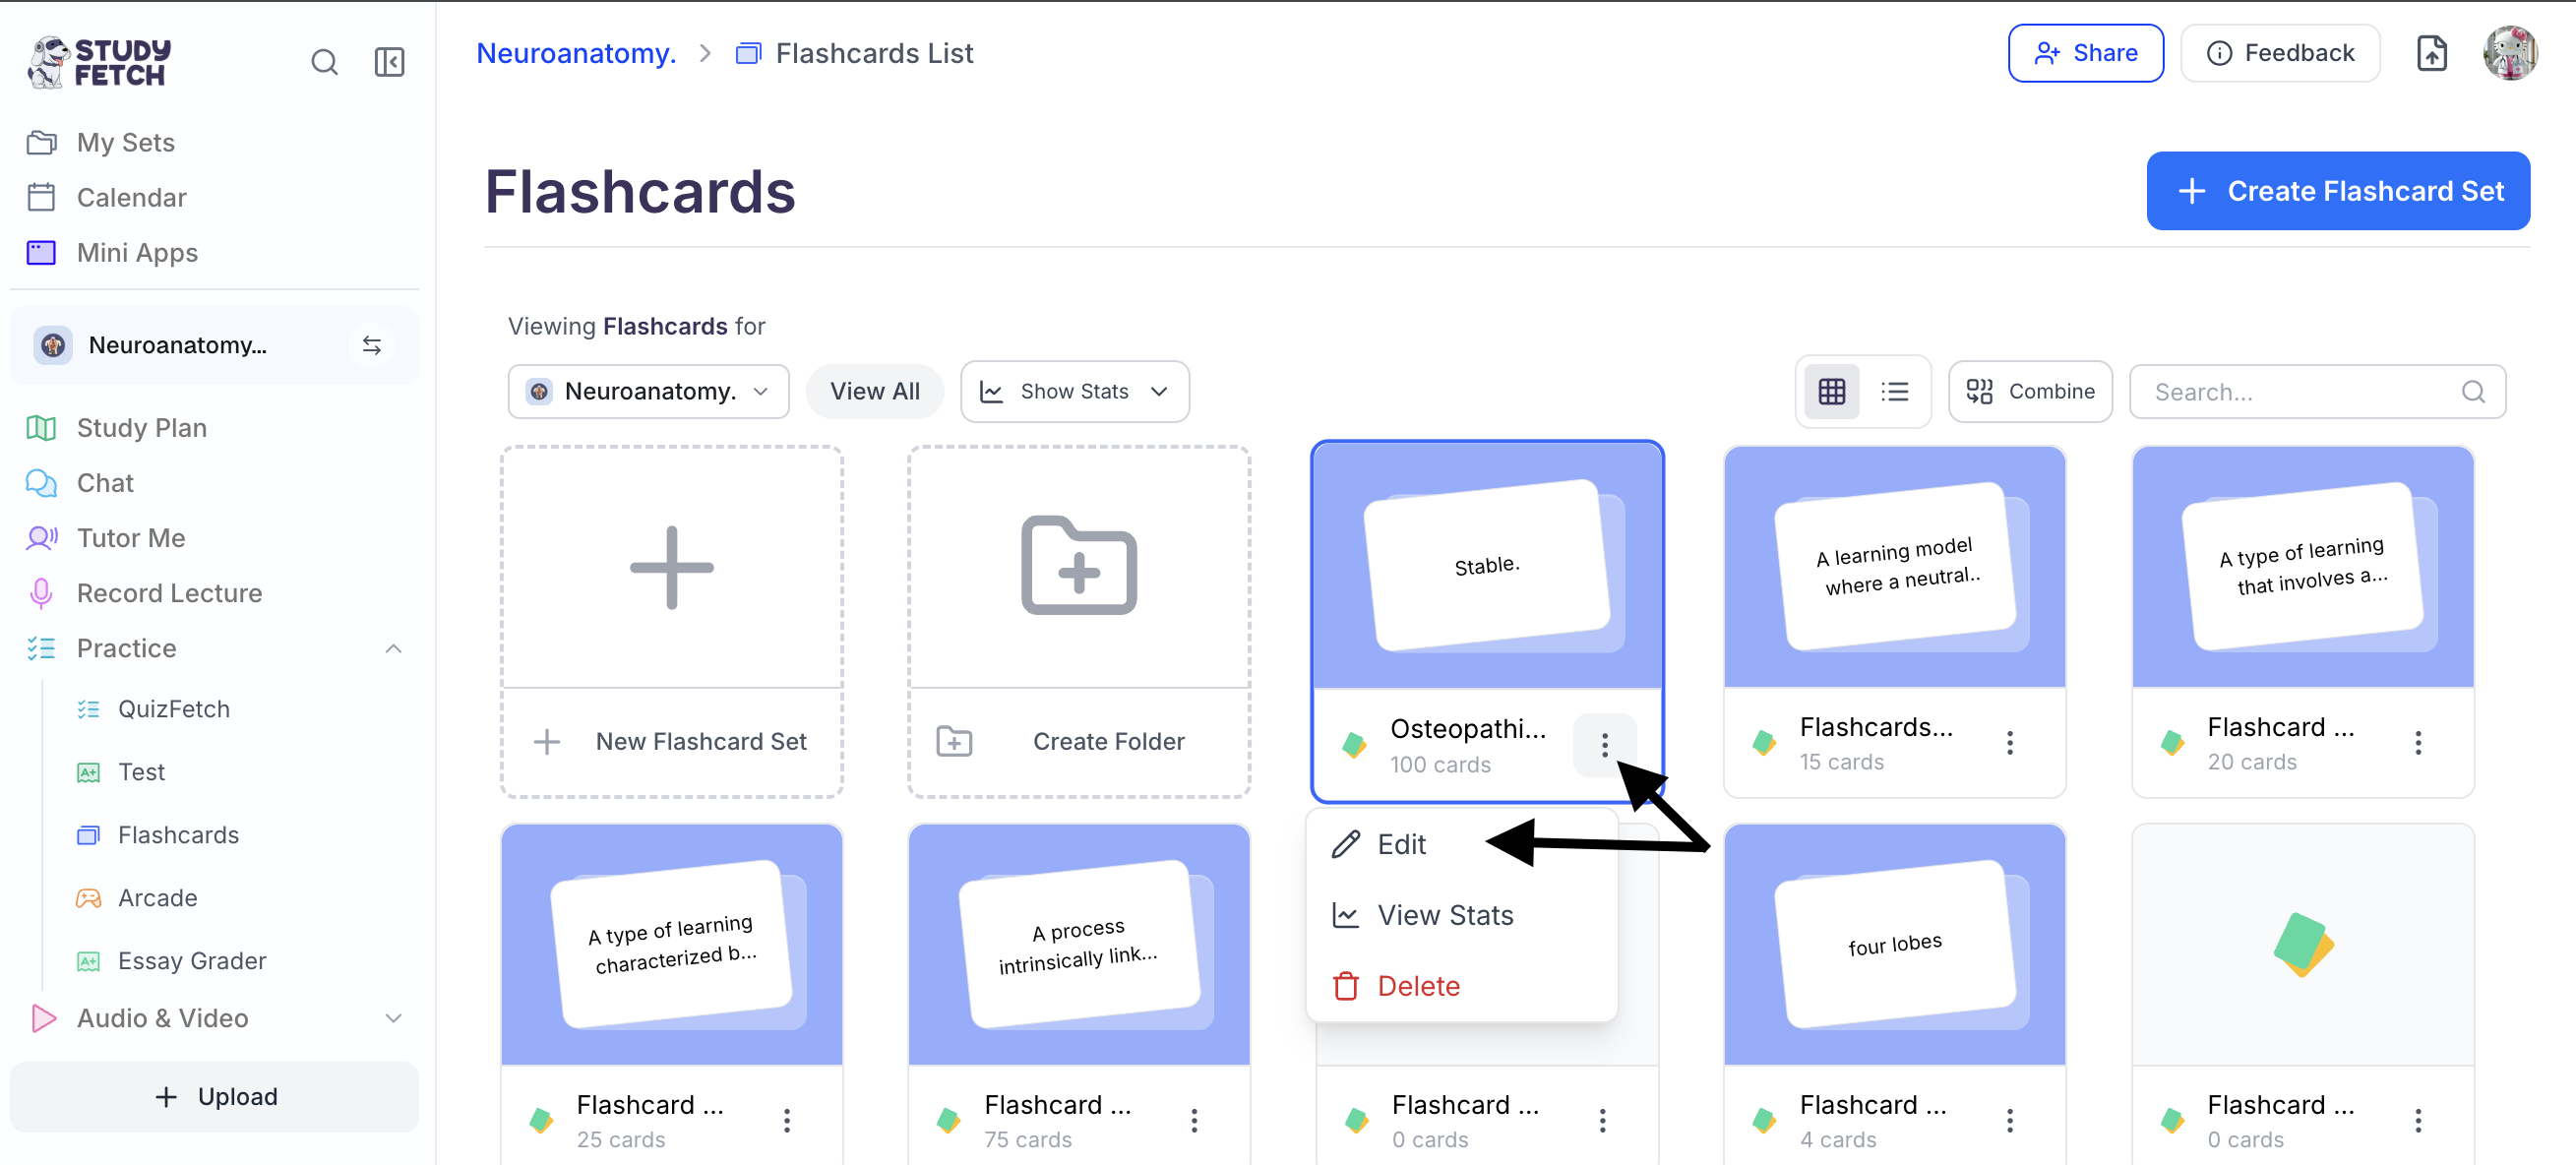
To review or edit a flashcard set that you are actively studying, click the downward arrow head to the right of your flashcard name and then click Edit

-
To review or edit any flashcard set that you are not actively studying , first select Practice from the left side bar and then choose Flashcards, here you can view all your existing flashcard sets. Next select the button with the 3 dots next to the flashcard deck that you want to review or edit, and click Edit
- Now you can review your existing flashcards, edit current cards, or create new flashcards.

Changing the Name of your Flashcard Set
Flashcard set names can be updated from either Study mode or Editing mode. Choose the method that works best for you: In Study Mode:-
Click the downward arrow head to the right of your flashcard name and then click Rename.
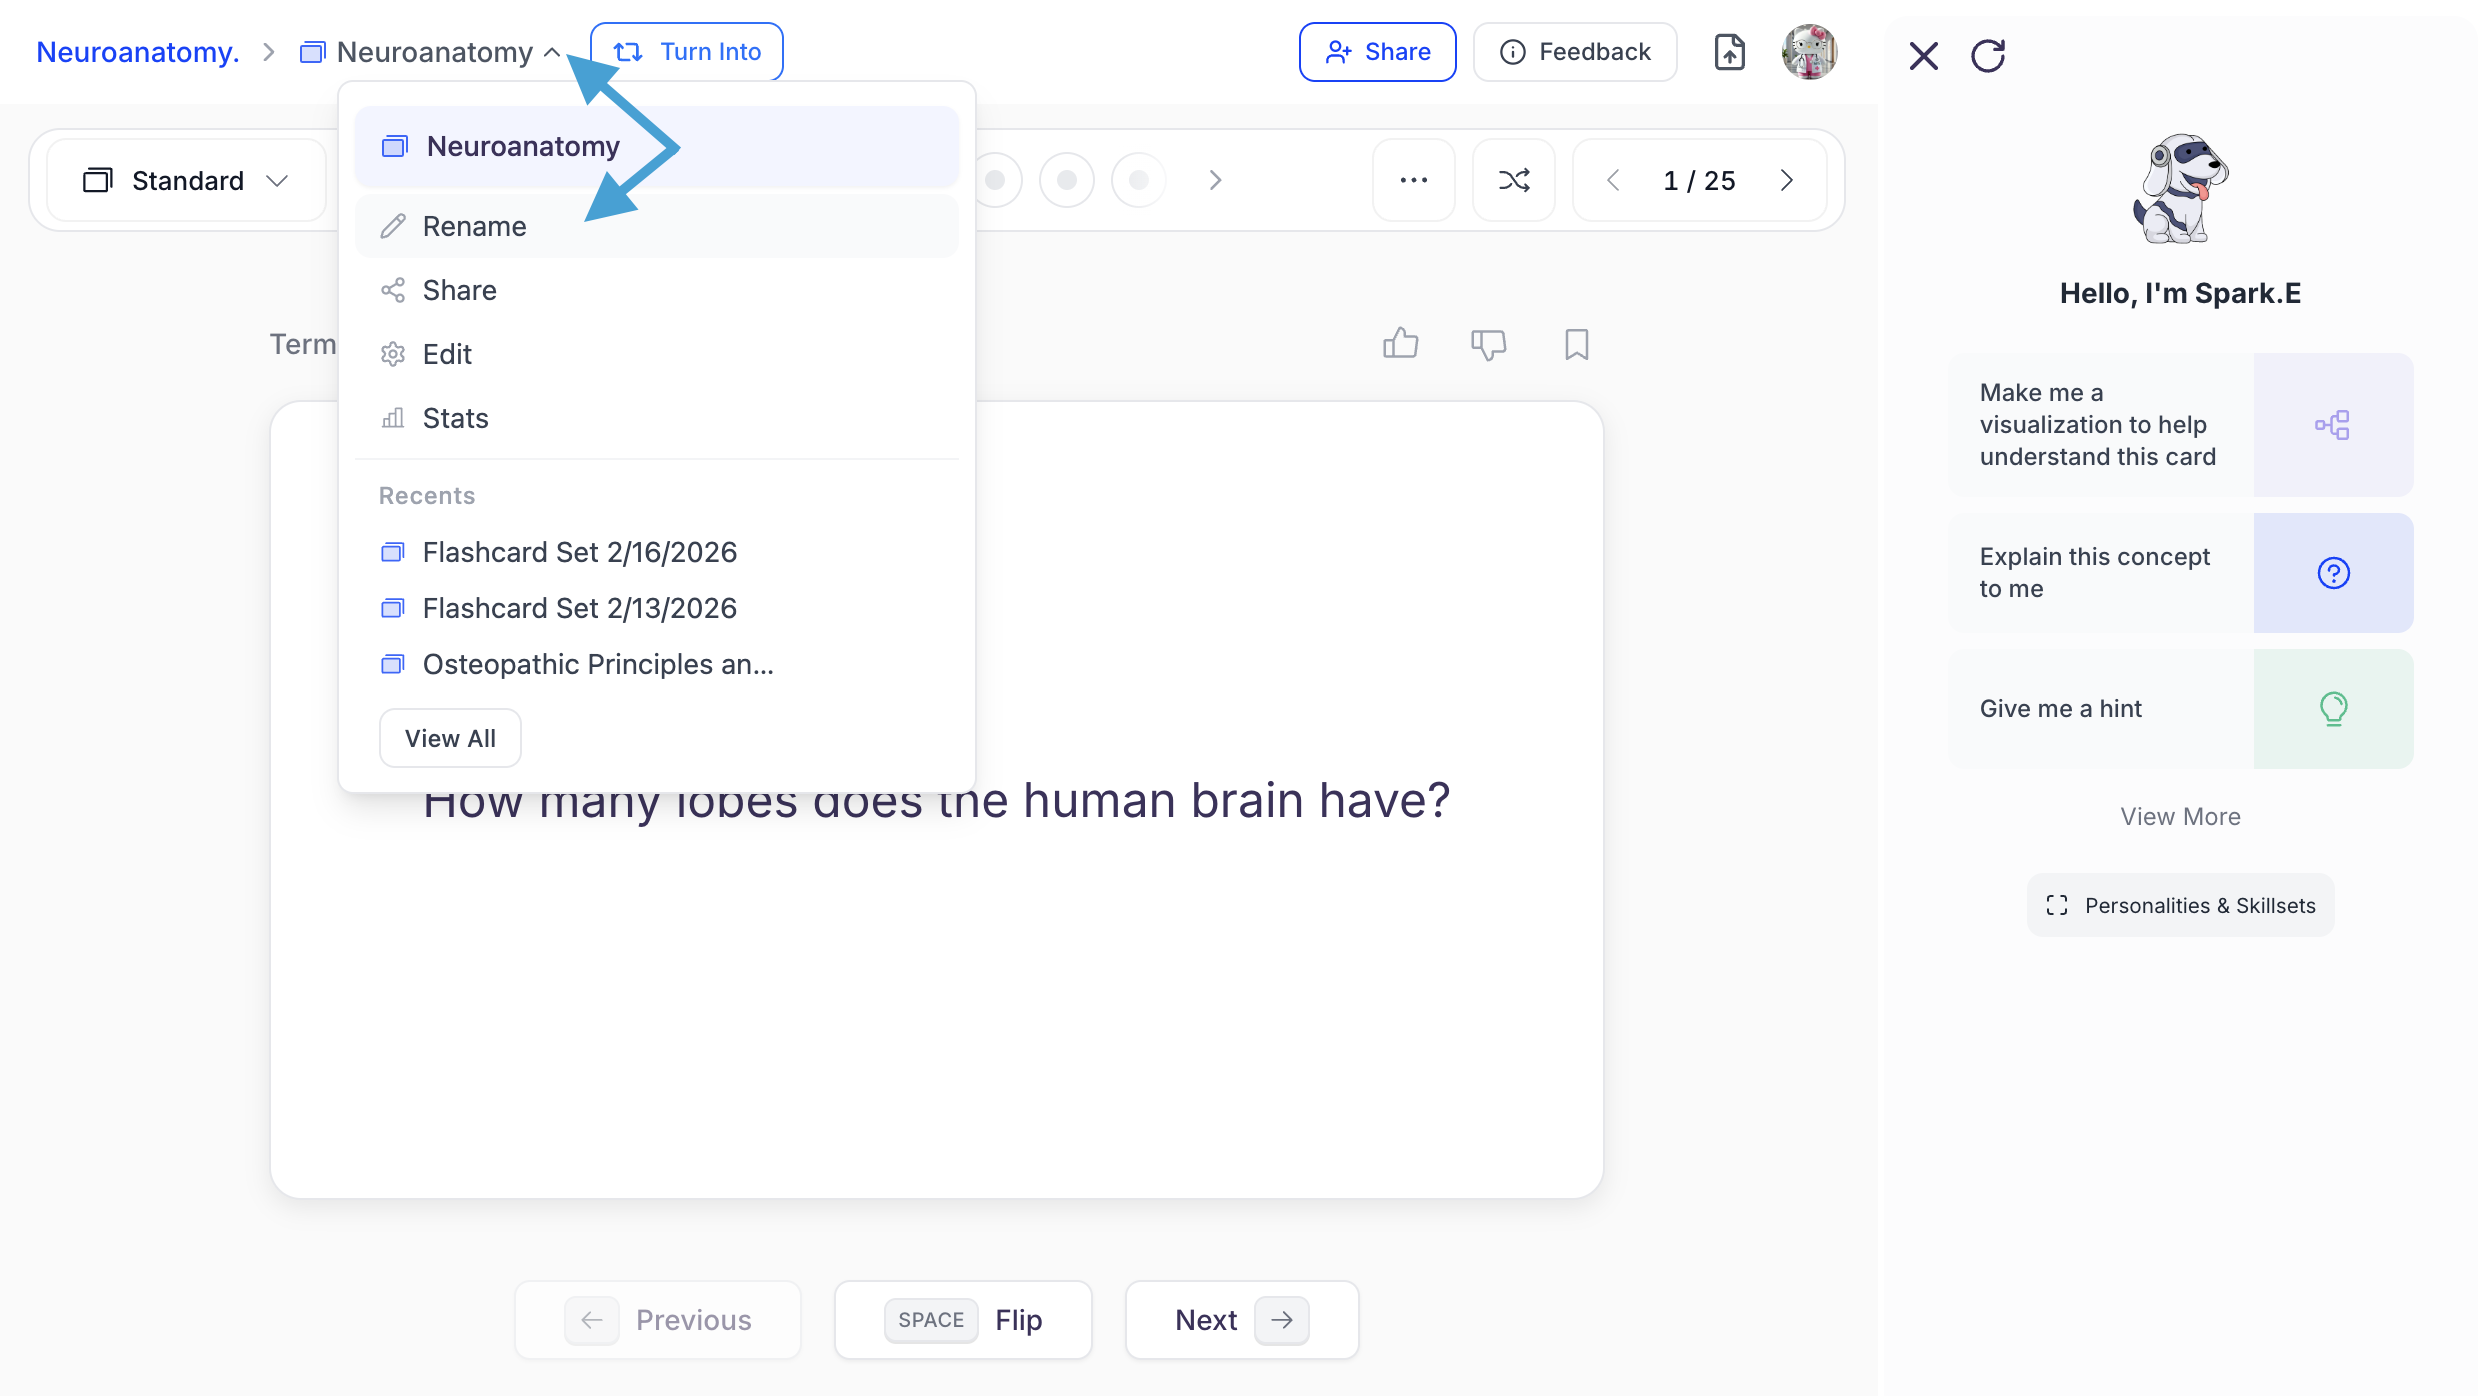
- You can edit the existing name or enter a new name for your flashcard set in the Name field. When done click Save.

-
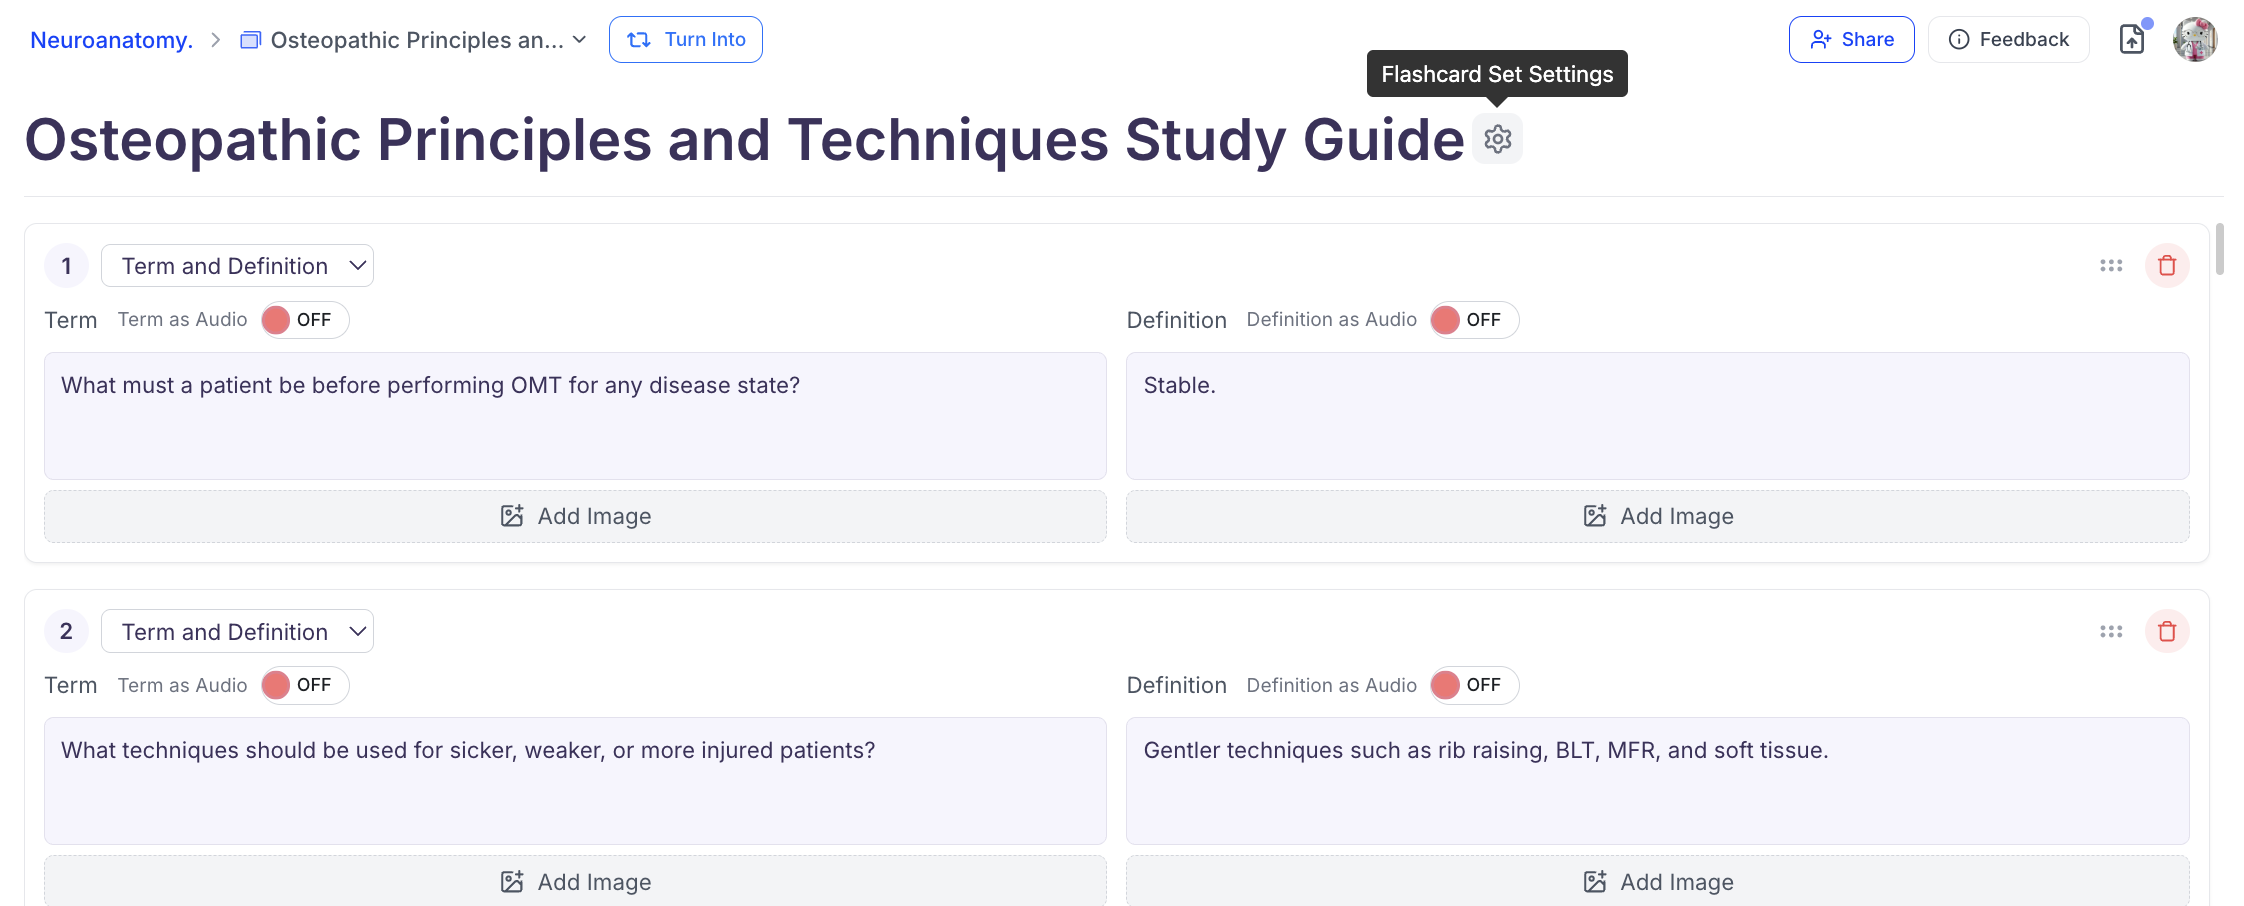
Click the Flashcard Set Settings button to the right of your Flashcard set current name
-
You can now change the name of your flashcard set to your liking by typing and editing the text in the box under Title

- You can also modify the description of your flashcard set by typing and editing the text in the box under Description
- After you are done making changes, click Save Changes
Saving Changes after Editing Flashcards
After making any desired changes to your flashcards, ensure to click Save All Changes from the top or the bottom toolbar
Generating more Flashcards
Need more flashcards? You can create them manually or follow the steps below to have AI generate more automatically-
In the Editing view of your flashcard set, select Generate More Flashcards from the bottom toolbar

-
Now select how you would like to make your flashcards from the options below.

- Next, follow the steps for the method you selected. Click the link below to be taken to the step by step instructions for your selected method a. Create from Materials b. Create from Topic c. Import Quizlet d. Import Anki
- Your new flashcards will then be automatically added to the set.
Creating Specific Types of Flashcards
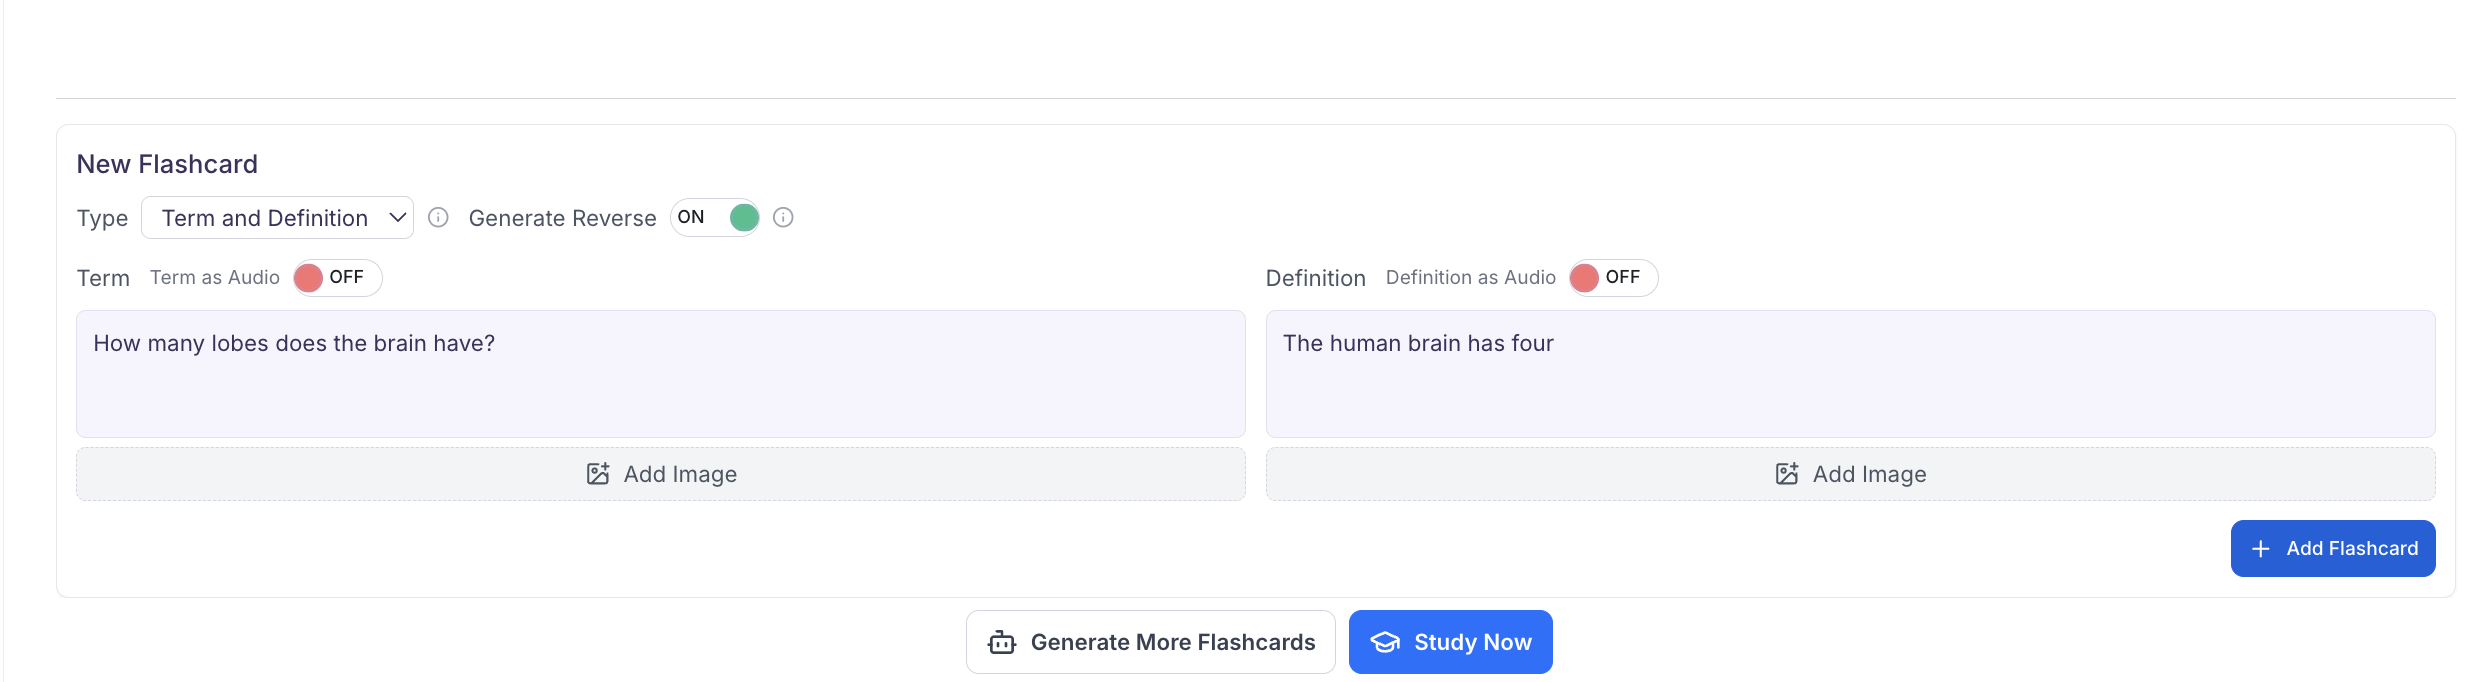
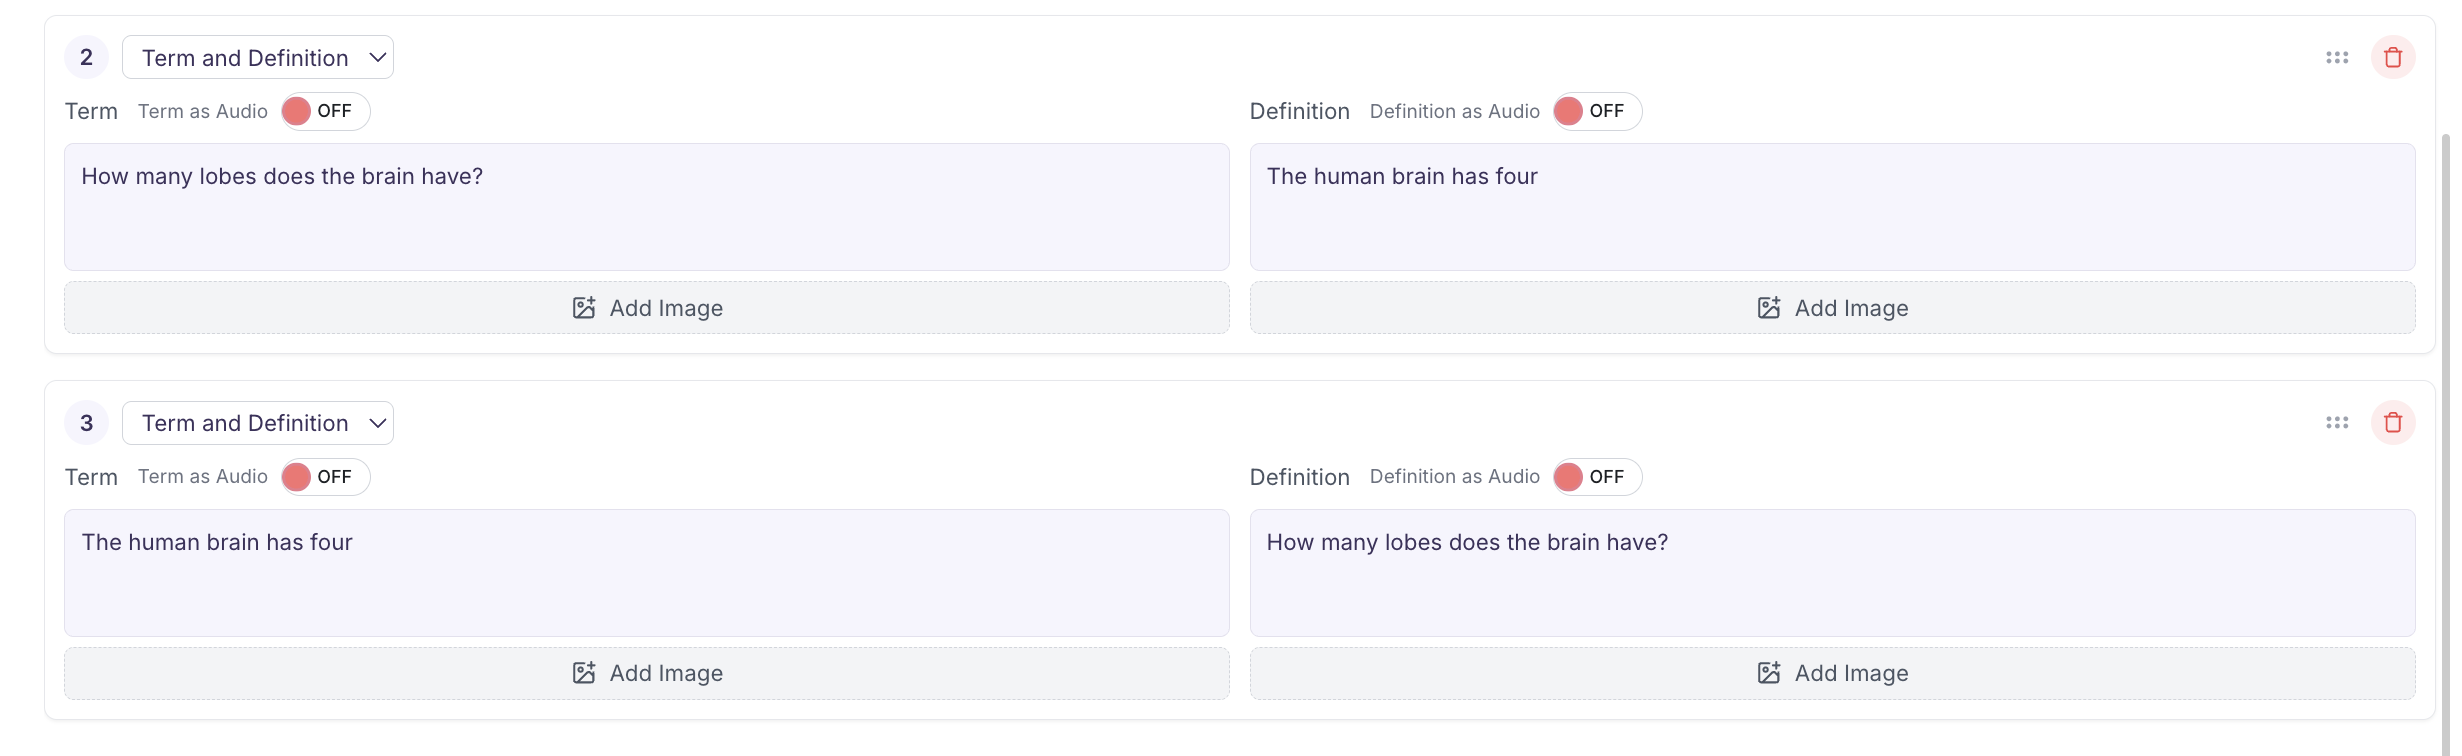
Whether building flashcards from scratch or enhancing existing sets, StudyFetch gives users full control to customize card types — helping learners match their study strategy to their unique learning preferences. Ensure you are on the Editing page of your flashcard set before proceeding, for steps on how to do this refer to the Opening the Editing View aboveTerm and Definition
Term and Definition flashcards are the most common type of flashcard. They consist of a term on one side and a definition on the other.
-
In the box next to Type, select Term and Definition
- Type the Term in the Term box on the left and then type the Definition(answer) in the Definition box on the right
- You can also add images to either or both sides of the flashcard by selecting Add Image in the desired card field
- To have either side of your flashcard automatically read aloud, toggle Term as Audio and/or Definition as Audio
-
Lastly, if you want to automatically generate the reverse version of your current flashcard, toggle Generate Reverse then click + Add Flashcard,
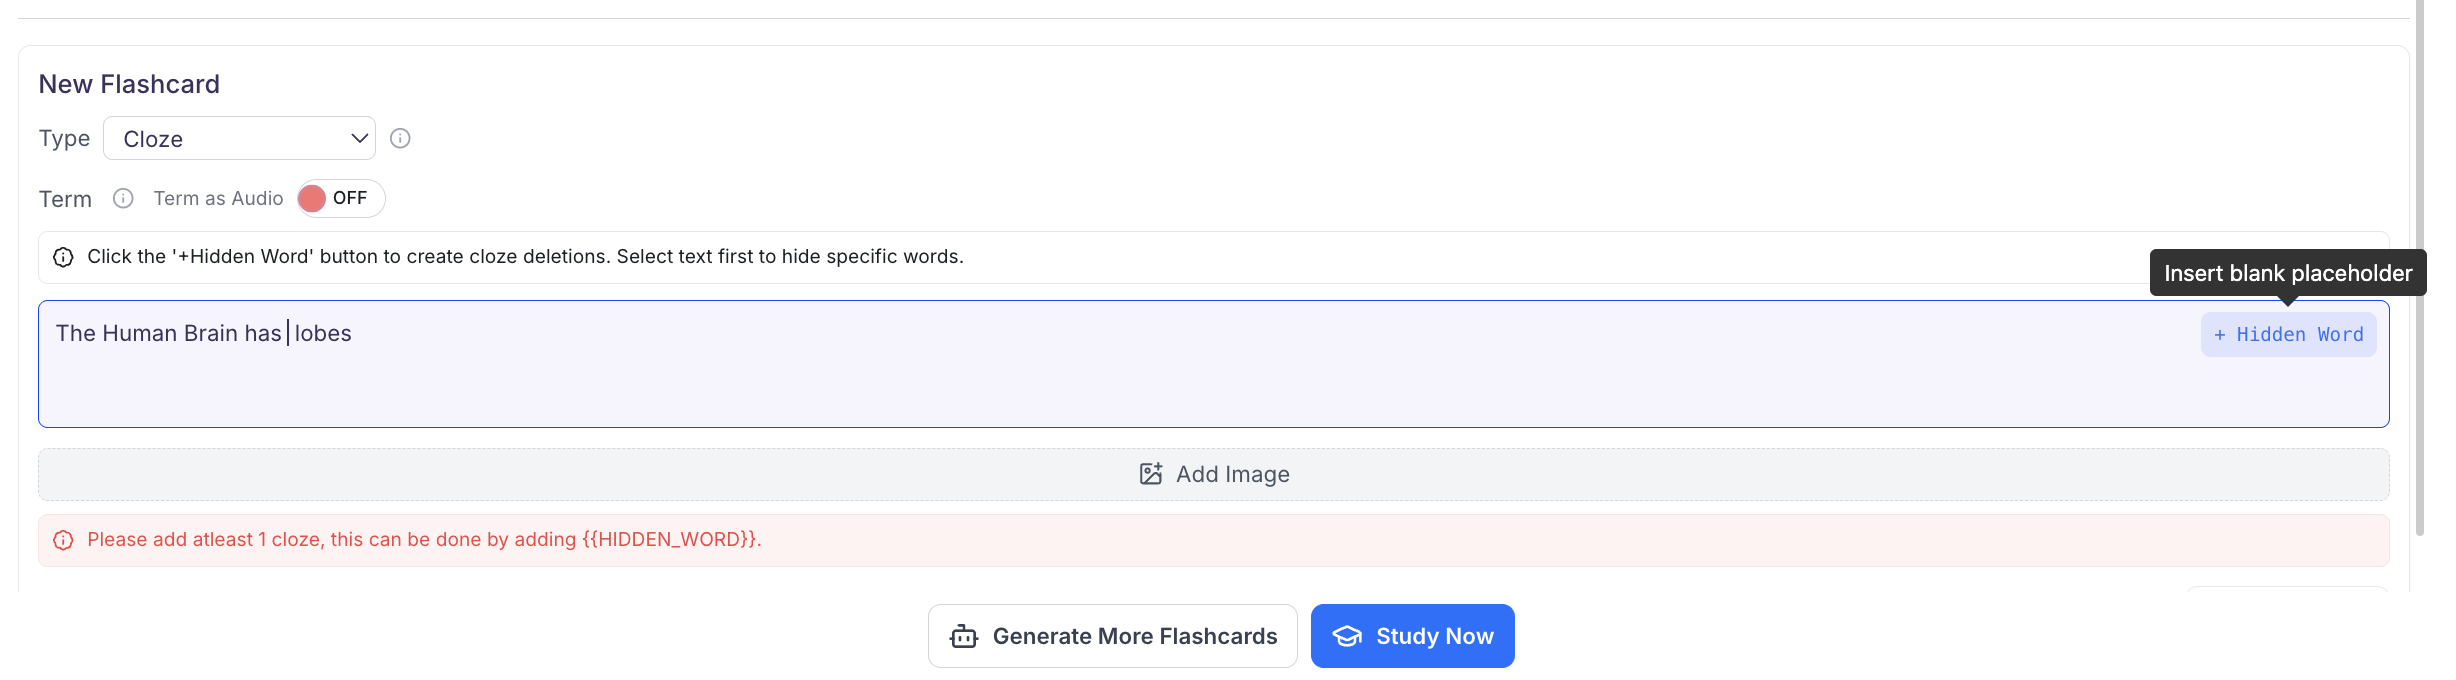
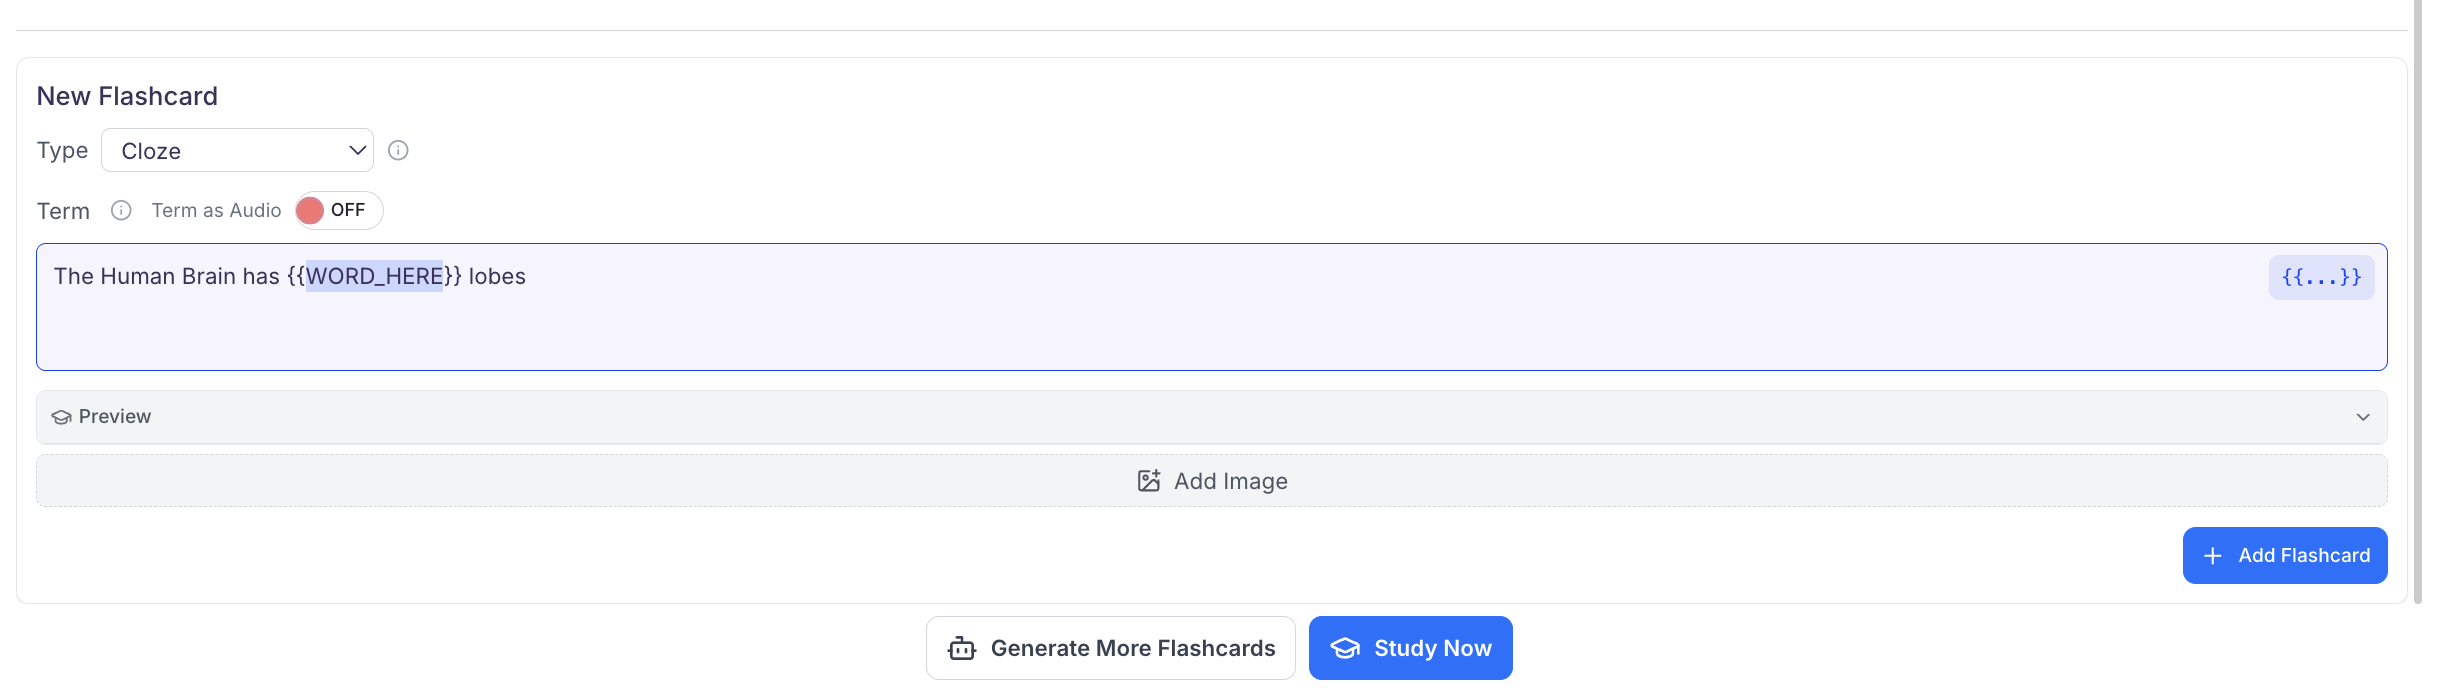
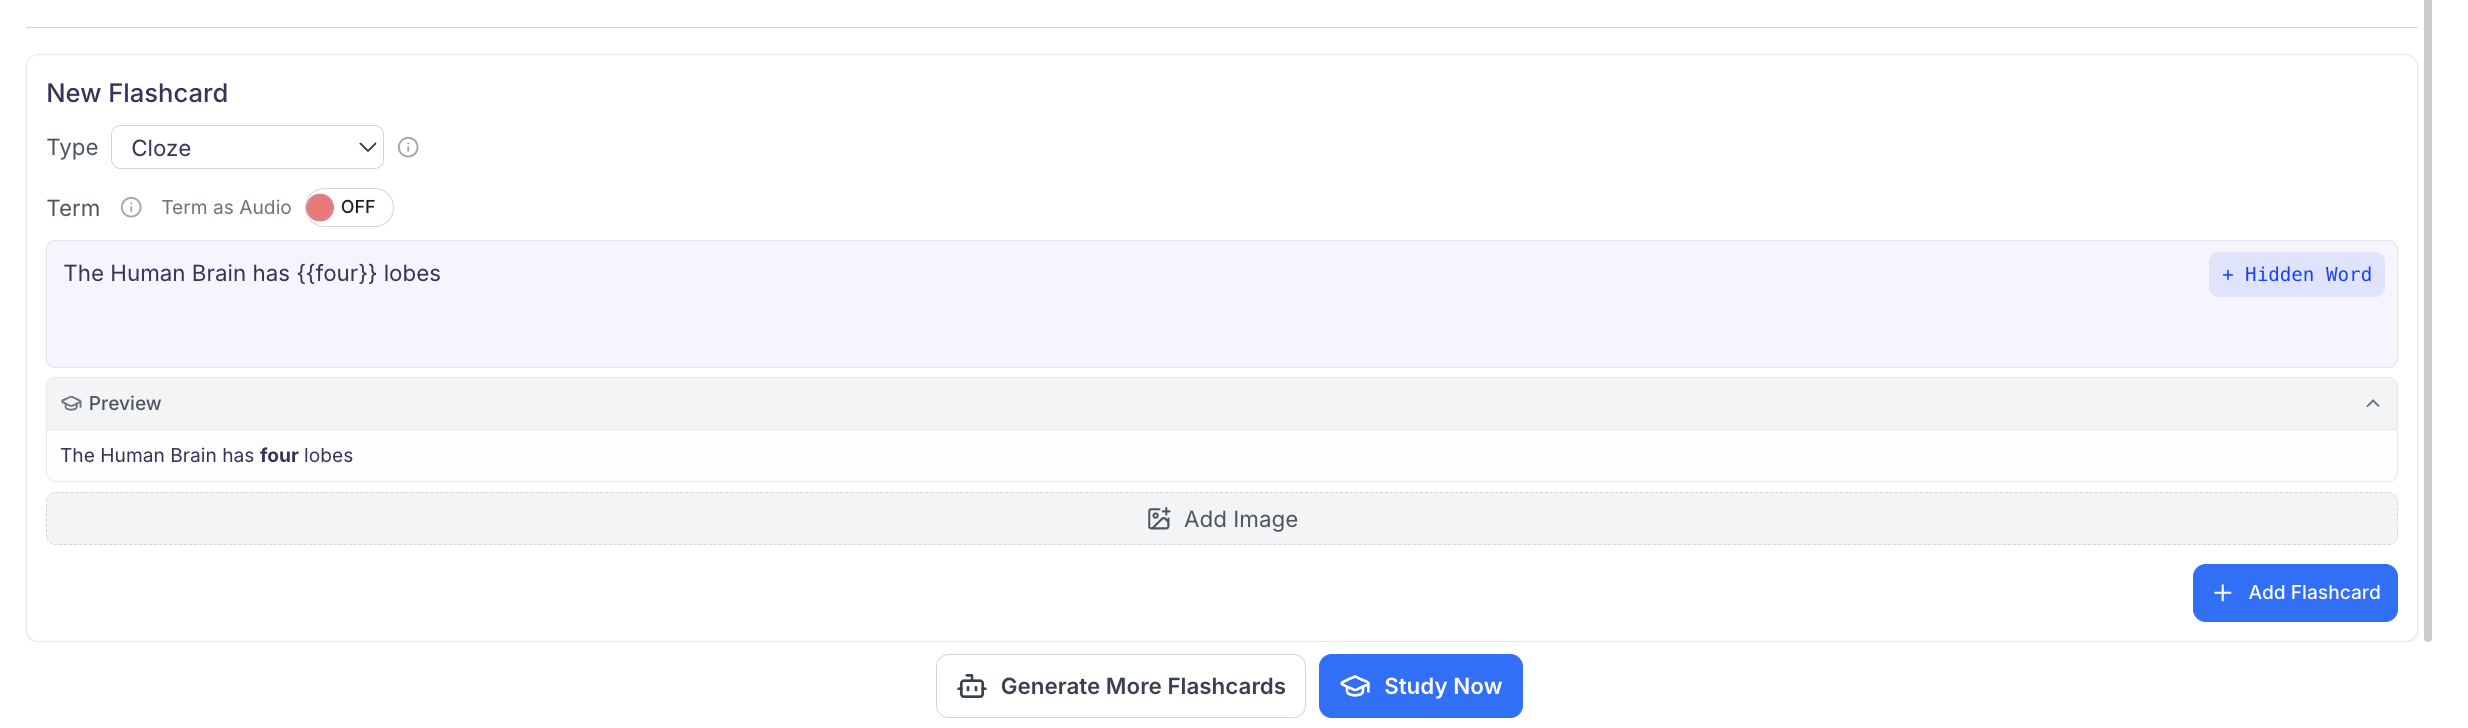
Cloze
Cloze Flashcards allow learners to hide specific words or phrases within a sentence or term. When reviewing the card, the hidden portions are concealed on the front, and flipping the flashcard reveals the complete text with the previously hidden words shown.
- In the box next to Type, select Cloze
- Enter the text for your flashcard in the box under Term
-
Next, you can select the + Hidden Word button to add a blank space where you can type the text you want to hide,
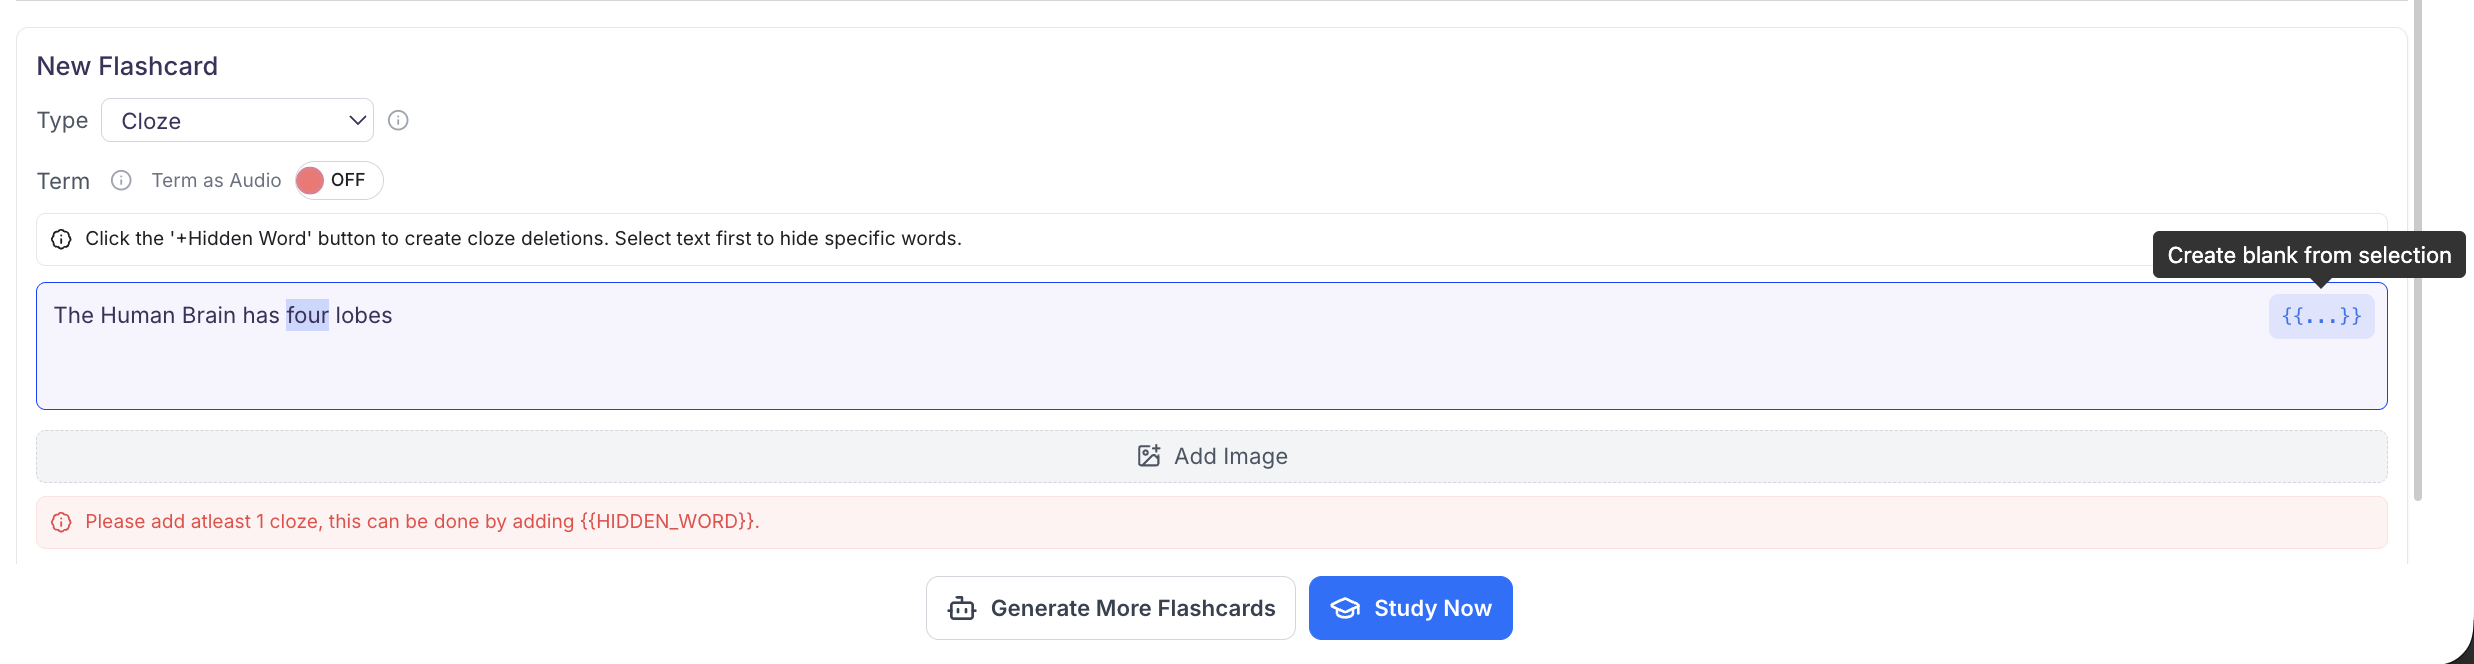
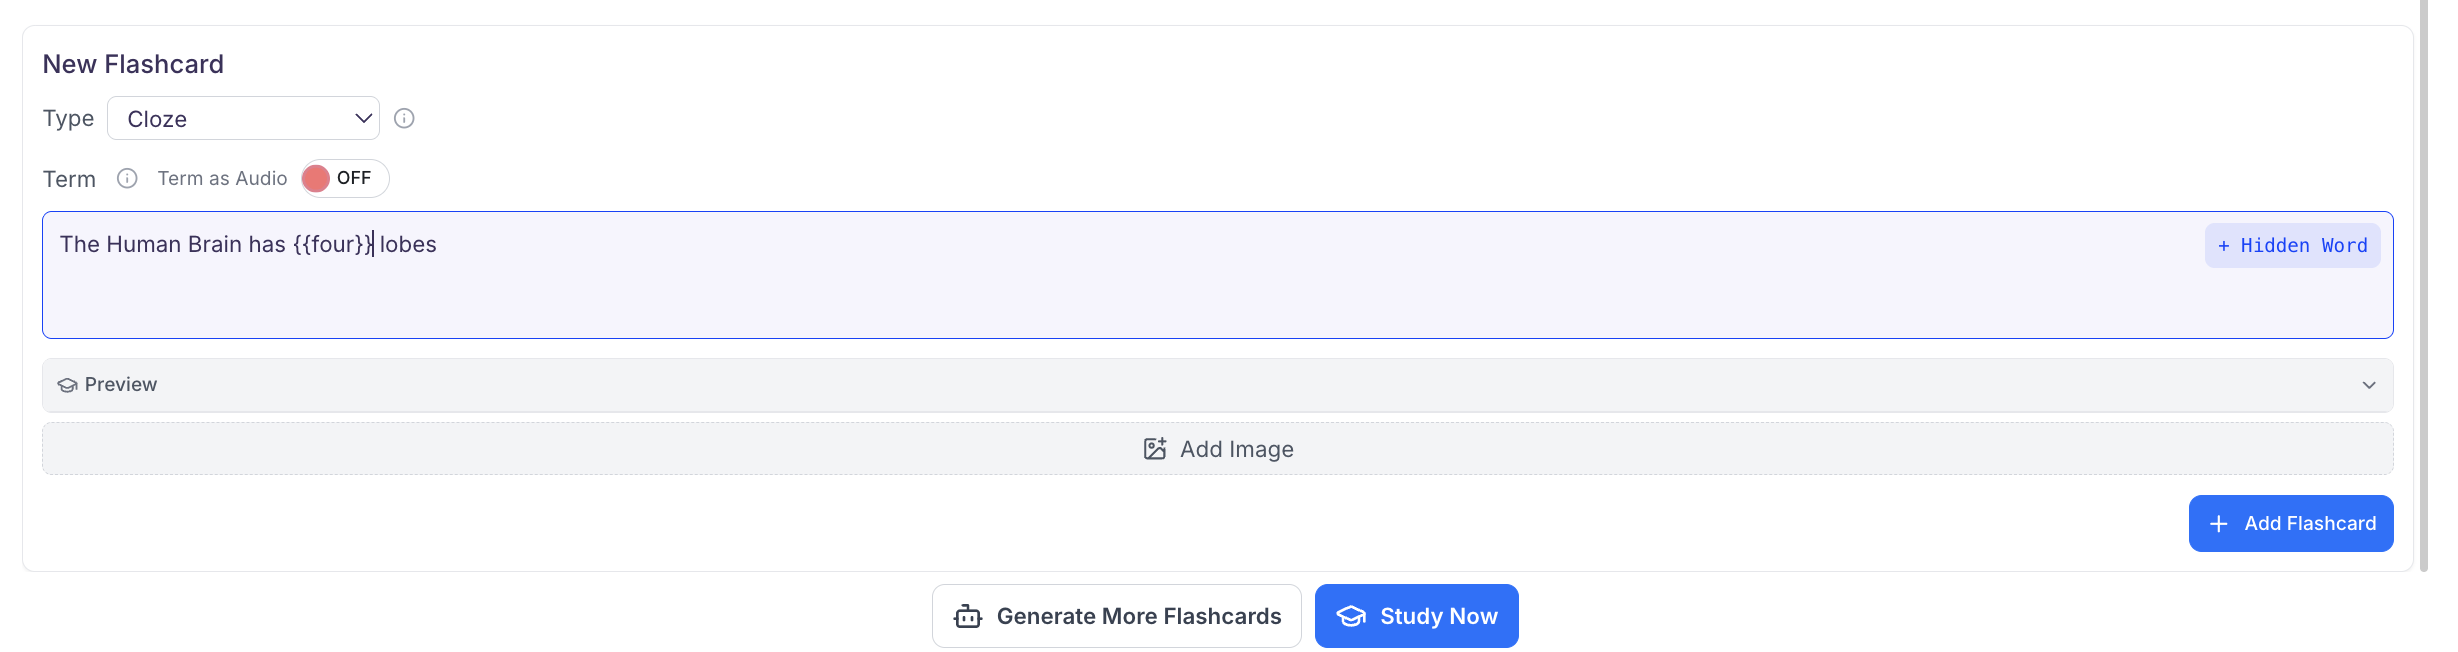
- You can also add an image to appear on the term side of your cloze flashcard by clicking Add Image
- When you are done making each flashcard, click + Add Flashcard
-
To view a preview of your Cloze Flashcard, click Preview. The hidden Cloze portion of your flashcard will appear bolded
Fill in the blank
Fill-in-the-blank flashcards hide specific word(s) within a term, sentence, or concept. Learners must actively type the missing word(s) to reveal the correct answer.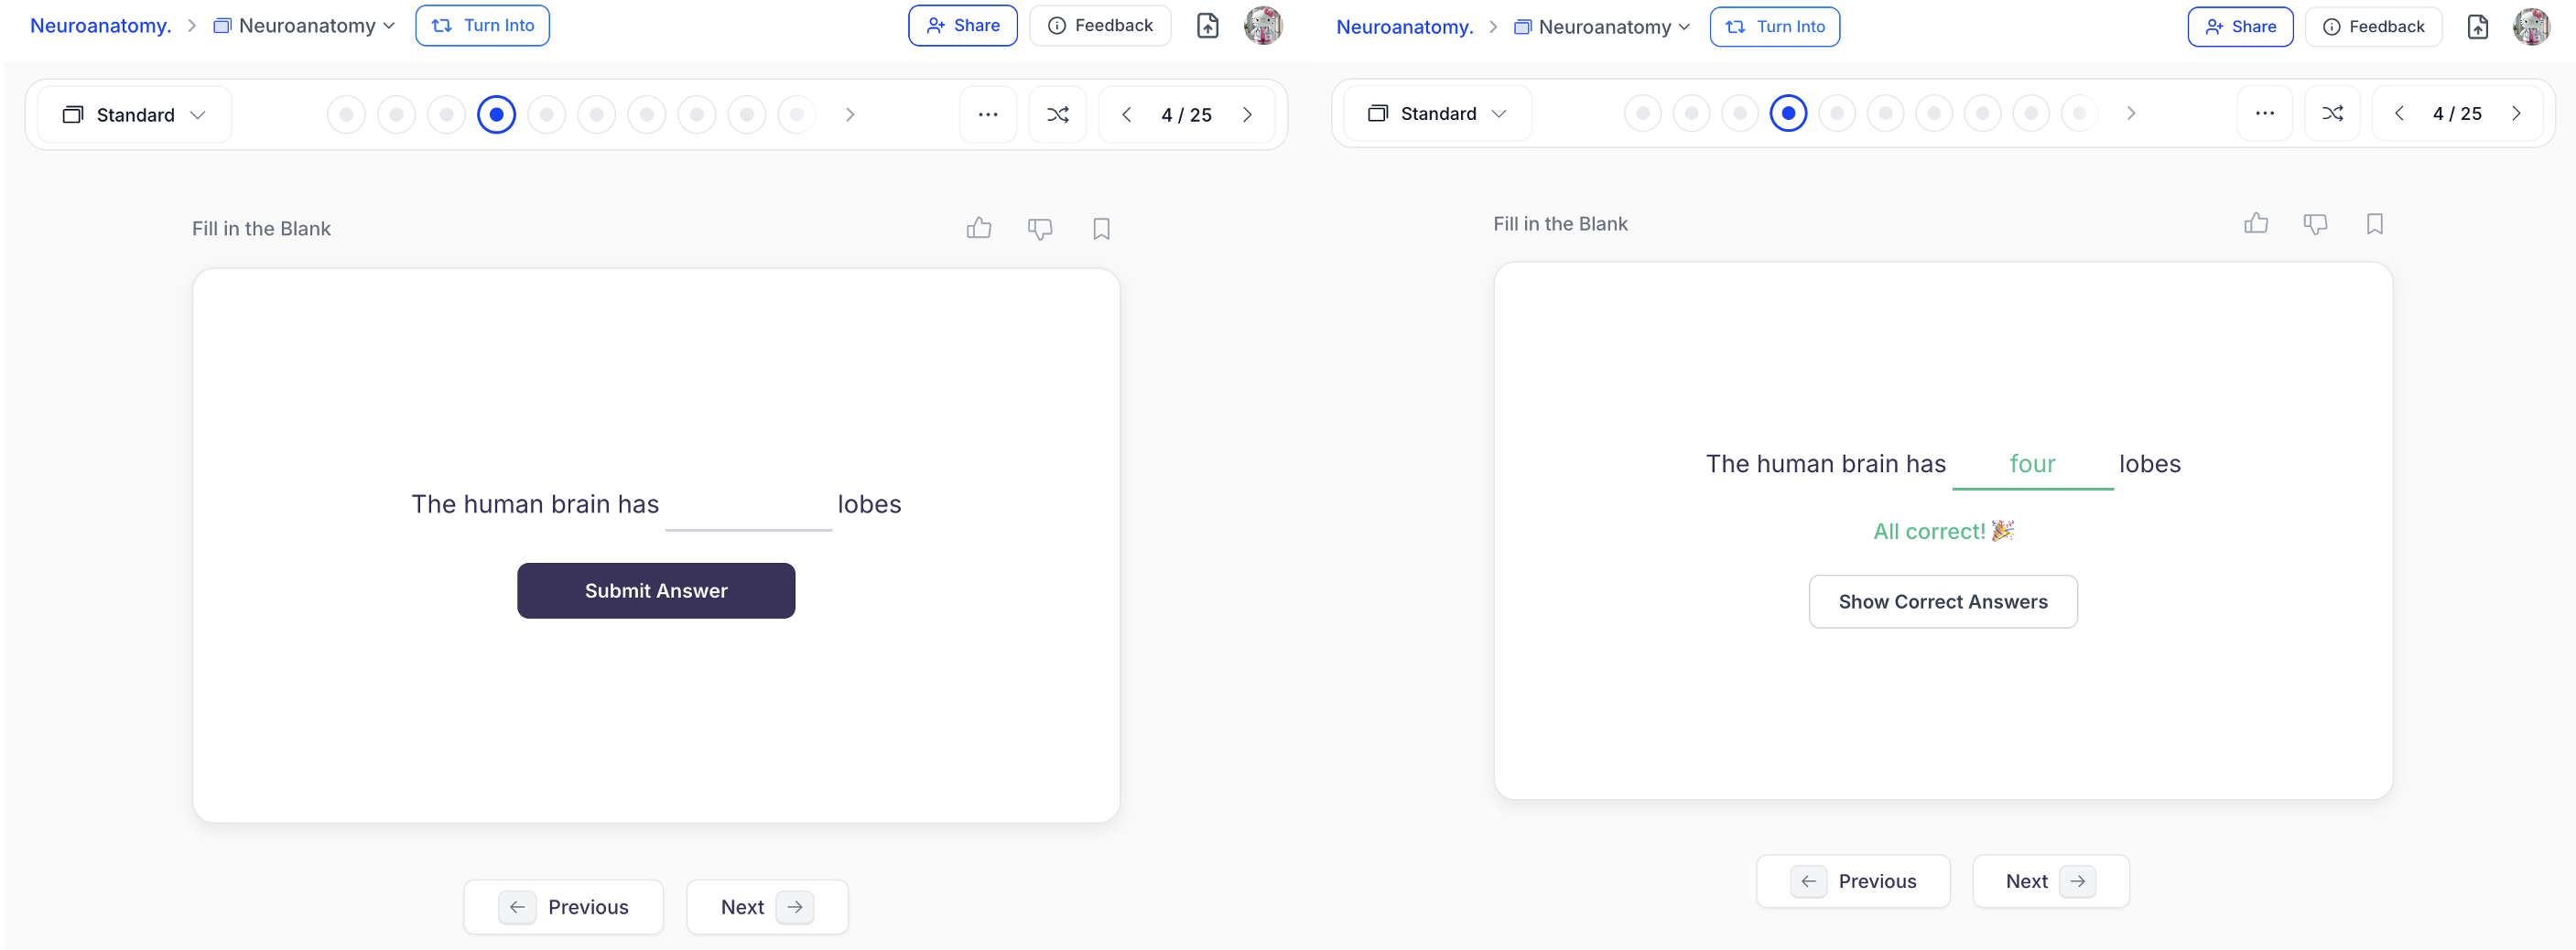
- In the box next to Type, select Fill in the Blank
-
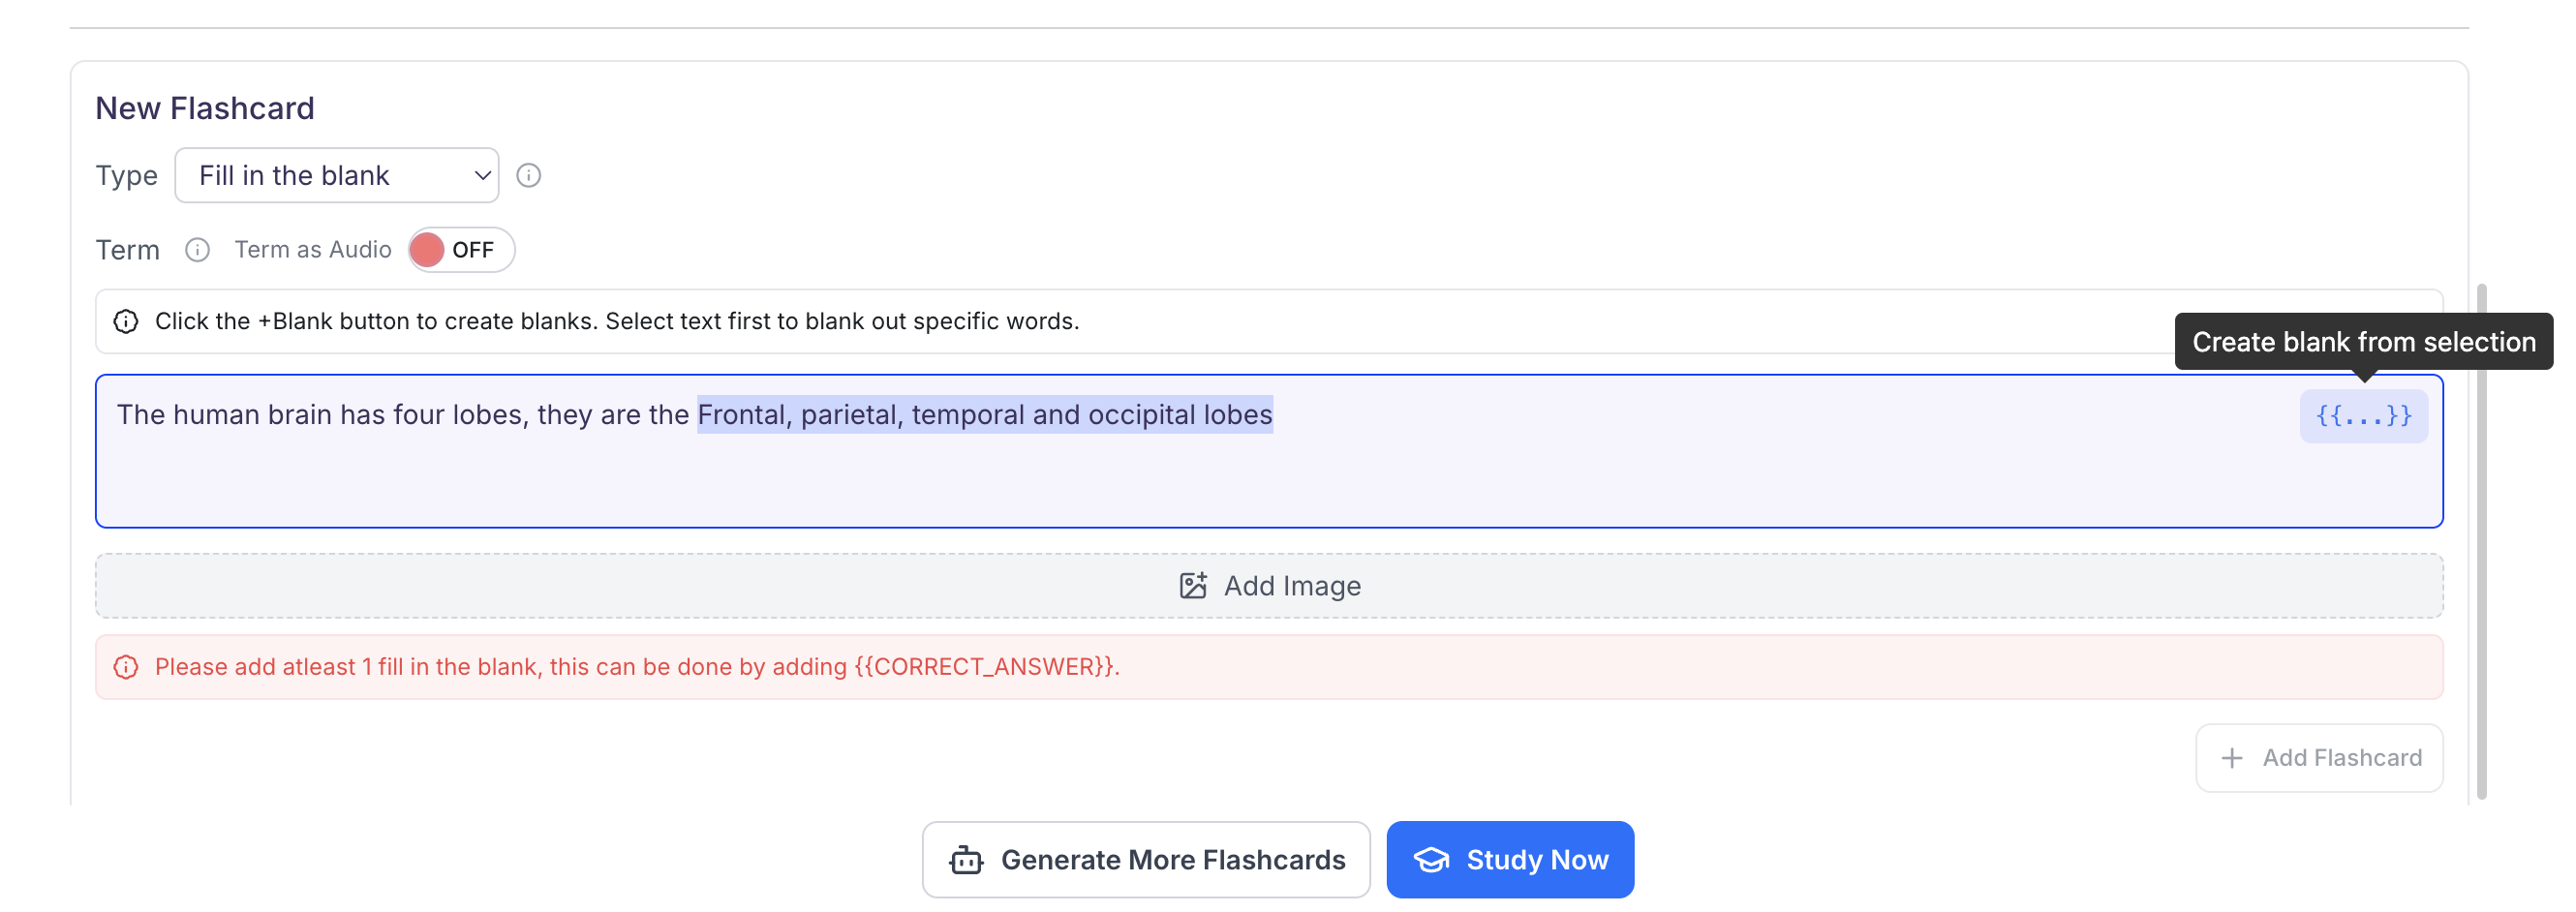
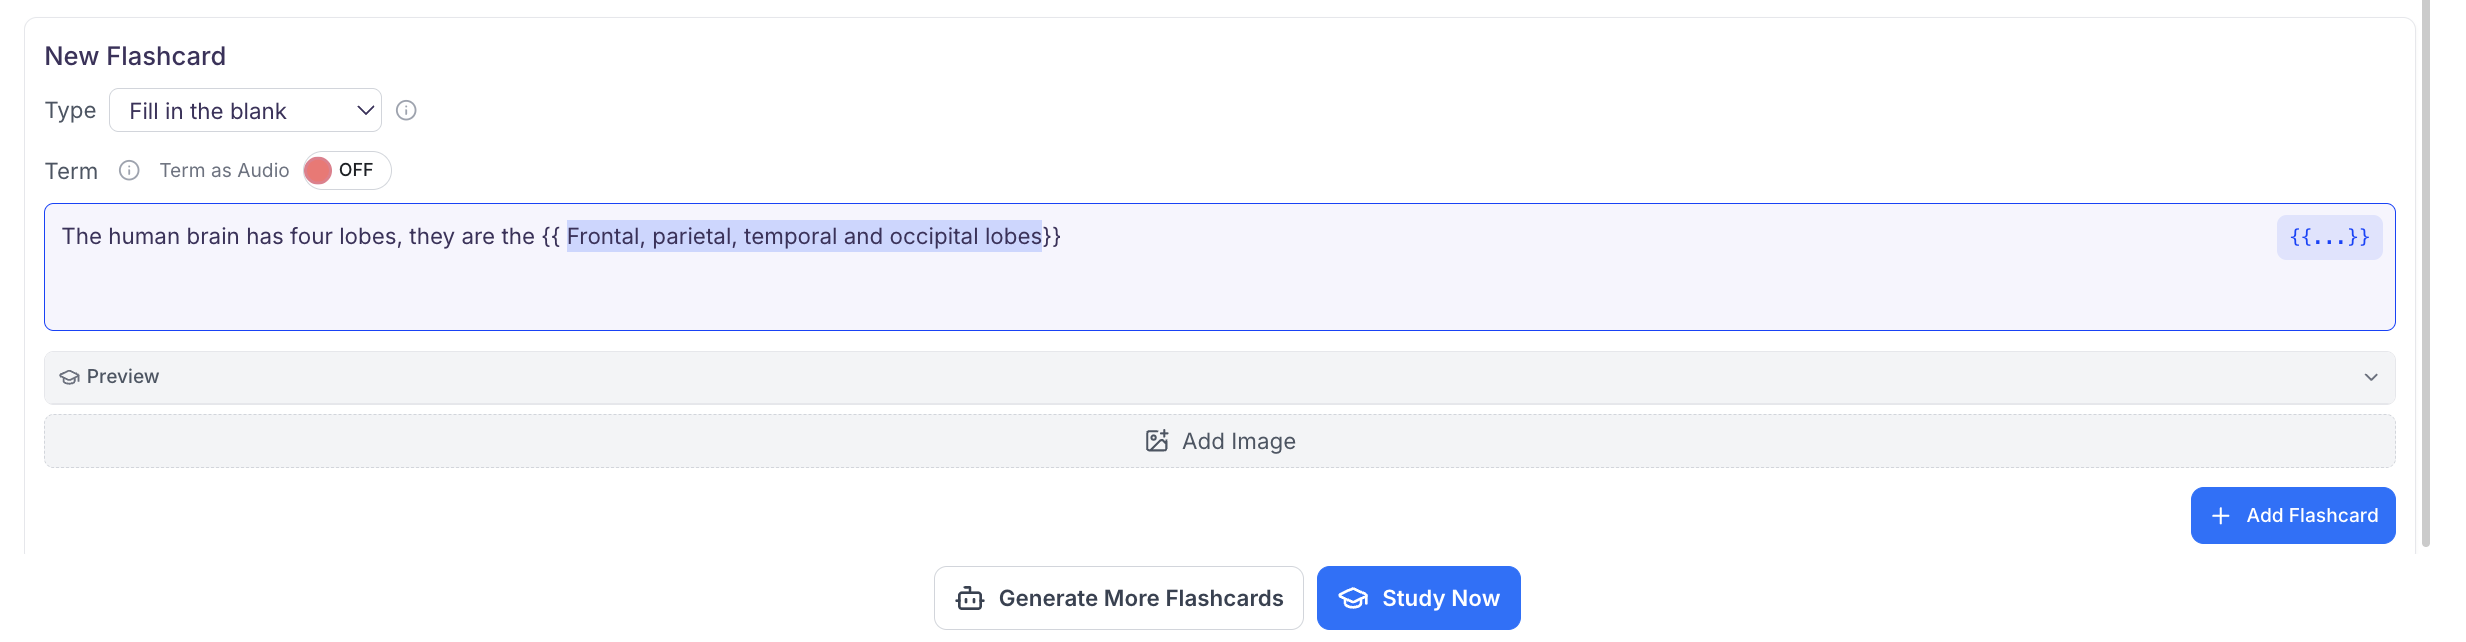
Enter the text for your flashcard in the box under Term
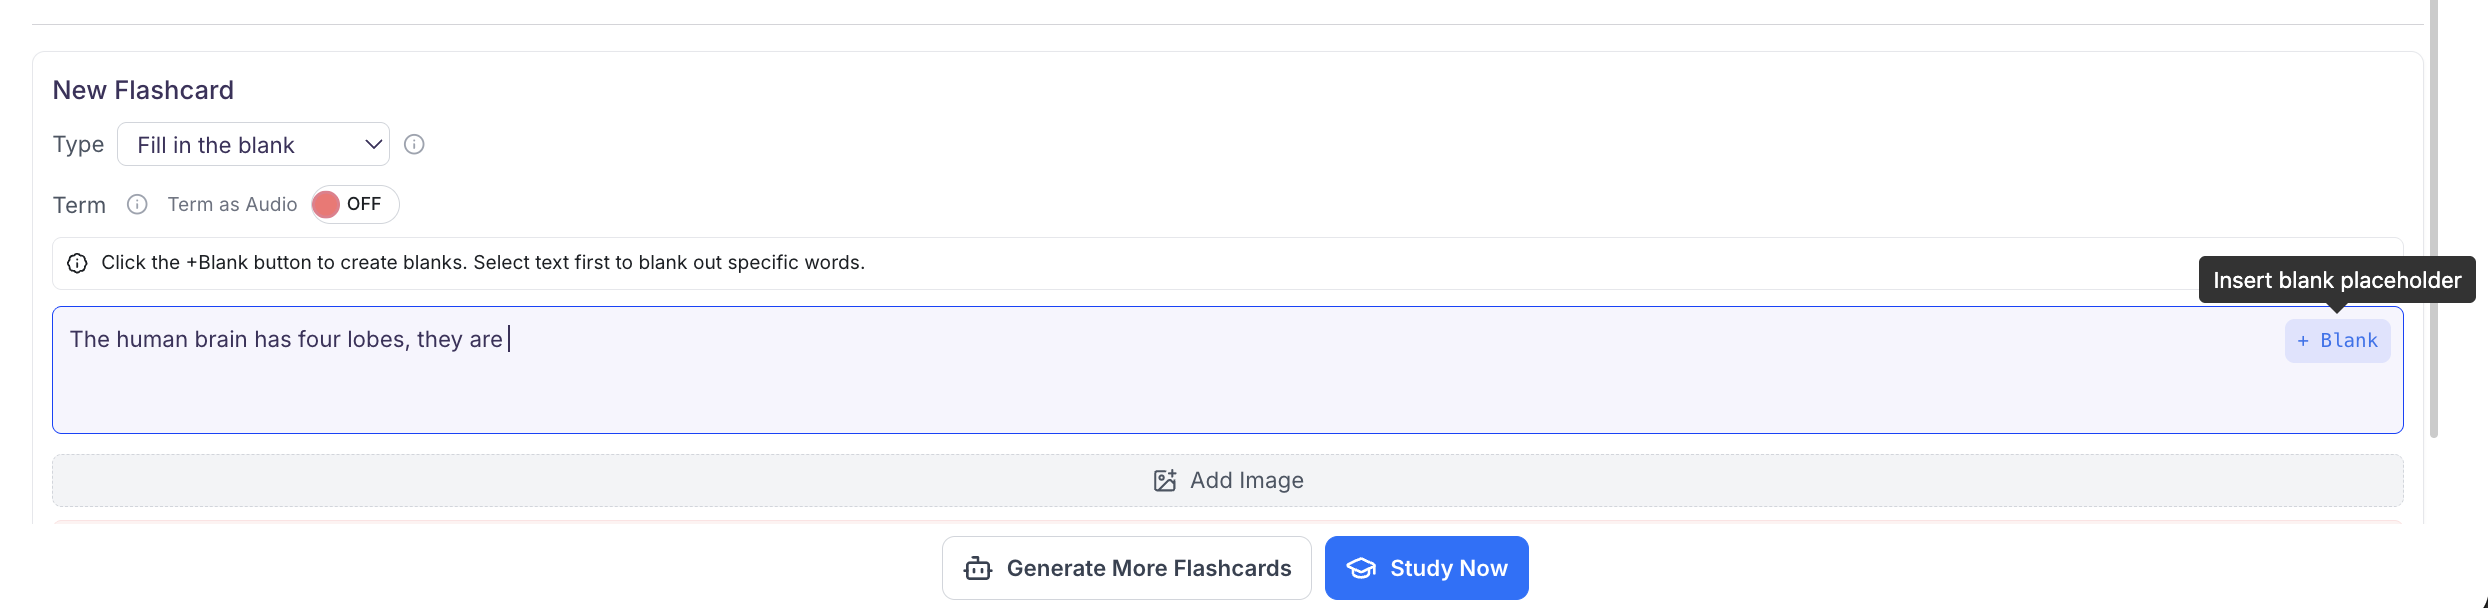
-
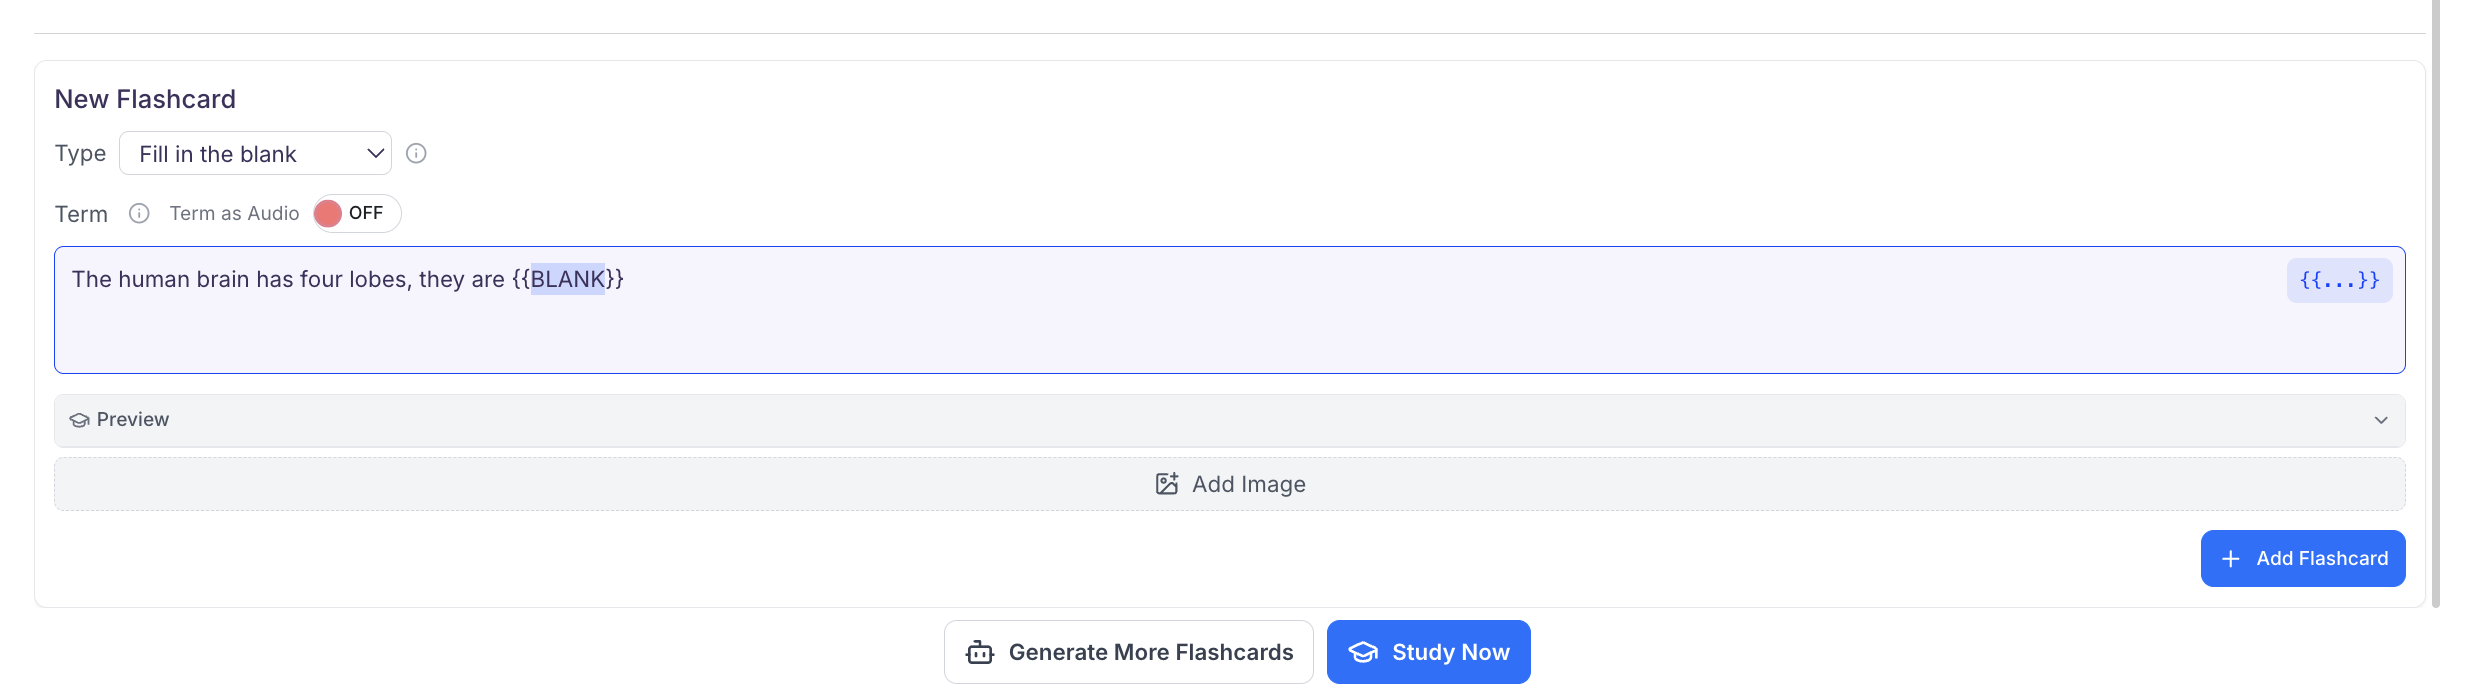
Next, you can select the + Blank button to add a blank space where you can type the text you want to hide,
- You can also add an image to appear on the term view of your fill in the blank flashcard by clicking Add Image
- When you are done making each flashcard, click + Add Flashcard
-
To view a preview of your Fill in the blank Flashcard, click Preview. The hidden portion of your flashcard will appear as a blank space
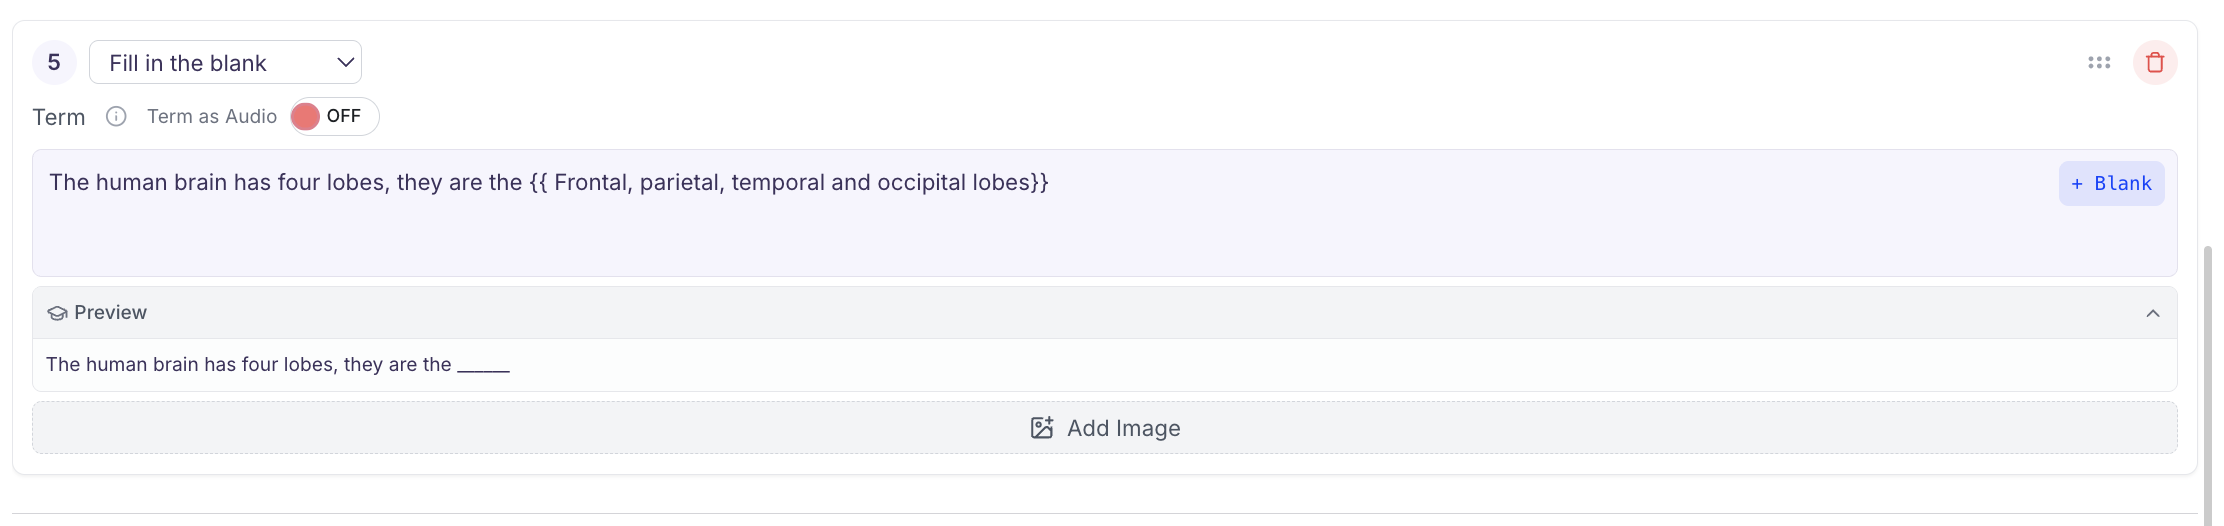
- When studying the learner will then have to type the exact response and click Check Answers to see if they are correct
Multiple Choice
Multiple Choice Flashcards present learners with a question followed by two to four answer options. Learners select the option they believe is correct and immediately receive feedback showing whether their answer was correct, along with the correct response.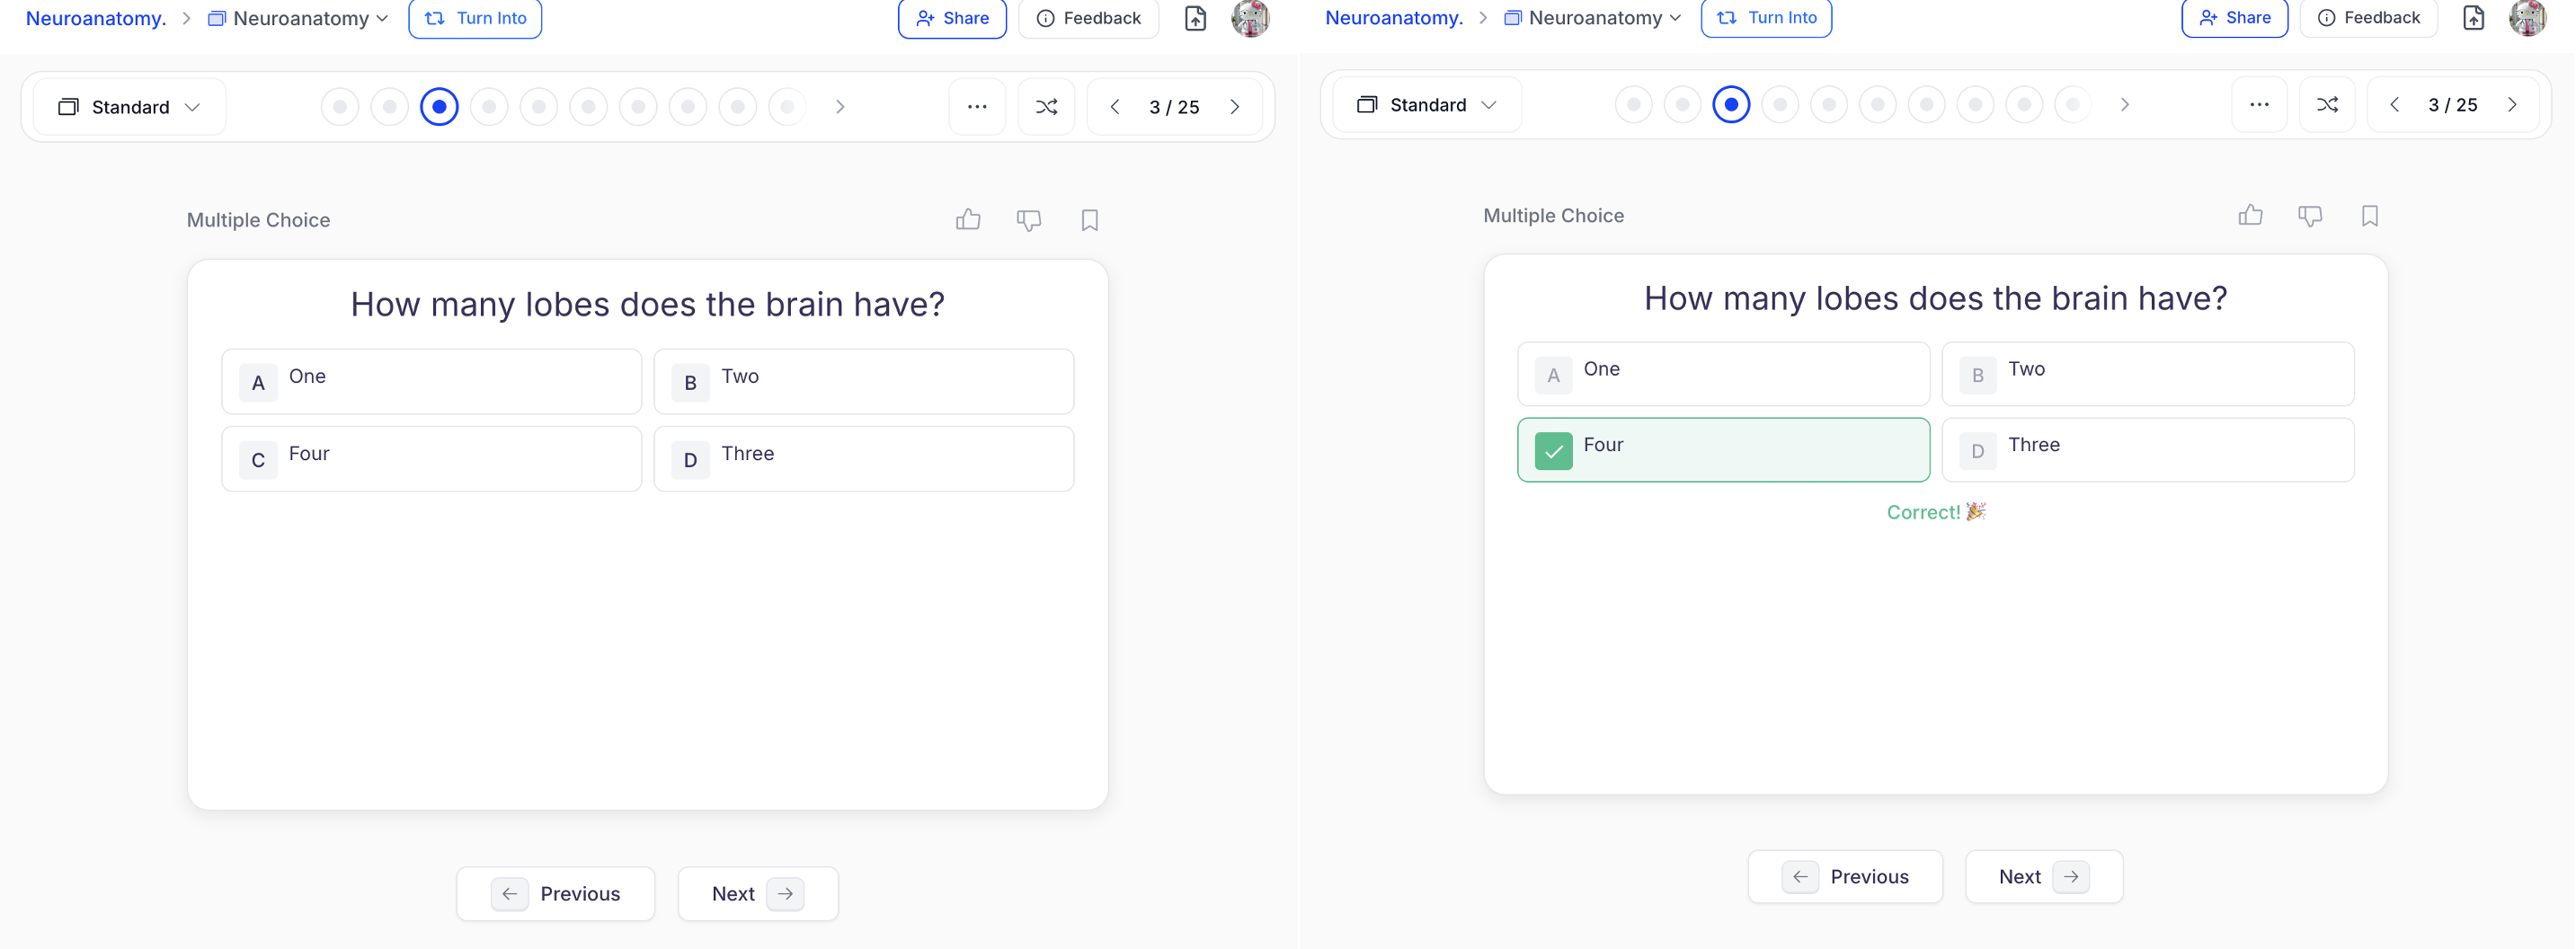
-
In the box next to Type, select Multiple choice

- Type the question for your multiple choice flashcard in the box under Term, you can optionally also add an image to the term side by selecting Add Image
-
On the right side under Choices, you will see two blank boxes labeled Option 1 and Option 2 (correct). If you want more than two answer choices simply click + Add Option to add up to two more answer choices.
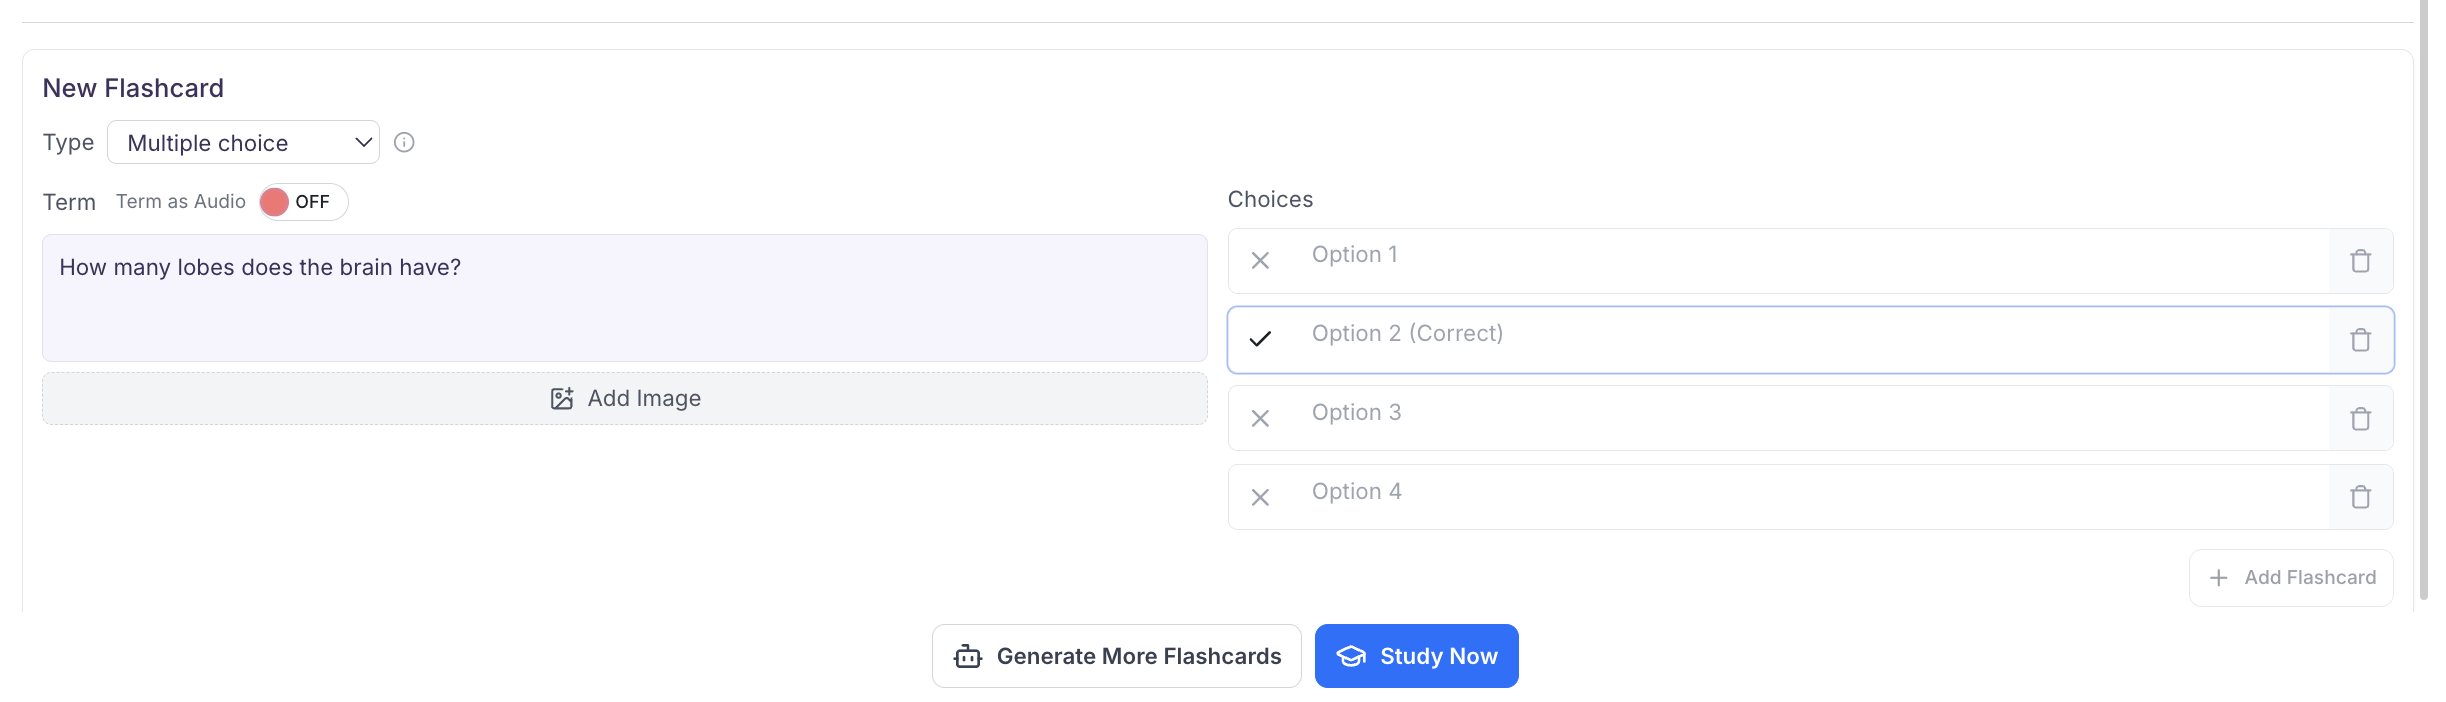
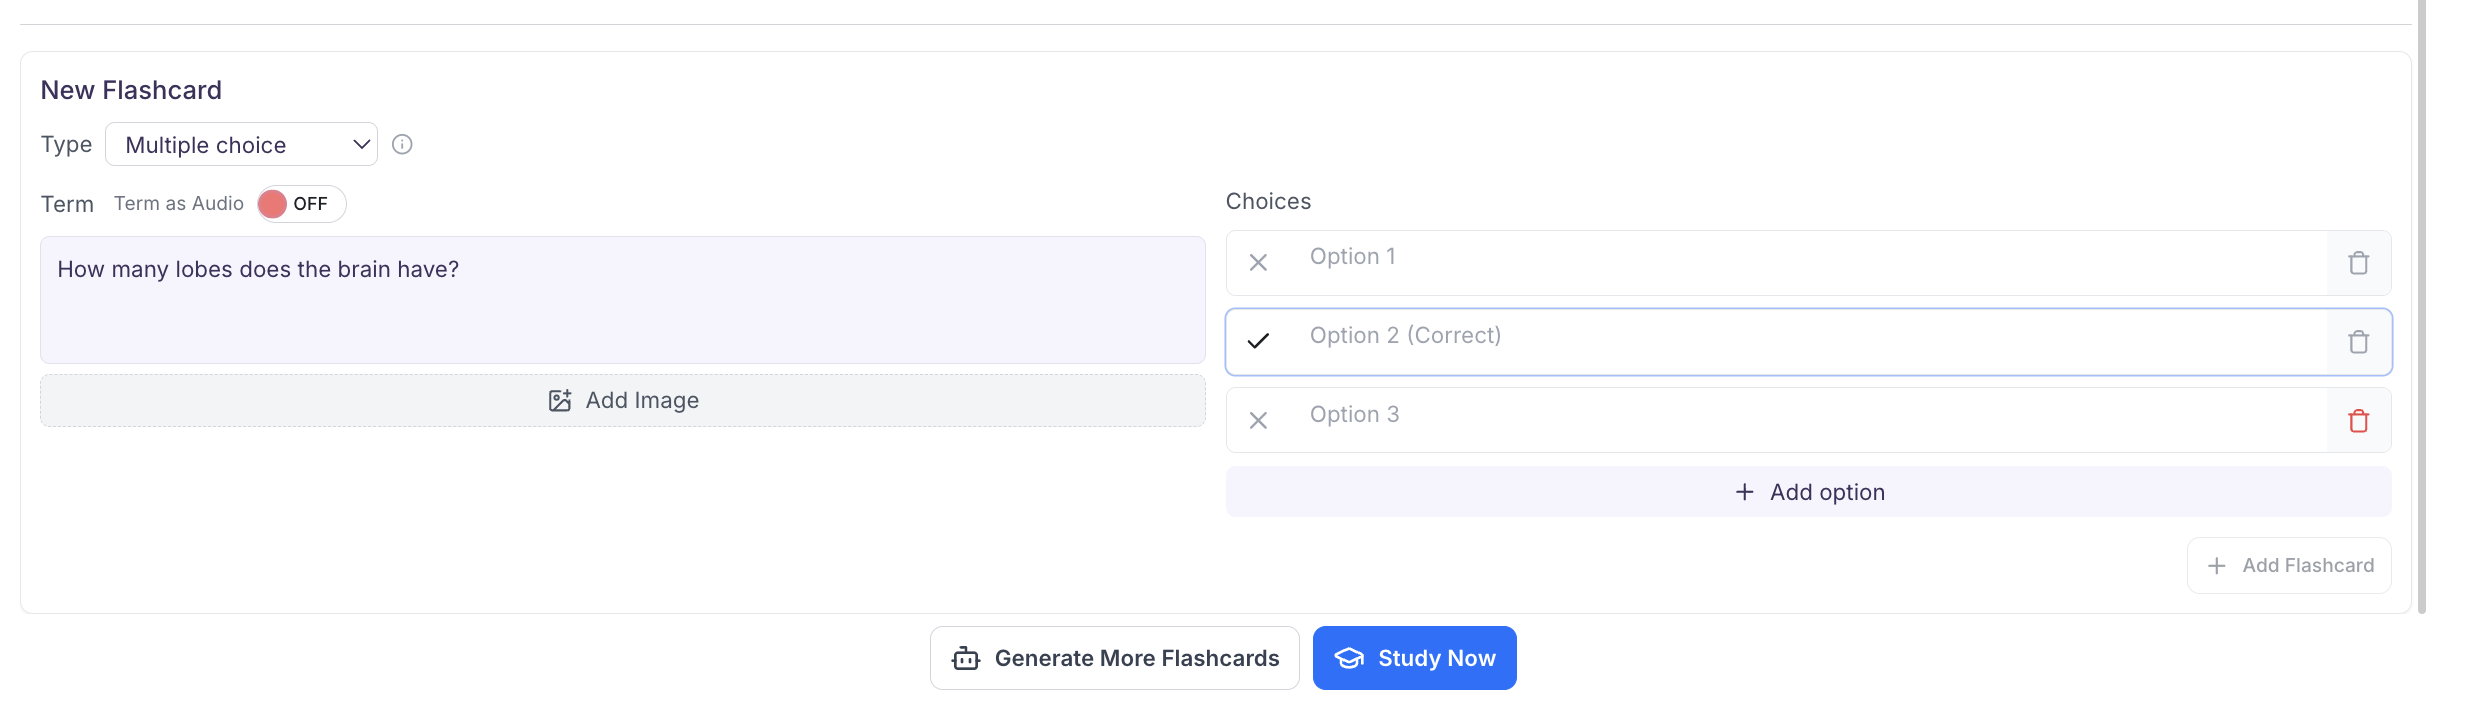
-
Next click each option box to type the text for that answer choice; do this for each answer option.
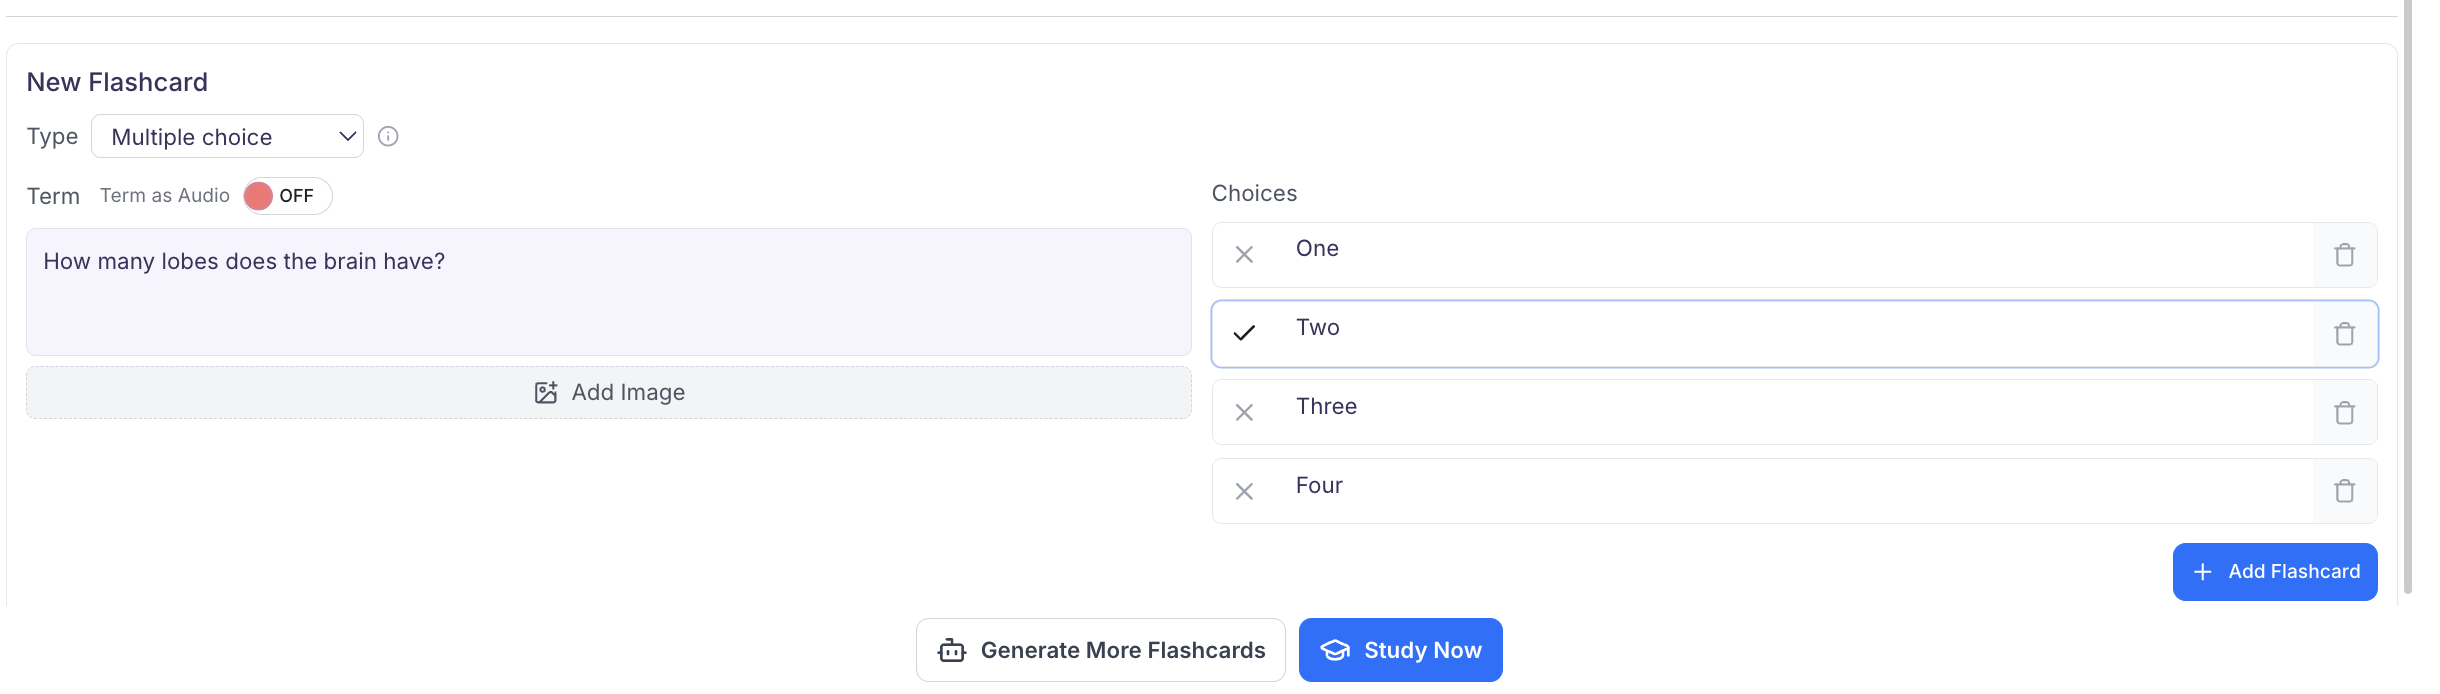
-
Option 2 will automatically display a checkmark icon and be marked as the correct answer by default. The remaining options will have a X icon indicating they are the incorrect option(s), however this can be modified; Once you have added all answer options, click the X to the left of the answer choice you want to mark as correct.
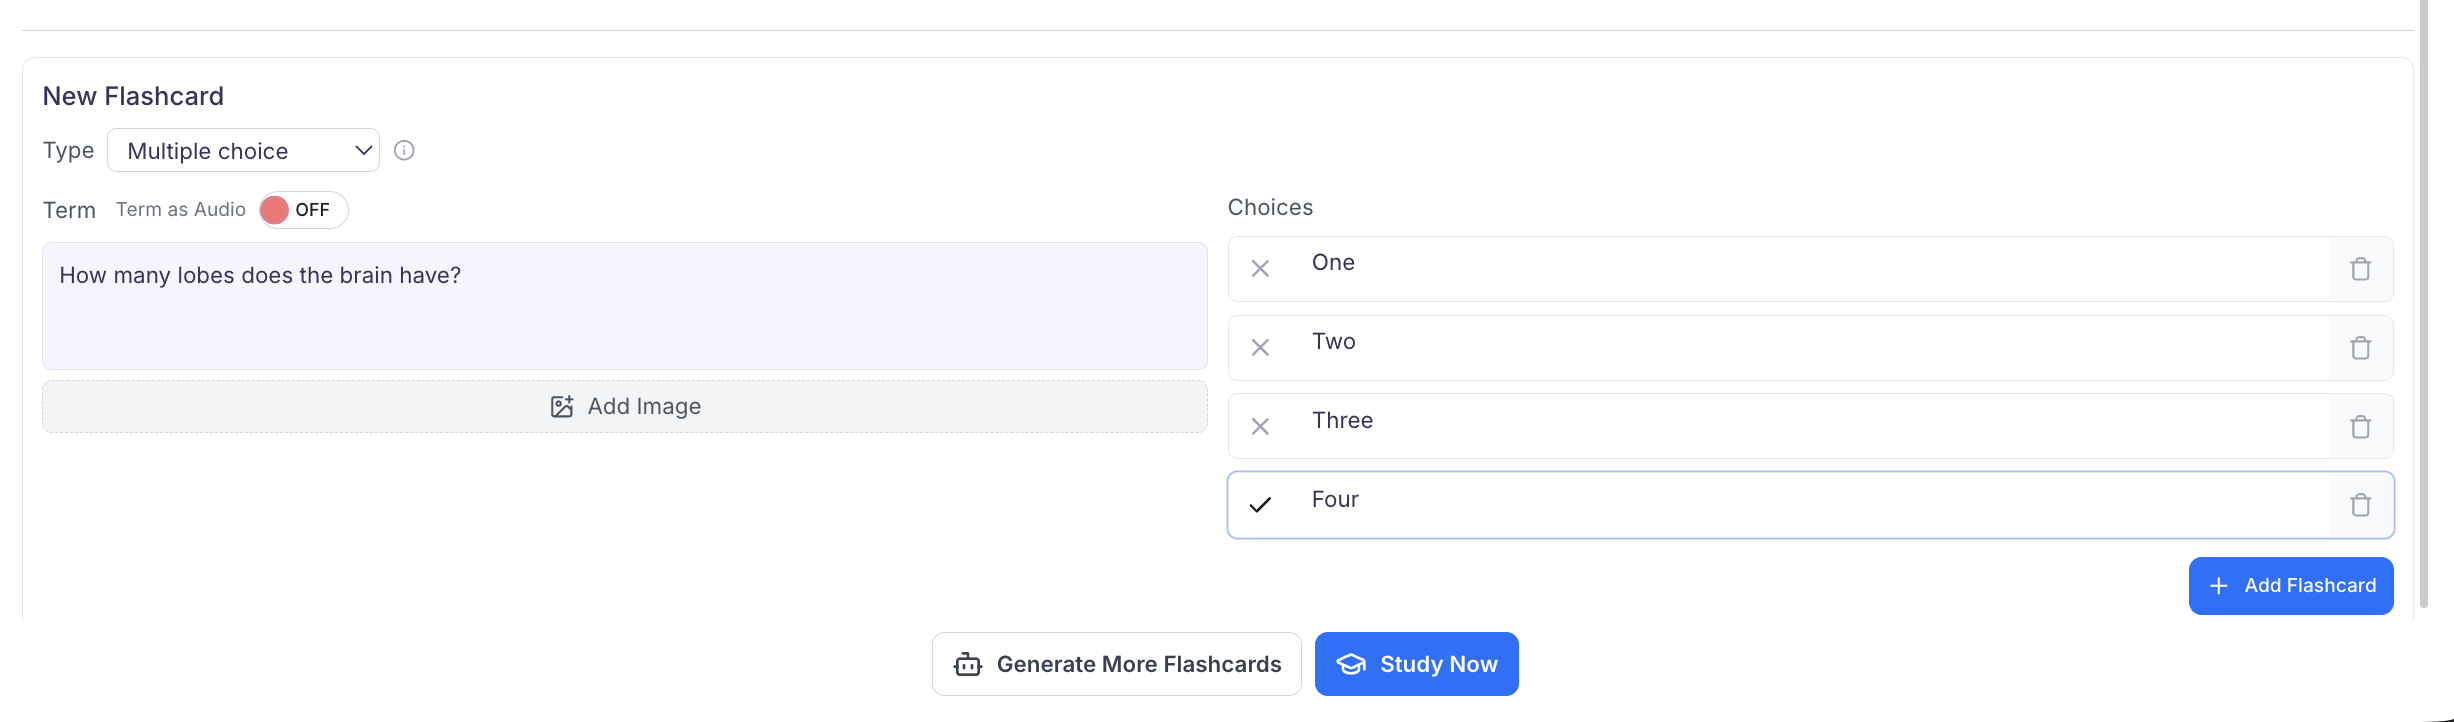
- When you are done making each flashcard, click + Add Flashcard
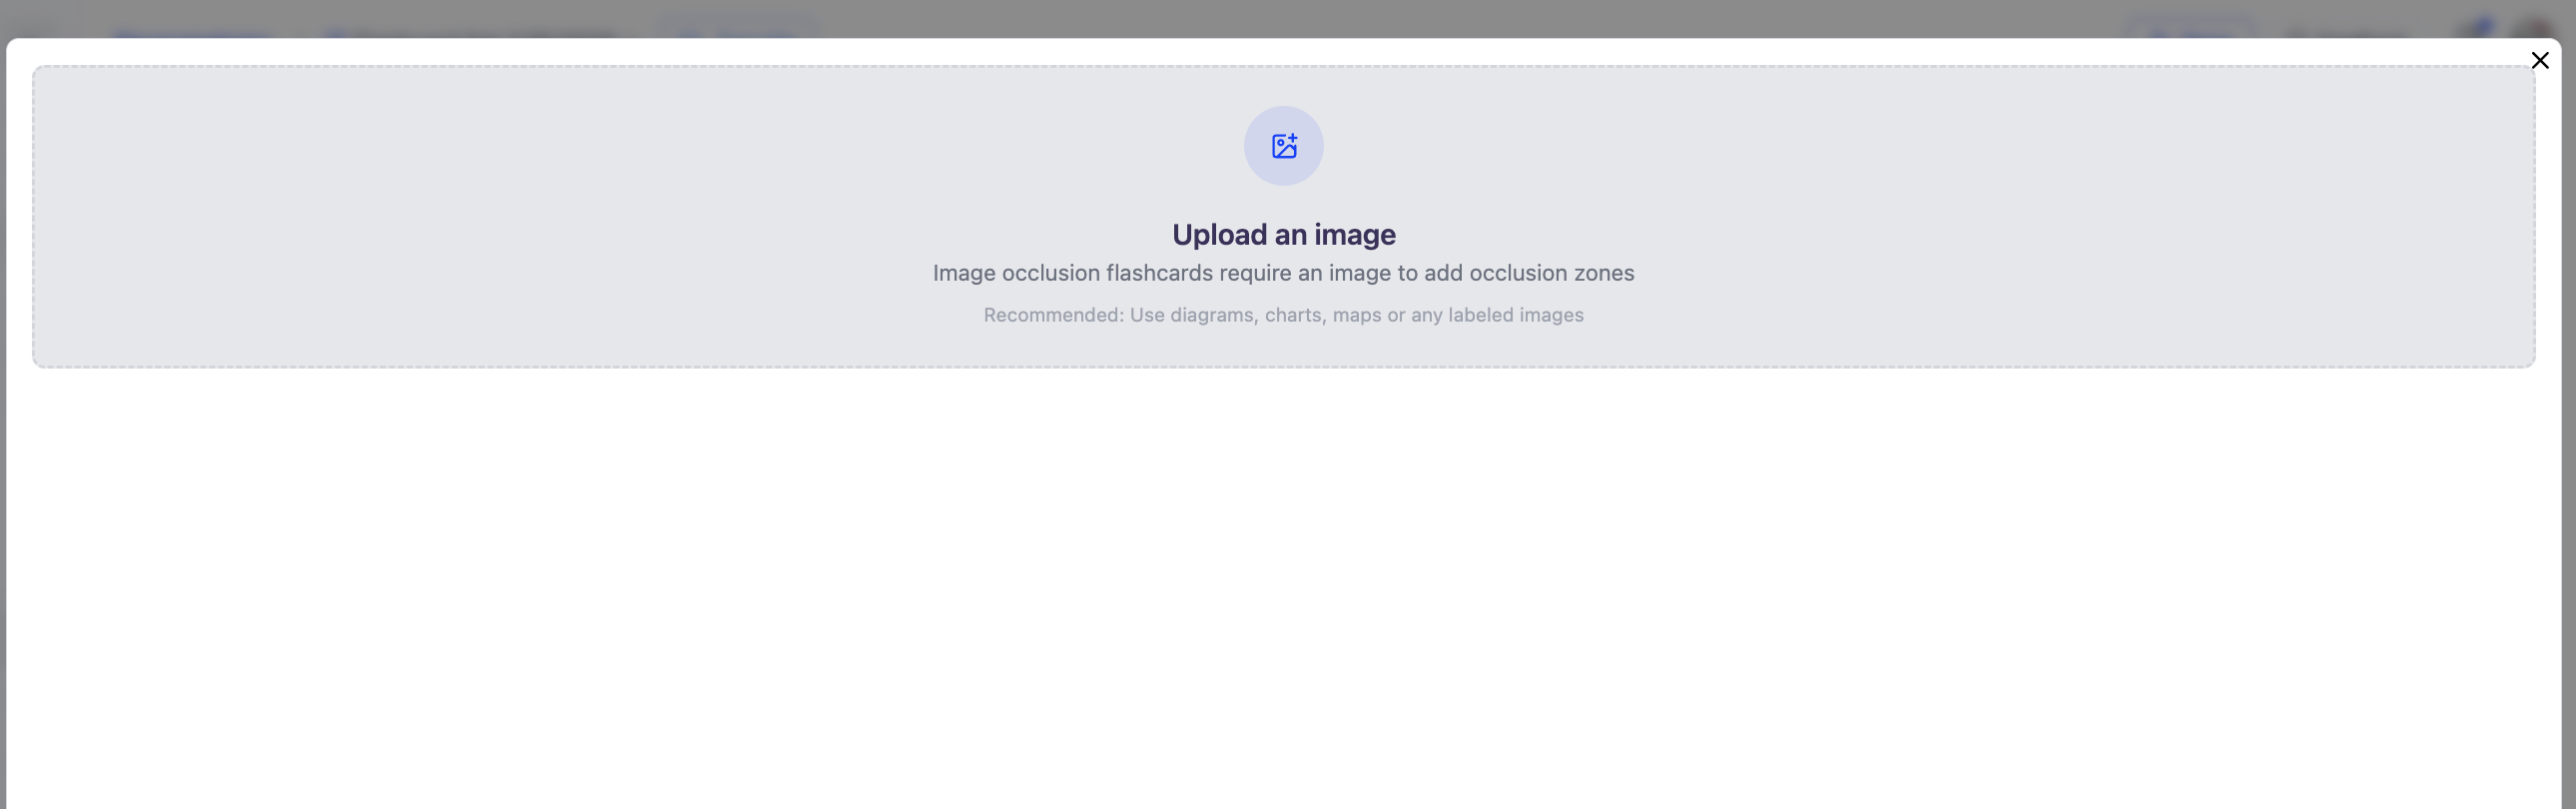
Image Occlusion
Image Occlusion Flashcards allow learners to upload an image and cover specific areas with adjustable masks. Each masked area creates a covered zone that can be clicked to reveal what is hidden underneath, encouraging active recall through visual interaction.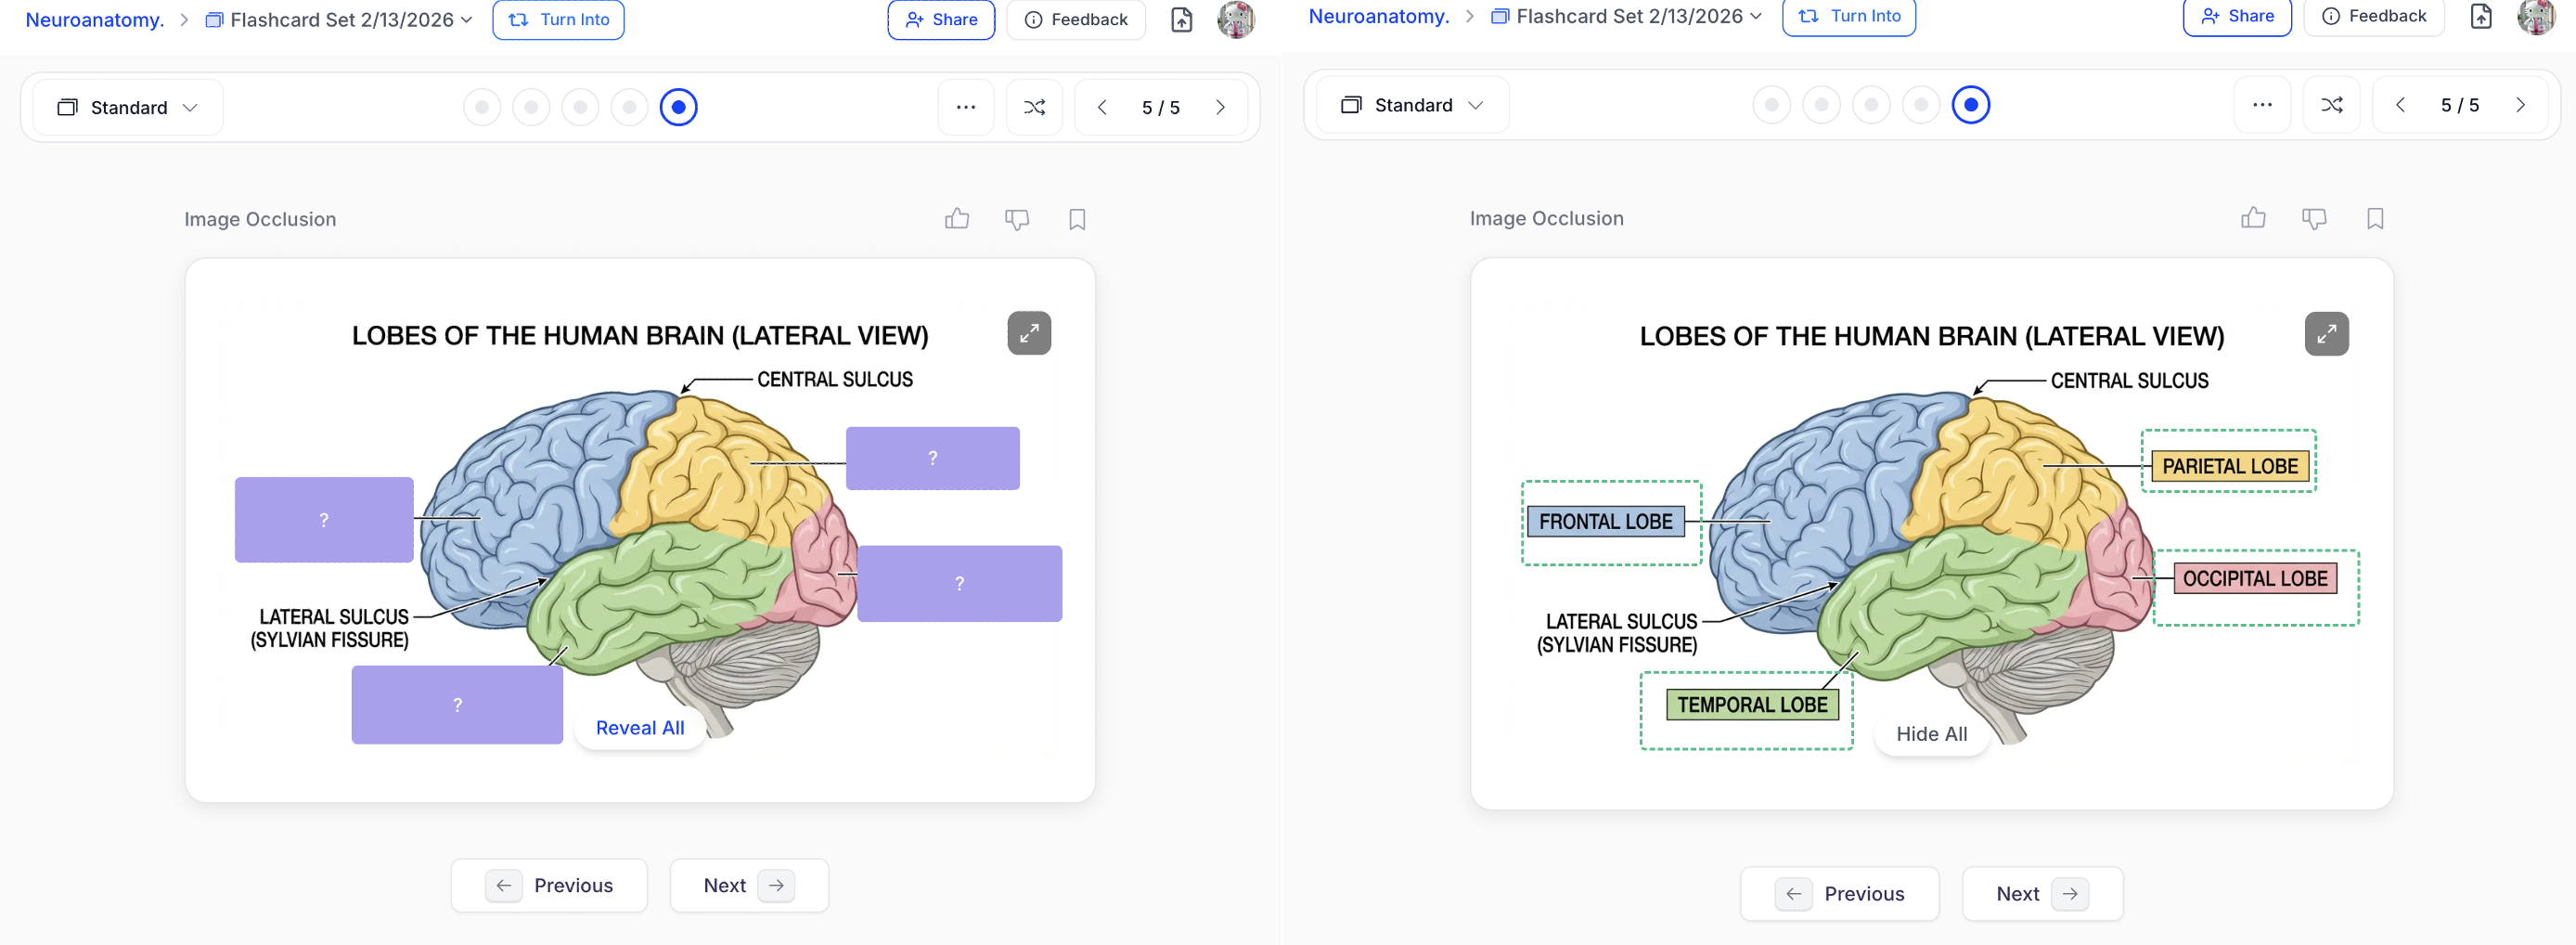
- In the box next to Type, select Image Occlusion
-
Click the box where it says No image uploaded

-
To open your devices file finder click Upload an Image and select the image you want to use for this flashcard or simply drag and drop the image into the box.
- If you accidentally selected the wrong image, you can change it by selecting Change Image from the top right corner
-
Once you have uploaded the desired image, you can begin creating occlusion zones by clicking and dragging on the image to place masks over specific areas.

- A zone will then appear as a semi transparent box.
-
Click on a zone to select it, when selected the zone will turn a blue semi transparent color with a yellow border

-
To resize a zone, use the corner handles to adjust its dimensions.

-
To reposition a zone , click and drag it to the desired location on the image.


-
To delete a zone, first select the zone and then click Delete Zone in the top-right corner.


-
Continue clicking and dragging on the image to create additional occlusion zones as needed. Once you have finished adding all occlusion zones, click the X in the top-right corner to close the editor.
The Image Occlusion flashcard preview may display staggered zones — this is normal and expected.
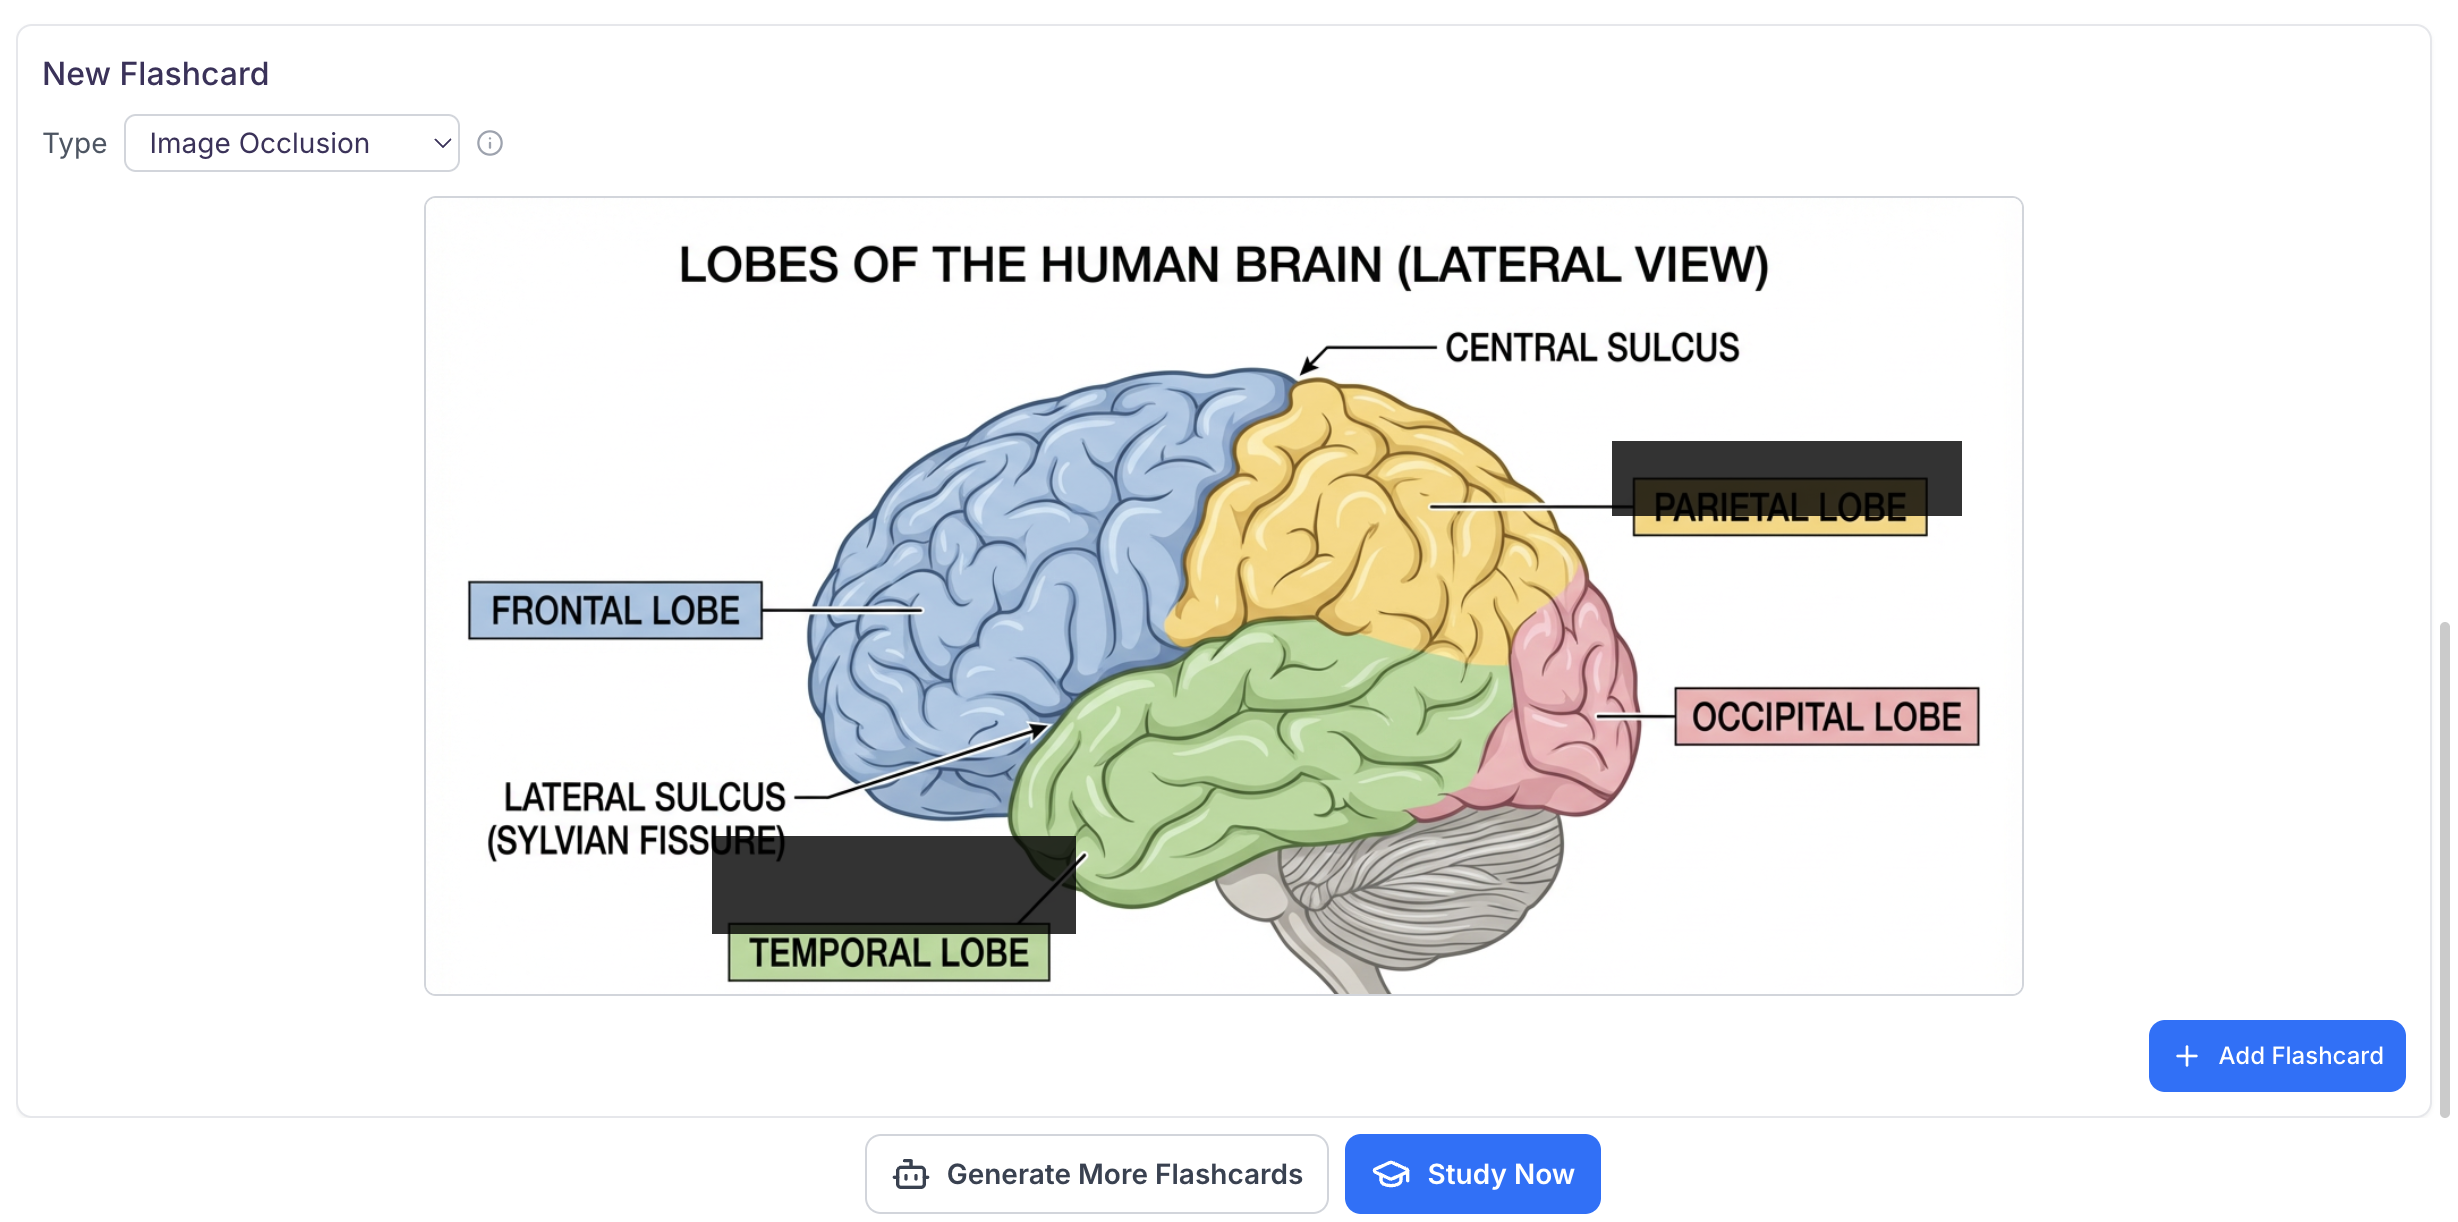
- When you are done, click + Add Flashcard to save to your flashcard set.
Using your Flashcards

Navigation Keys
- To navigate between flashcards click the ← Previous or Next → buttons below the flashcard, or use the left andright arrow keys on your keyboard.
- To flip a flashcard and reveal the back, click anywhere on the card, select the Flip button below the flashcard, or press the space bar on your keyboard. Use any of these methods again to return to the front of the card.
-
Above your flashcards, you’ll see a progress bar made up of dots. Each dot represents an individual flashcard and fills in as you move through the set. You can also click any dot to jump directly to that flashcard. The appearance of the dots may vary depending on the selected study mode — see the study modes section below for more details.

-
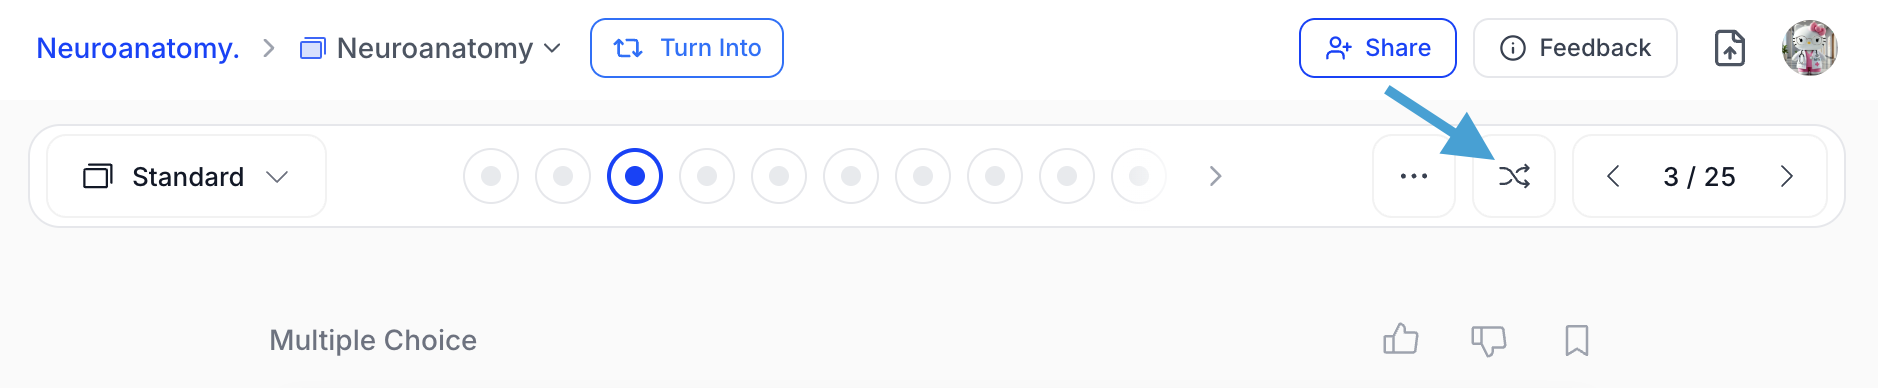
Select the Shuffle button in the top right toolbar to randomize the order of your flashcards.
-
How do you like your flashcards? Use the thumbs up or thumbs down buttons located in the top right above your flashcards to provide feedback on AI-generated flashcards. A thumbs up indicates the flashcard contains helpful content, while a thumbs down indicates the content needs improvement. The more feedback provided, the better the flashcards become over time.

-
Curious about the source? Click the number in the top left above your flashcard to see exactly where the information comes from in your study material.

Choosing a Study Mode
On the top left of the toolbar above your flashcards, you can choose how you want to study. Click the downward arrow to select from the following study modes: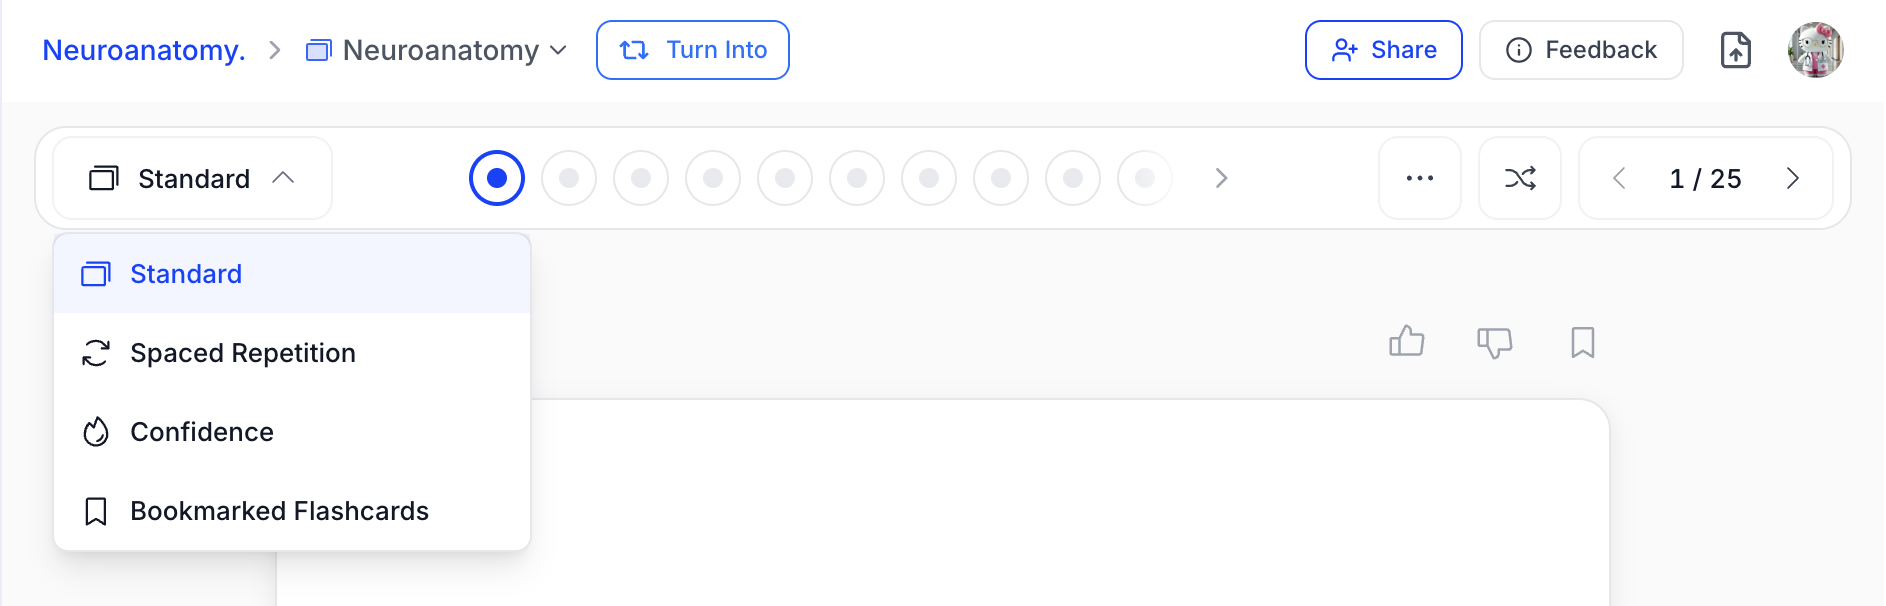
- Standard: Review all flashcards in order. Ideal for initial learning or quick review sessions.
- Spaced Repetition: Uses smart scheduling based on how well you know each card. Cards you struggle with appear more frequently to optimize retention.
- Confidence: Rate your confidence level for each card. Great for tracking progress over time.
- Bookmarked Flashcards: Focus only on flashcards you’ve bookmarked. Perfect for reviewing challenging topics you want to master.
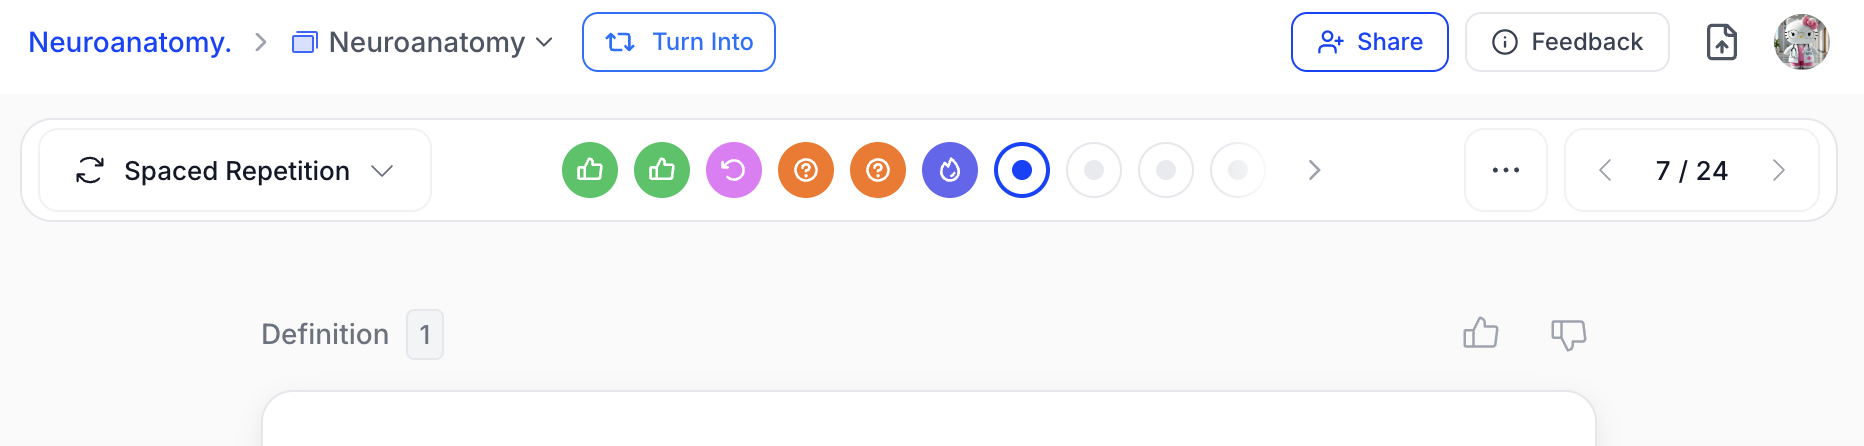
How to use Spaced Repetition Study Mode
Spaced repetition strengthens long-term memory through timed review intervals. Follow the steps below to easily activate this mode while studying your flashcards in StudyFetch.-
To start studying with spaced repetition, select Spaced Repetition from the top left of the toolbar

-
While studying, once you flip a flashcard or reveal the answer, you will be asked to rate your confidence level using Again, Hard, Good, or Easy
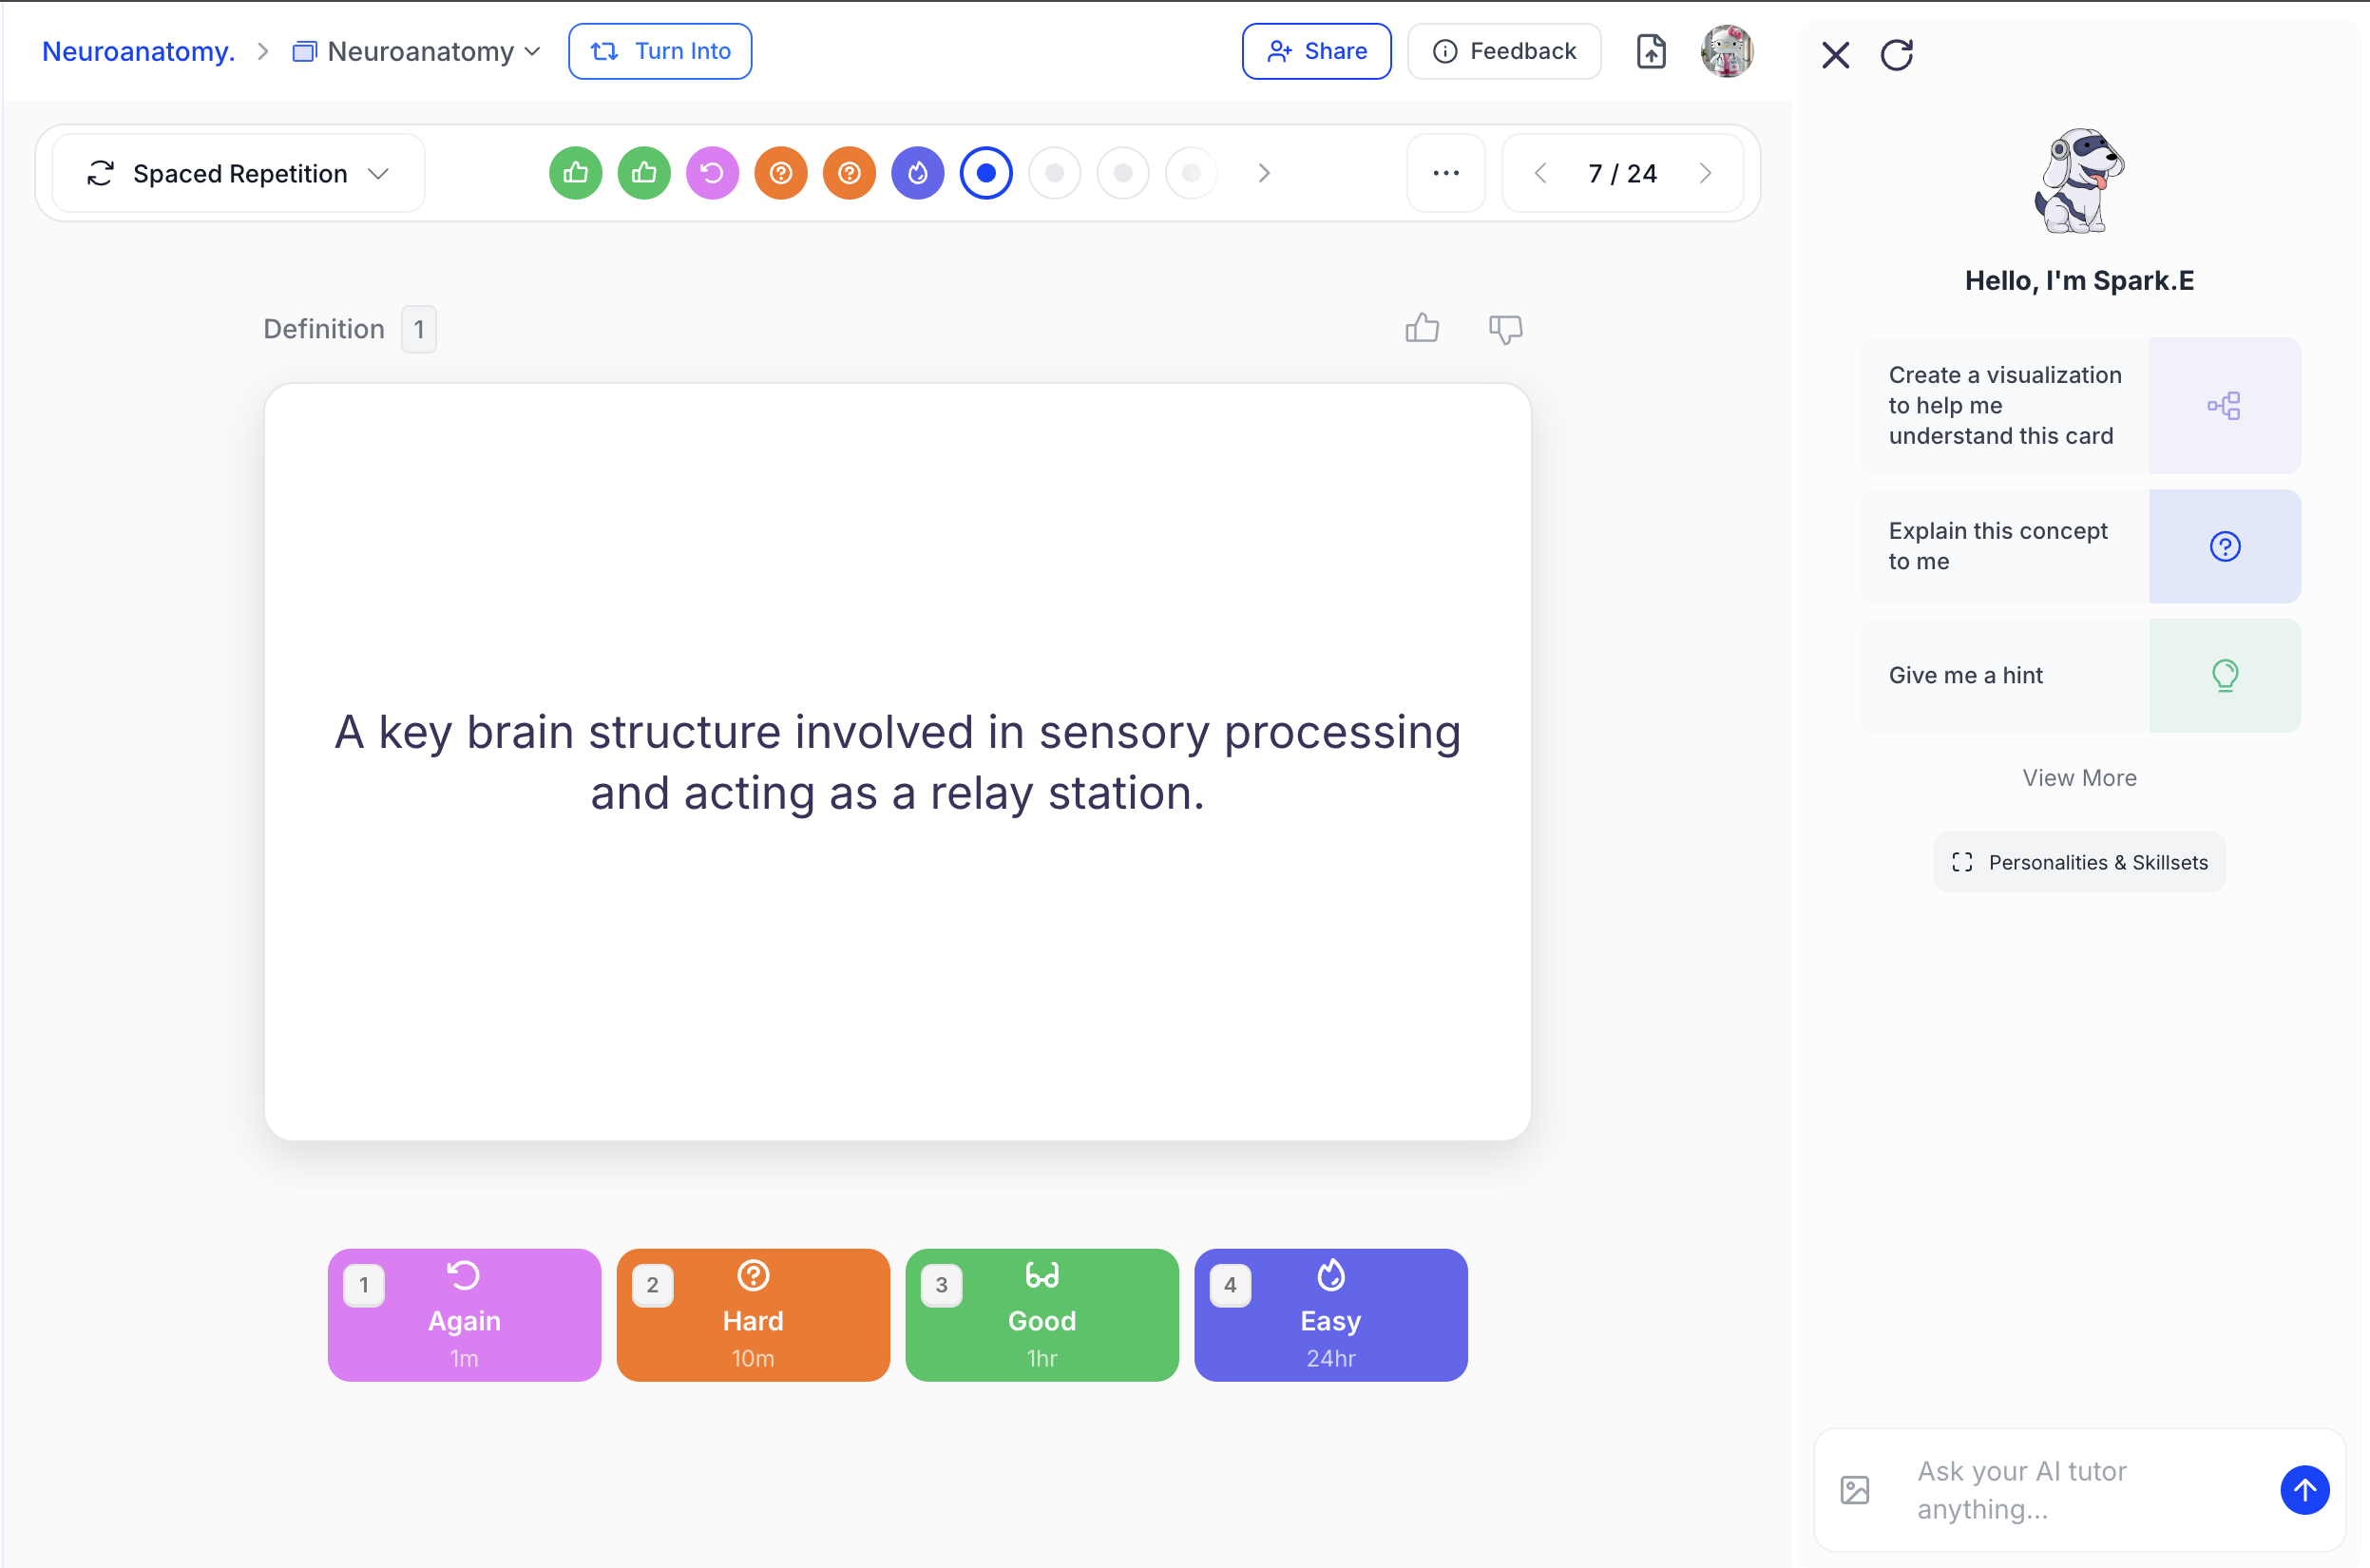
- Again (1): Shows again in 1 minute
- Hard (2): Shows again in 10 minutes
- Good (3): Shows again in 1 hour
- Easy (4): Shows again in 24 hours
-
In spaced repetition mode, the progress bar appearance of each dot updates based on your confidence ratings to reflect your learning progress.
- When you’re finished studying, you can switch to a different study mode by selecting the downward arrow next to Spaced Repetition in the top left of the toolbar, or simply leave the page. Don’t worry — your progress is automatically saved, so you can return to Spaced Repetition mode anytime and continue right where you left off.
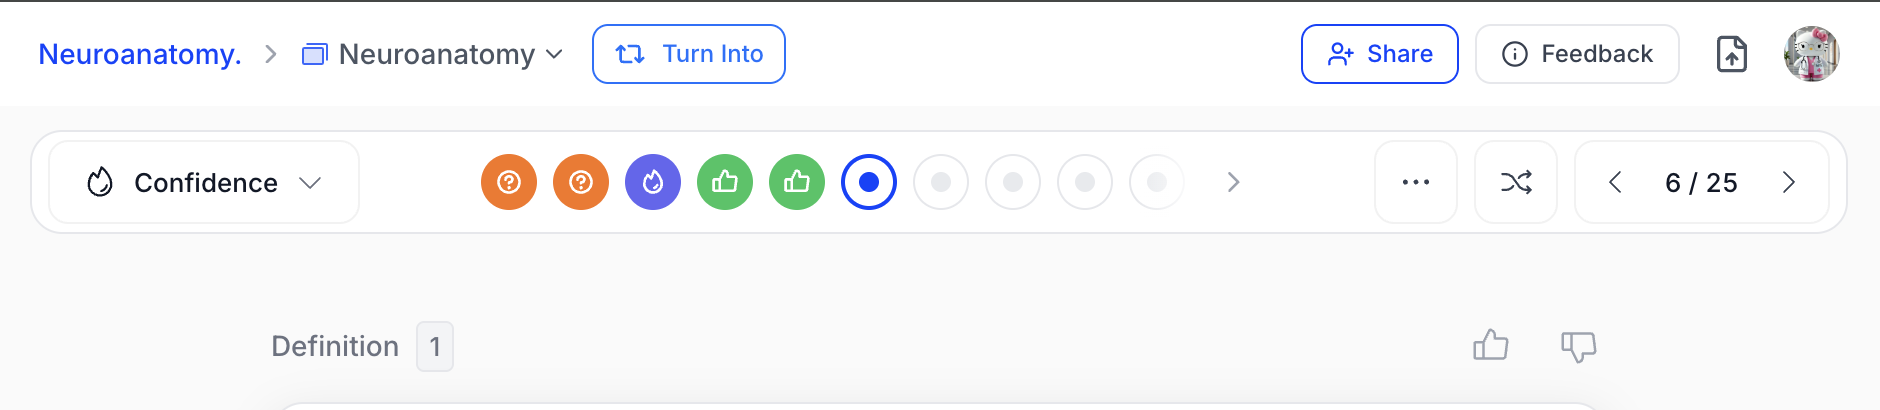
How to use Confidence Study mode
Confidence Study Mode lets you rate how confident you feel about each flashcard, making it easy to monitor your progress and identify areas for improvement. Follow the steps below to activate this mode while studying flashcards in StudyFetch.-
To start, select Confidence from the top left of the toolbar

-
After flipping a flashcard, you will be asked to rate your confidence level using Not Very Confident (1), Somewhat Confident (2), or Very Confident (3) .

-
In Confidence mode, the progress bar appearance of each dot updates based on your confidence ratings to reflect your learning progress.
- When you’re finished studying, you can switch to a different study mode by selecting the downward arrow next to Confidence in the top left of the toolbar, or simply leave the page. Don’t worry — your progress is automatically saved and can be reviewed in Statistics. You can return to Confidence mode anytime and continue tracking your confidence over time.
Using Bookmarks
When studying flashcards in Standard mode, you can use bookmarks to tag cards you want to review later — ideal for mastering challenging topics.-
Bookmark flashcards you want to revisit by selecting the bookmark icon located in the top right above your flashcard.

-
When bookmarked, the icon will turn yellow.

-
To review your bookmarked flashcards, click the downward arrow next to Standard and select Bookmarked Flashcards. This will switch your study session to focus only on your bookmarked cards.
The number to the right of Bookmarked Flashcards represents the total amount of flashcards you have bookmarked

-
After you’ve mastered a flashcard, remove the bookmark by selecting the same bookmark icon in the top right above the flashcard.

- After removing the bookmark, the flashcard will be taken out of your Bookmarked Flashcards study rotation, and the total number of bookmarked cards will update automatically. Don’t worry — the card will still be available in Standard mode.
-
If you want to return to your full flashcard set before mastering all bookmarked cards, select the downward arrow next to Bookmarked Flashcards in the top left of the toolbar and choose Standard.


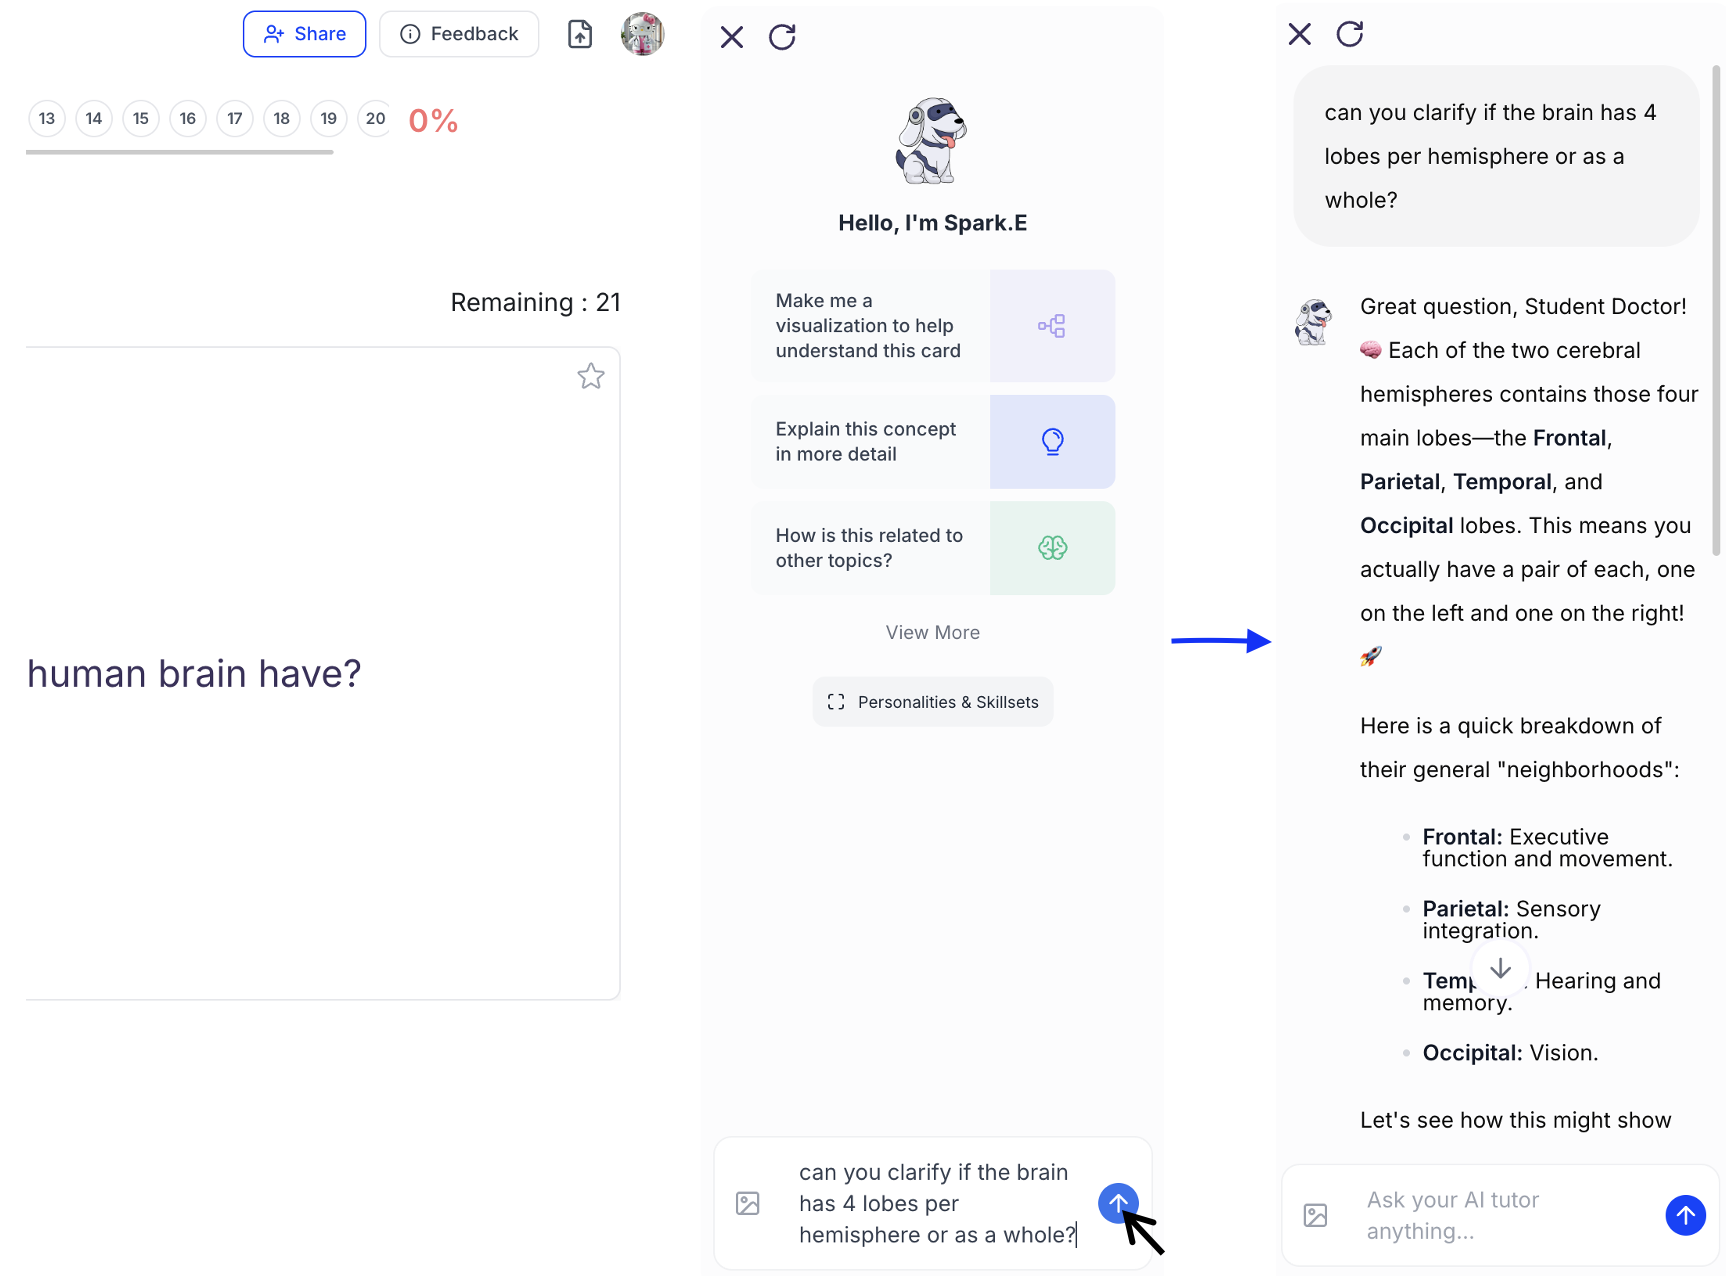
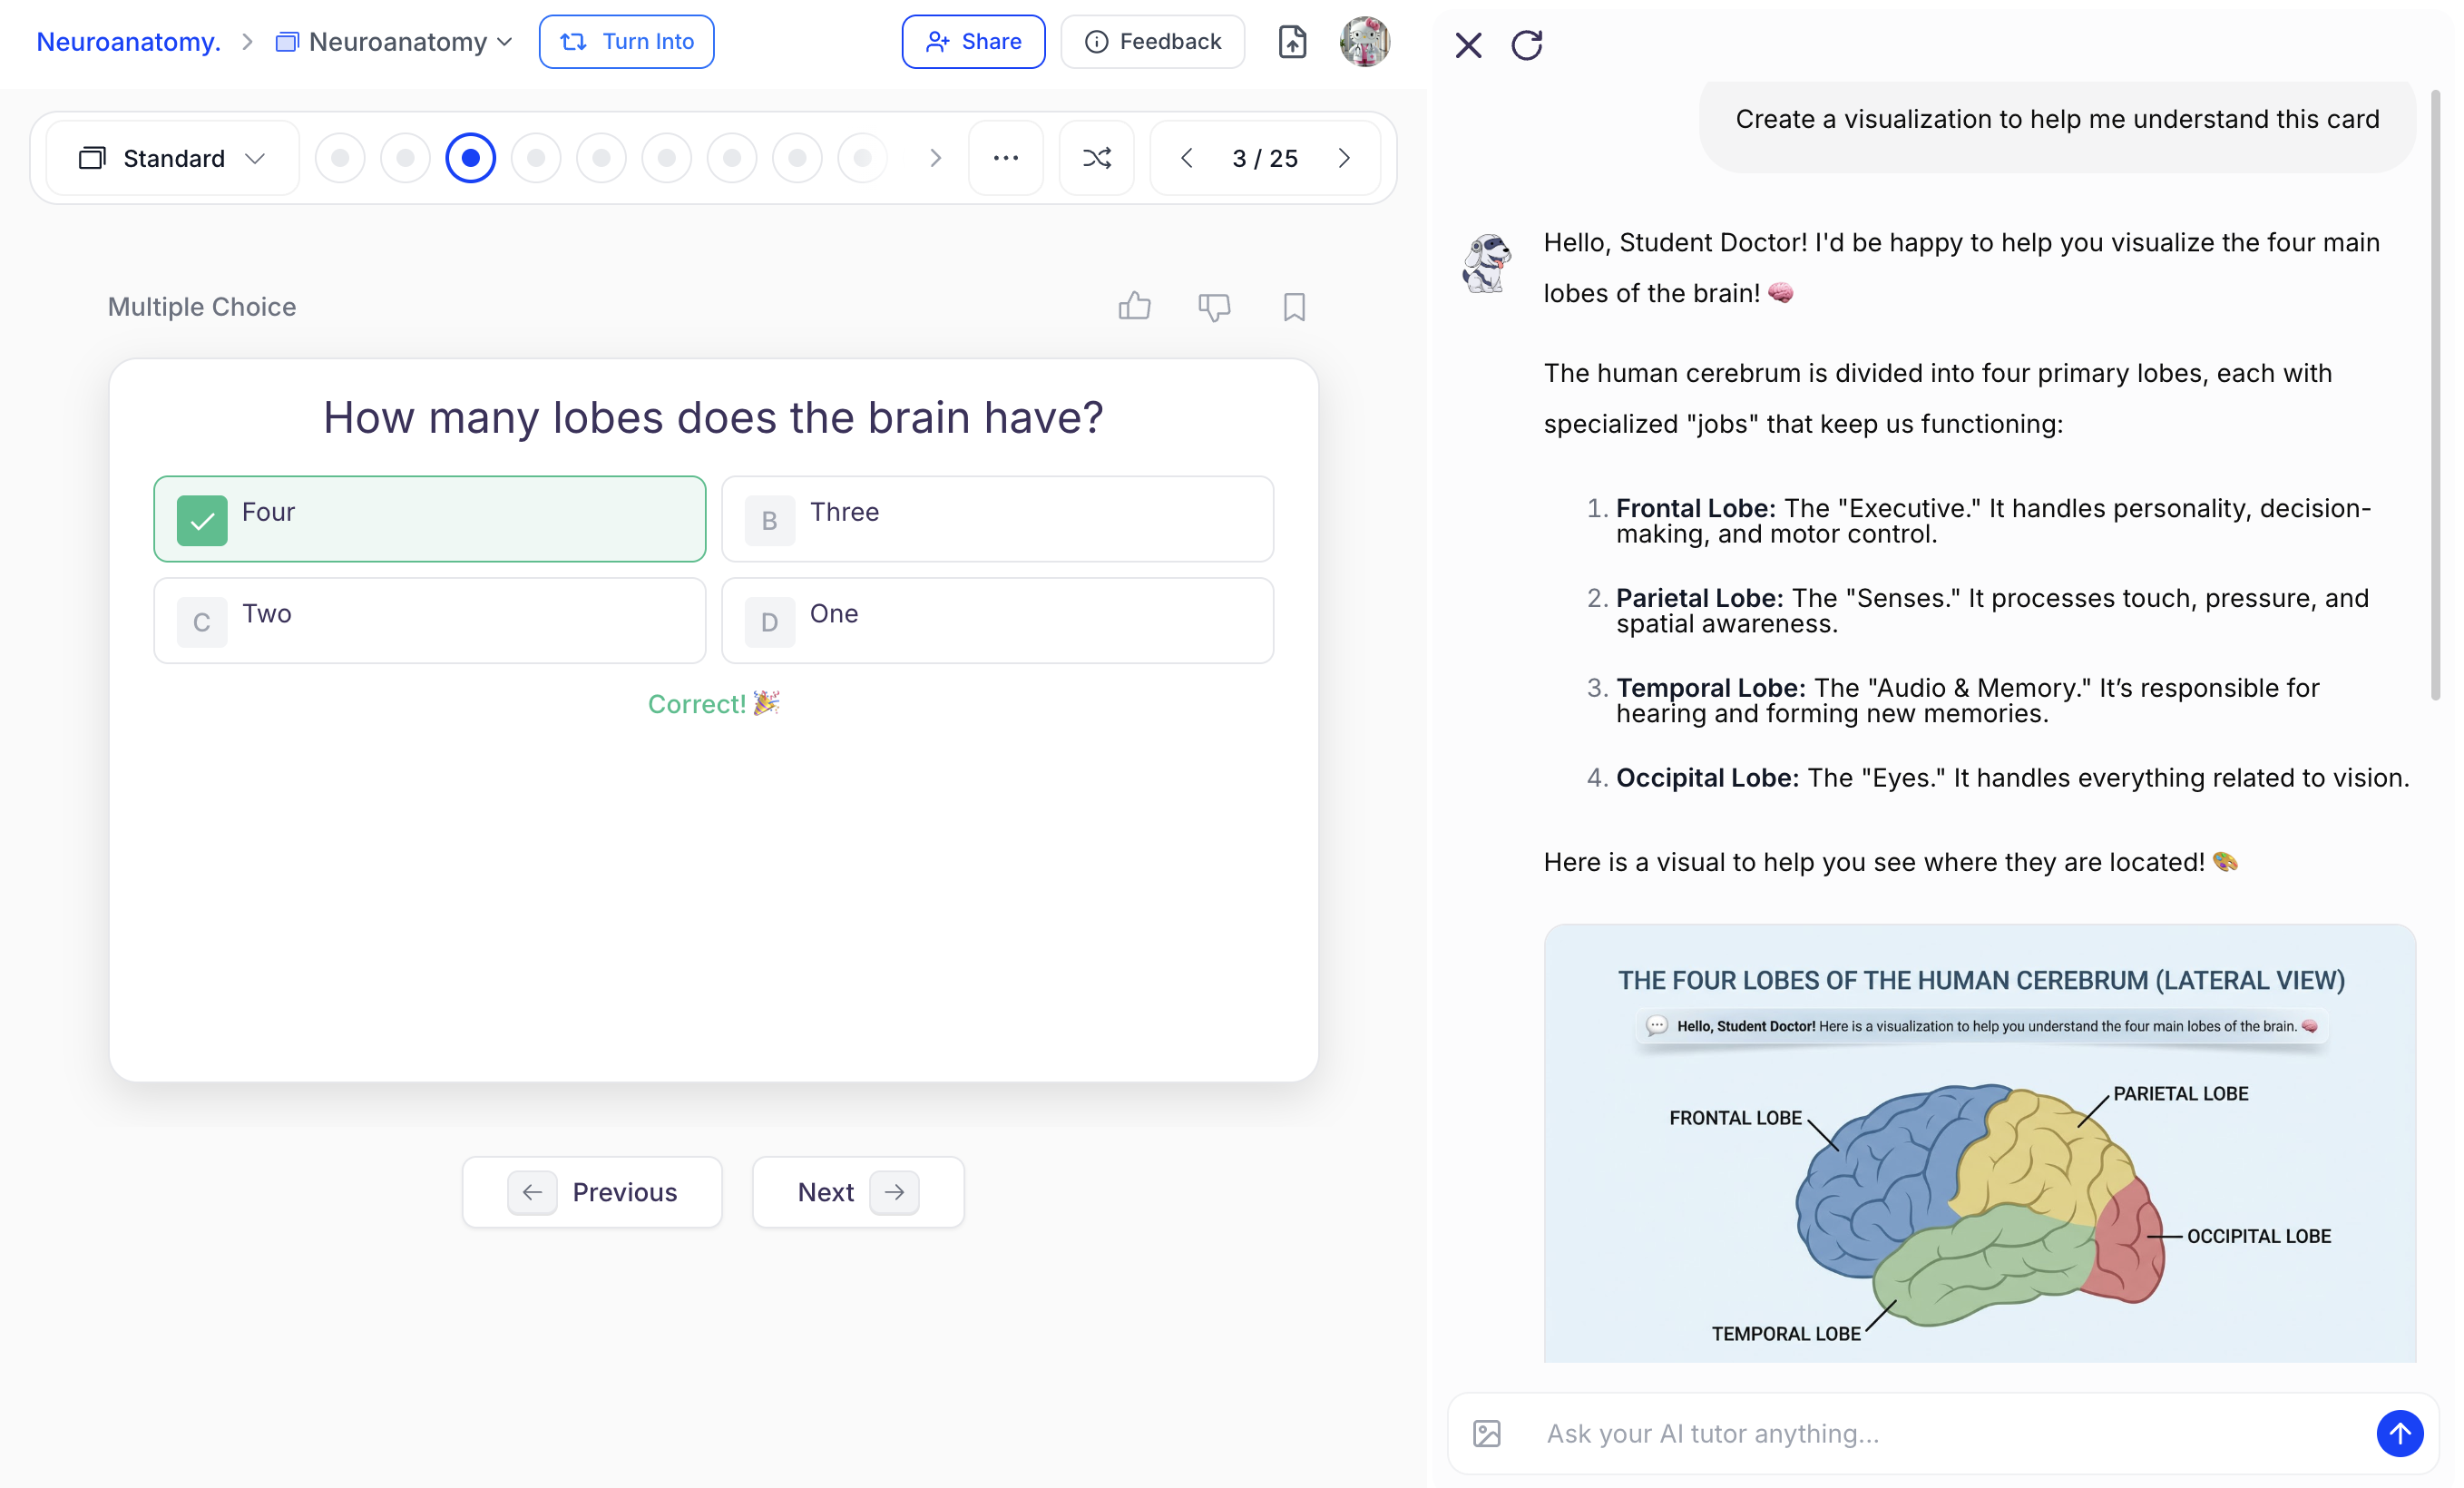
Get Help from Spark.E
Have questions or need help clarifying something from your flashcards? Use the Spark.E chat to get personalized support instantly!
- As you study your flashcards, the Spark.E chat is available on the right side for real-time support.
-
You can ask questions by typing directly into the chat box and pressing Enter,

-
Ask anything from “make me a visualization of this card,” to “explain this concept in more detail,” or “what is the best way to memorize this?” Spark.E will provide detailed, personalized responses tailored to your learning style.
Interpreting your Statistics
-
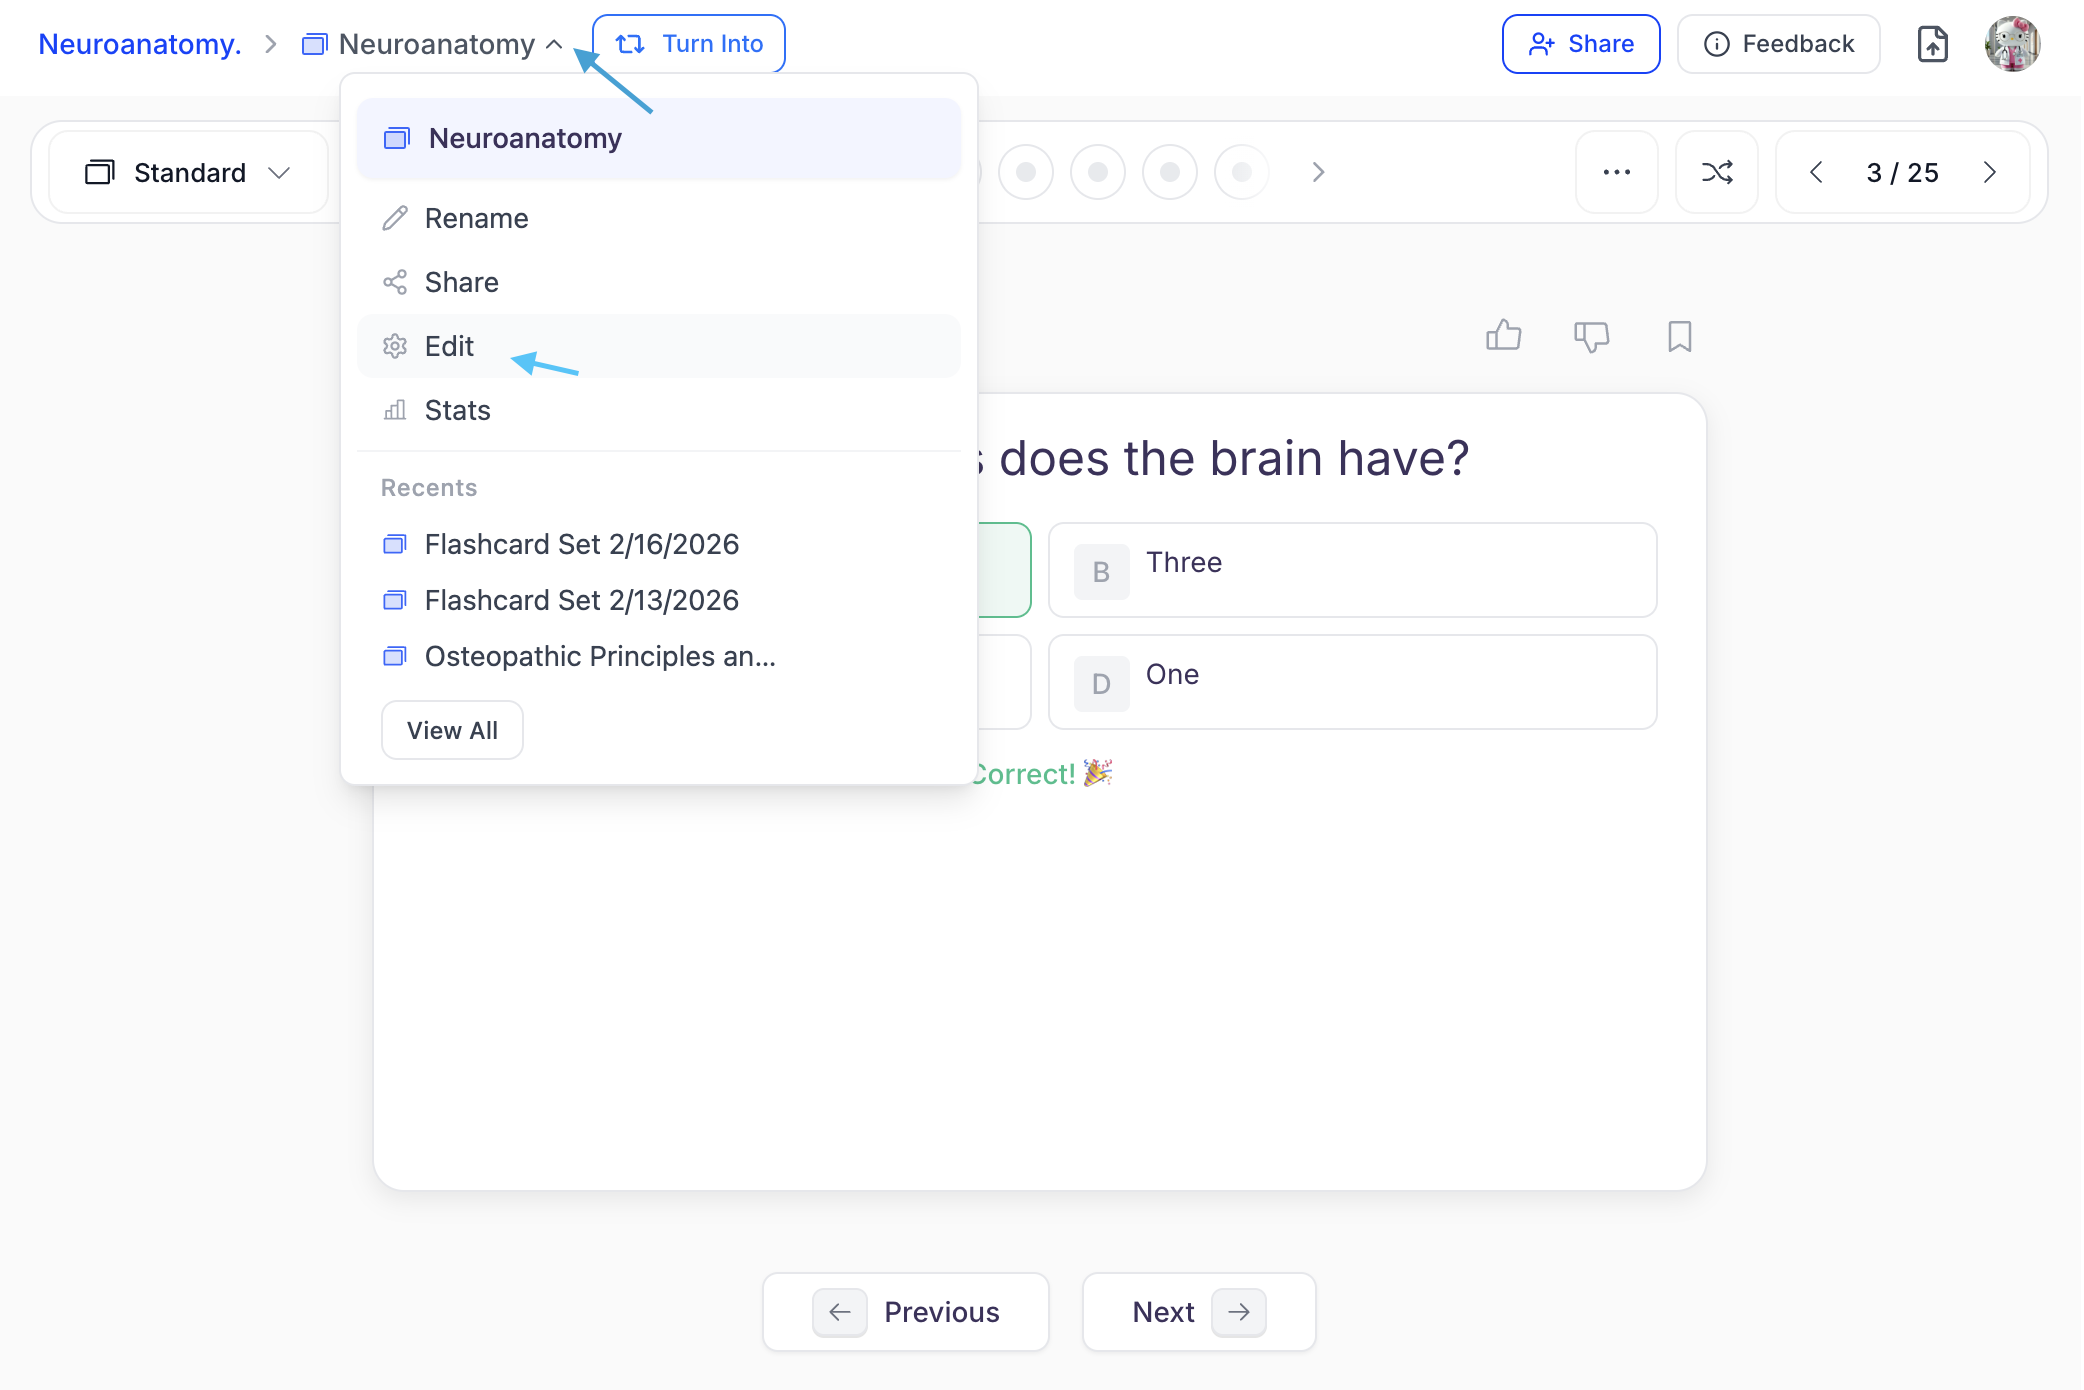
To view your flashcard sets study progress and statistics, click the downward arrow head to the right of your flashcard name, and then select Stats.

-
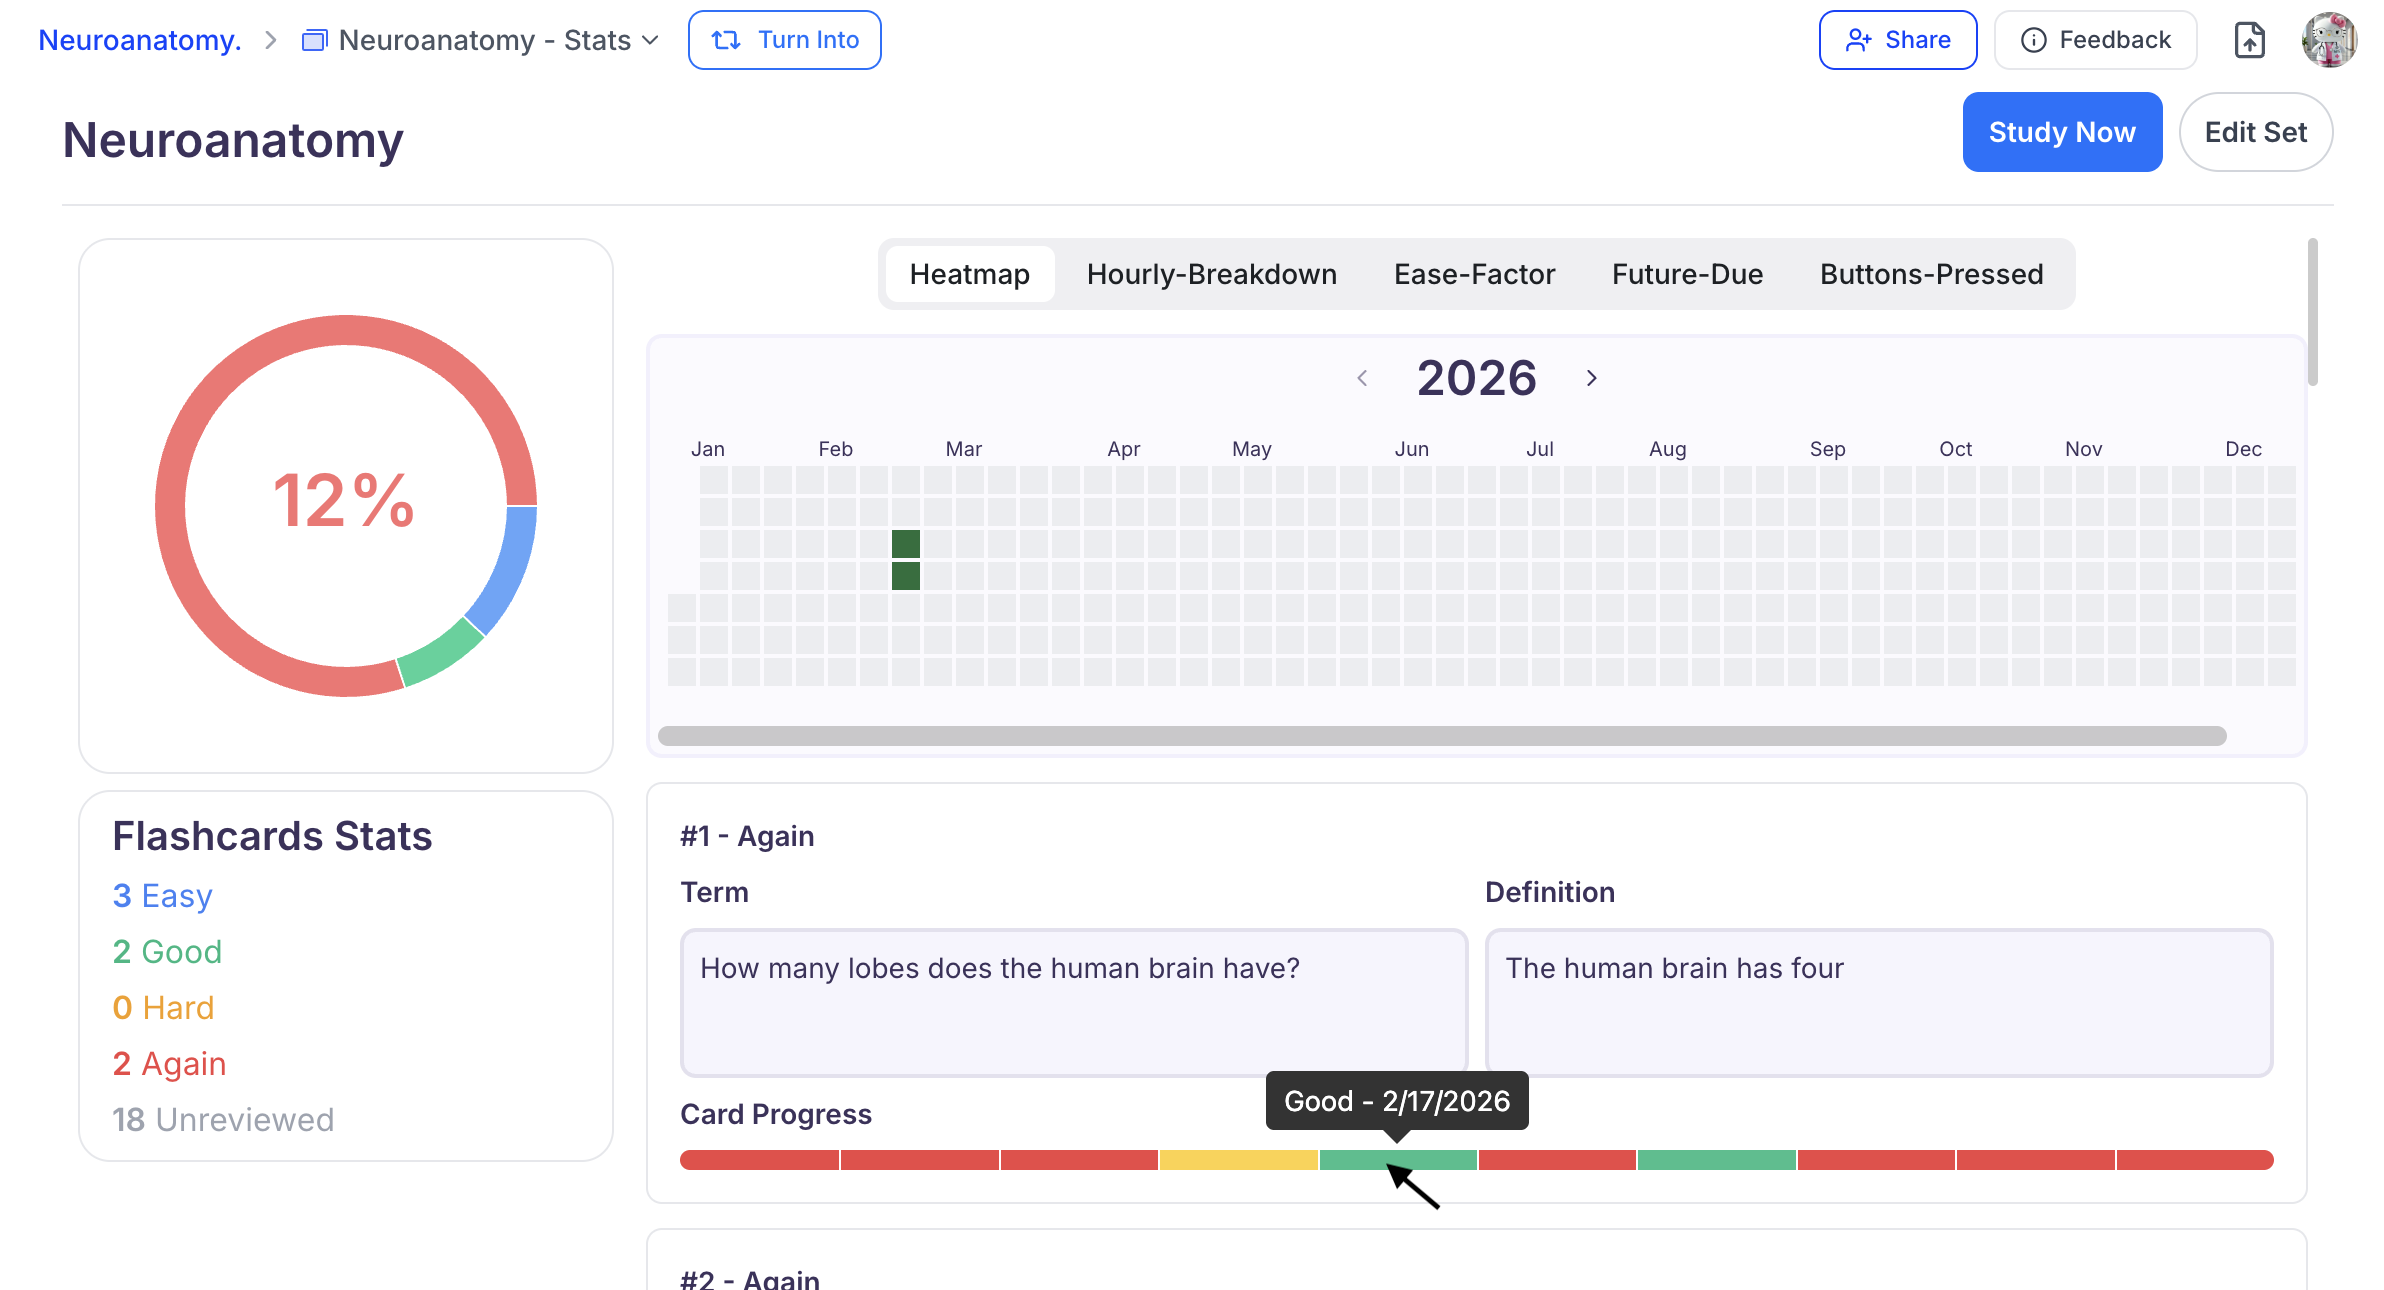
Each flashcard includes a Card Progress bar with shaded segments for each confidence rating button selection. Hover over a shaded section to view the ease rating and date it was recorded.
-
The Heatmap is a visual calendar that displays your flashcard study activity over time, helping you track consistency and review habits. Each square represents one day and shading indicates study activity:
Darker shading = more reviews completed Lighter shading = fewer reviews No Shading = No study activity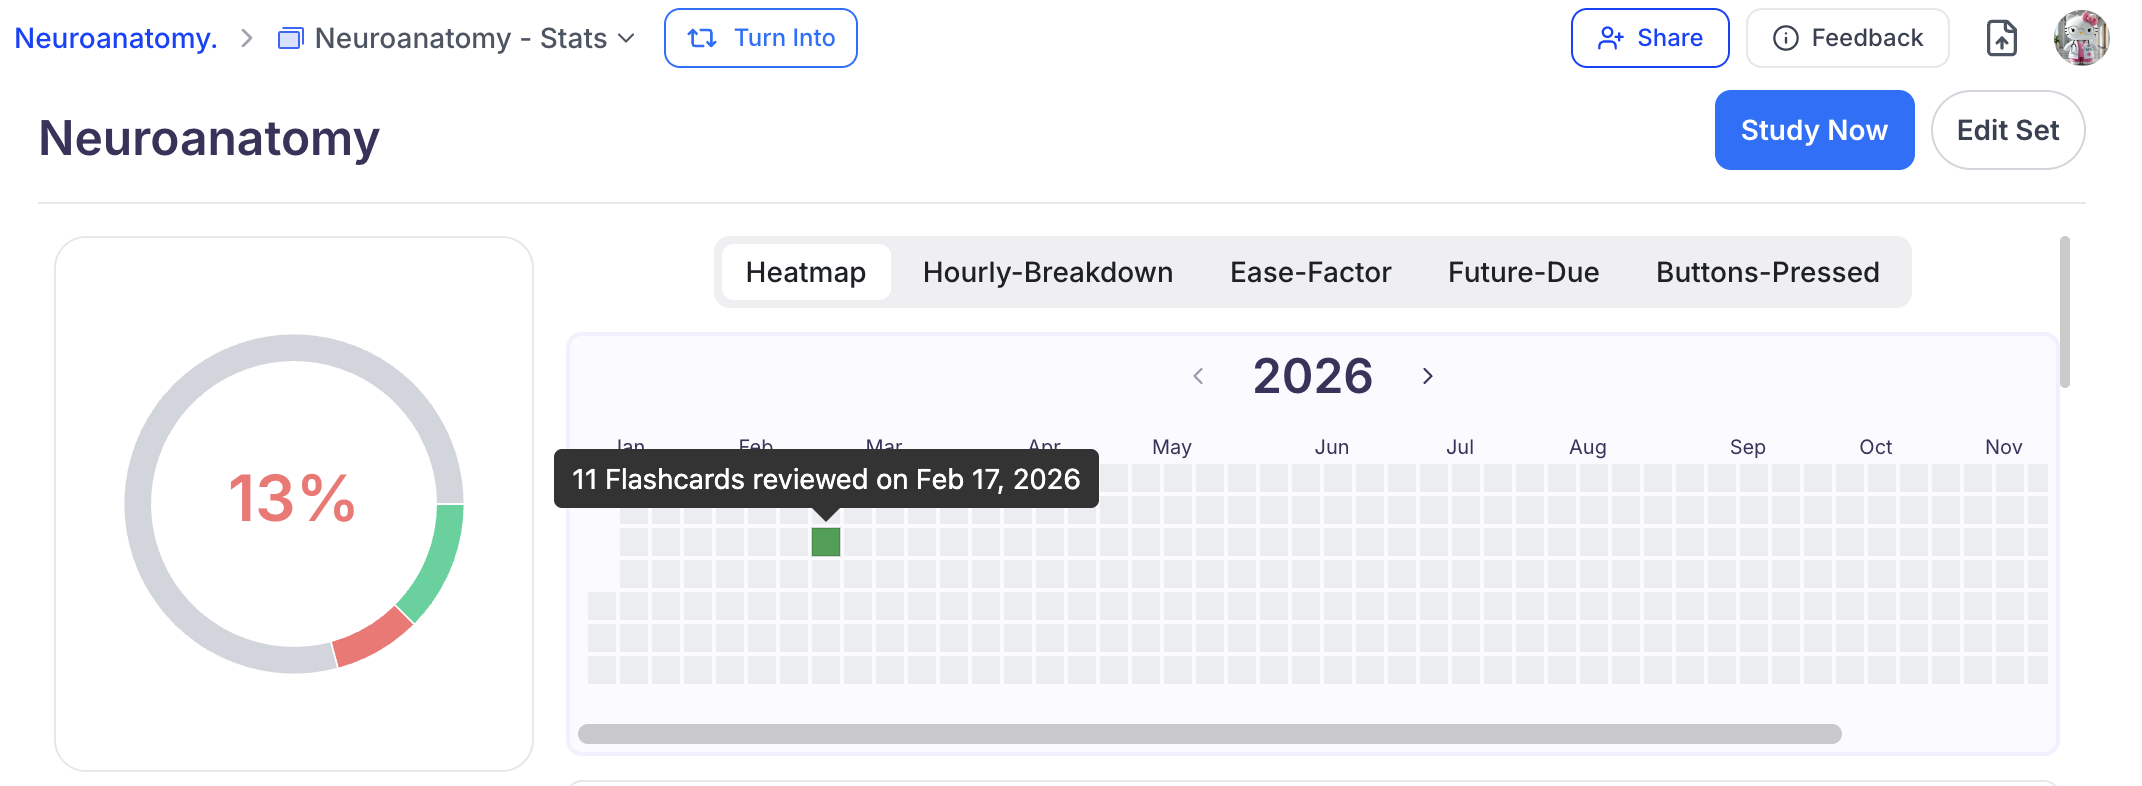
-
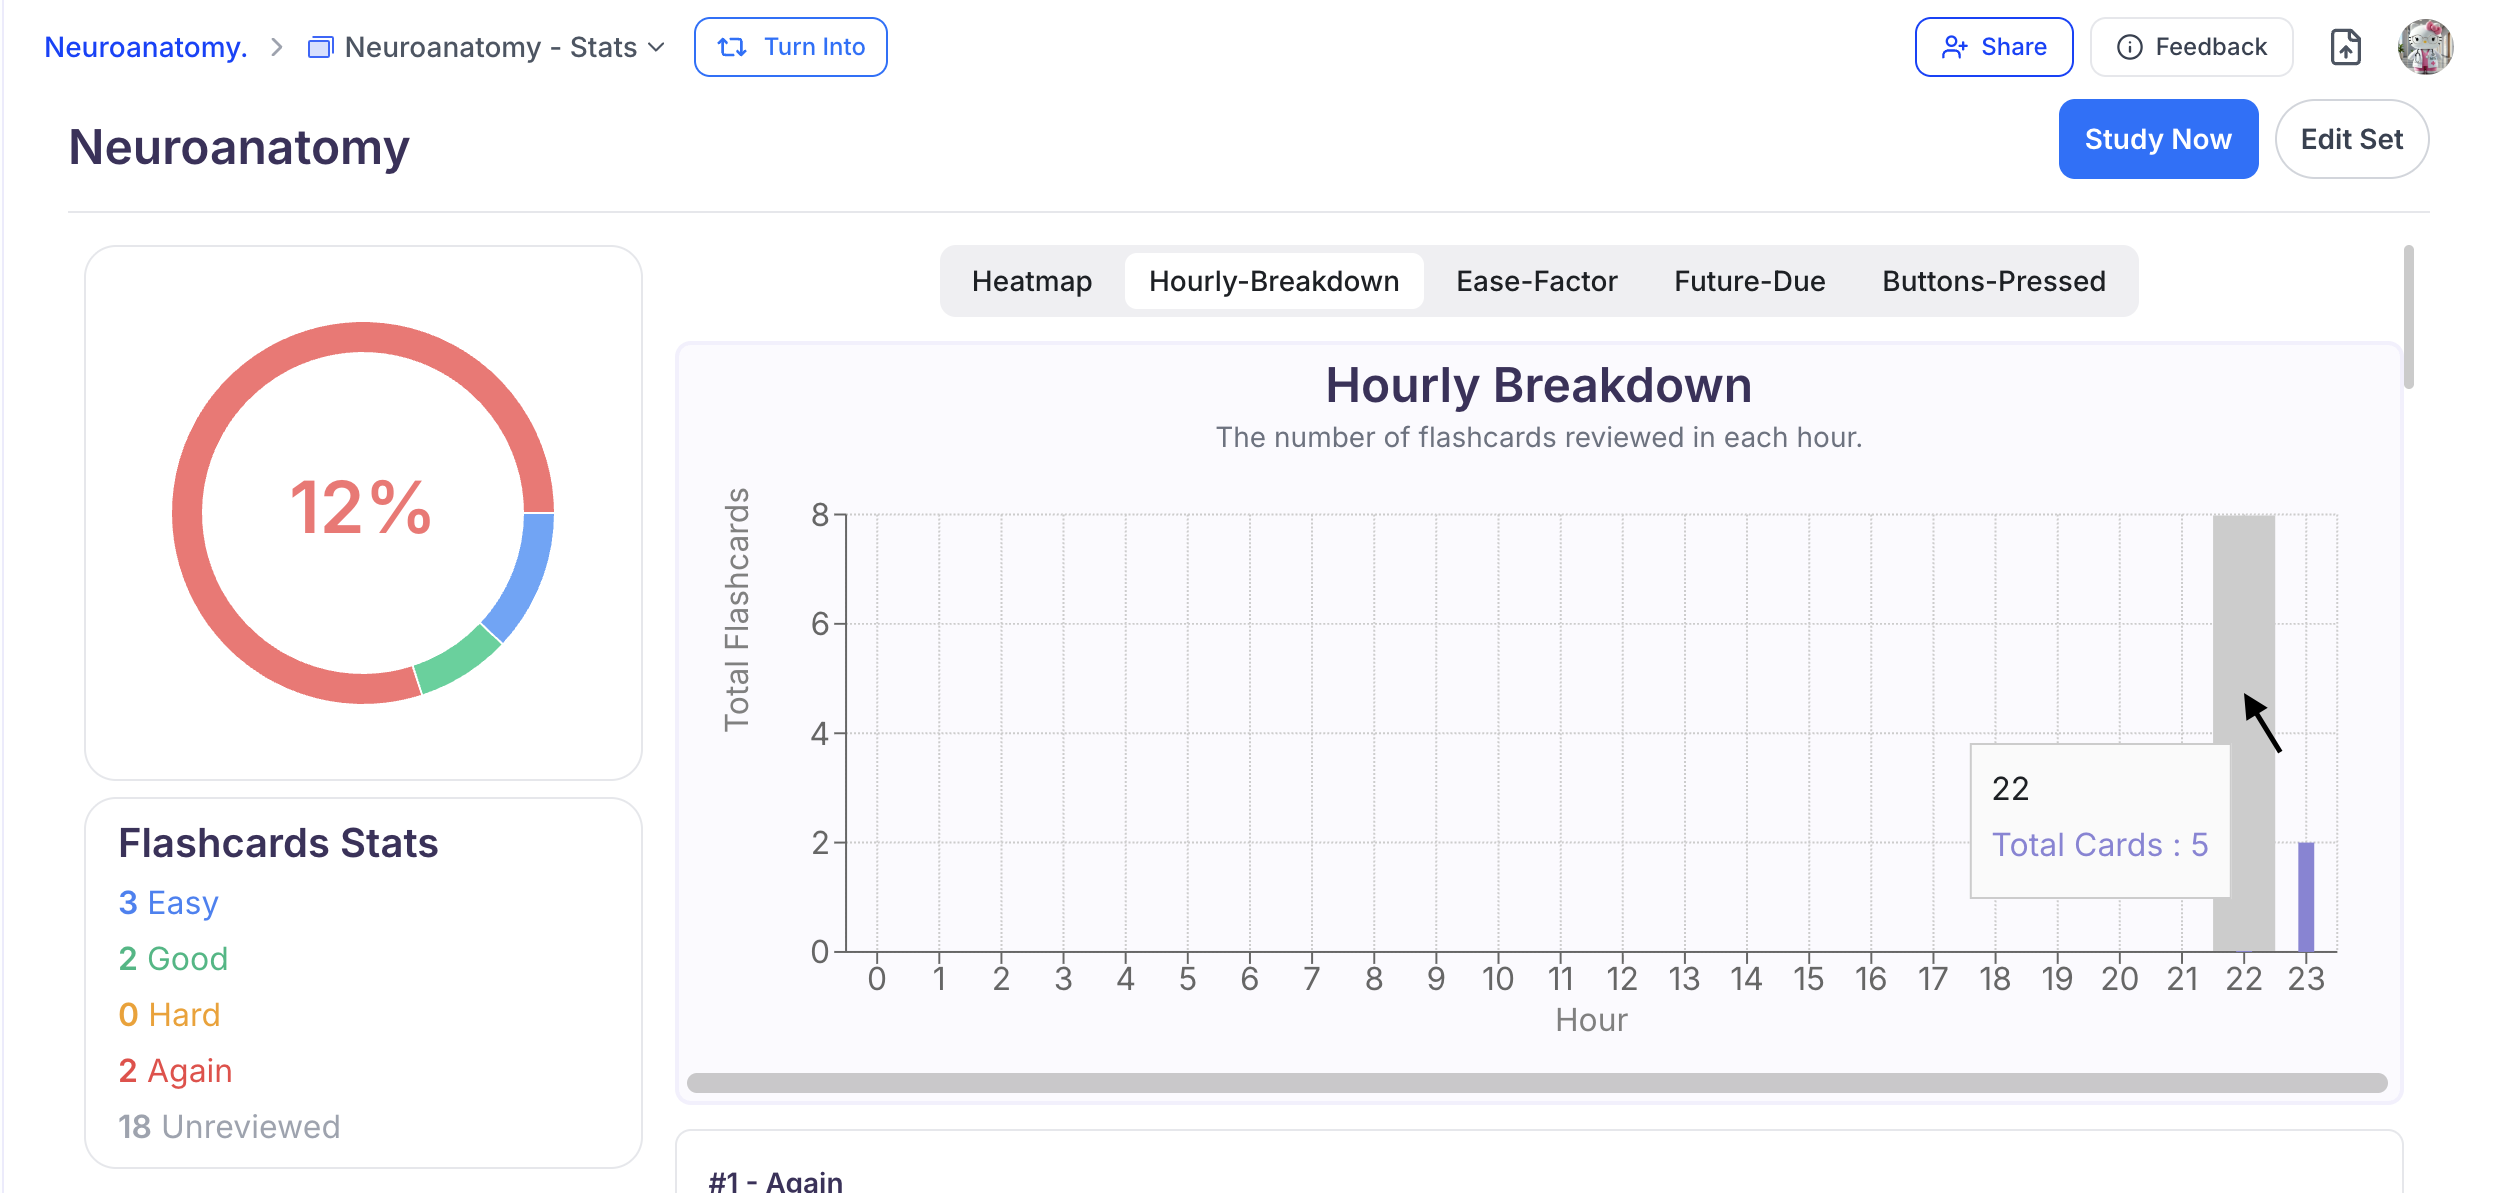
The Hourly-Breakdown graph shows the number of flashcards reviewed during each hour of the day.
To view specific details, hover over an hourly bar to see the total number of cards reviewed during that time.
-
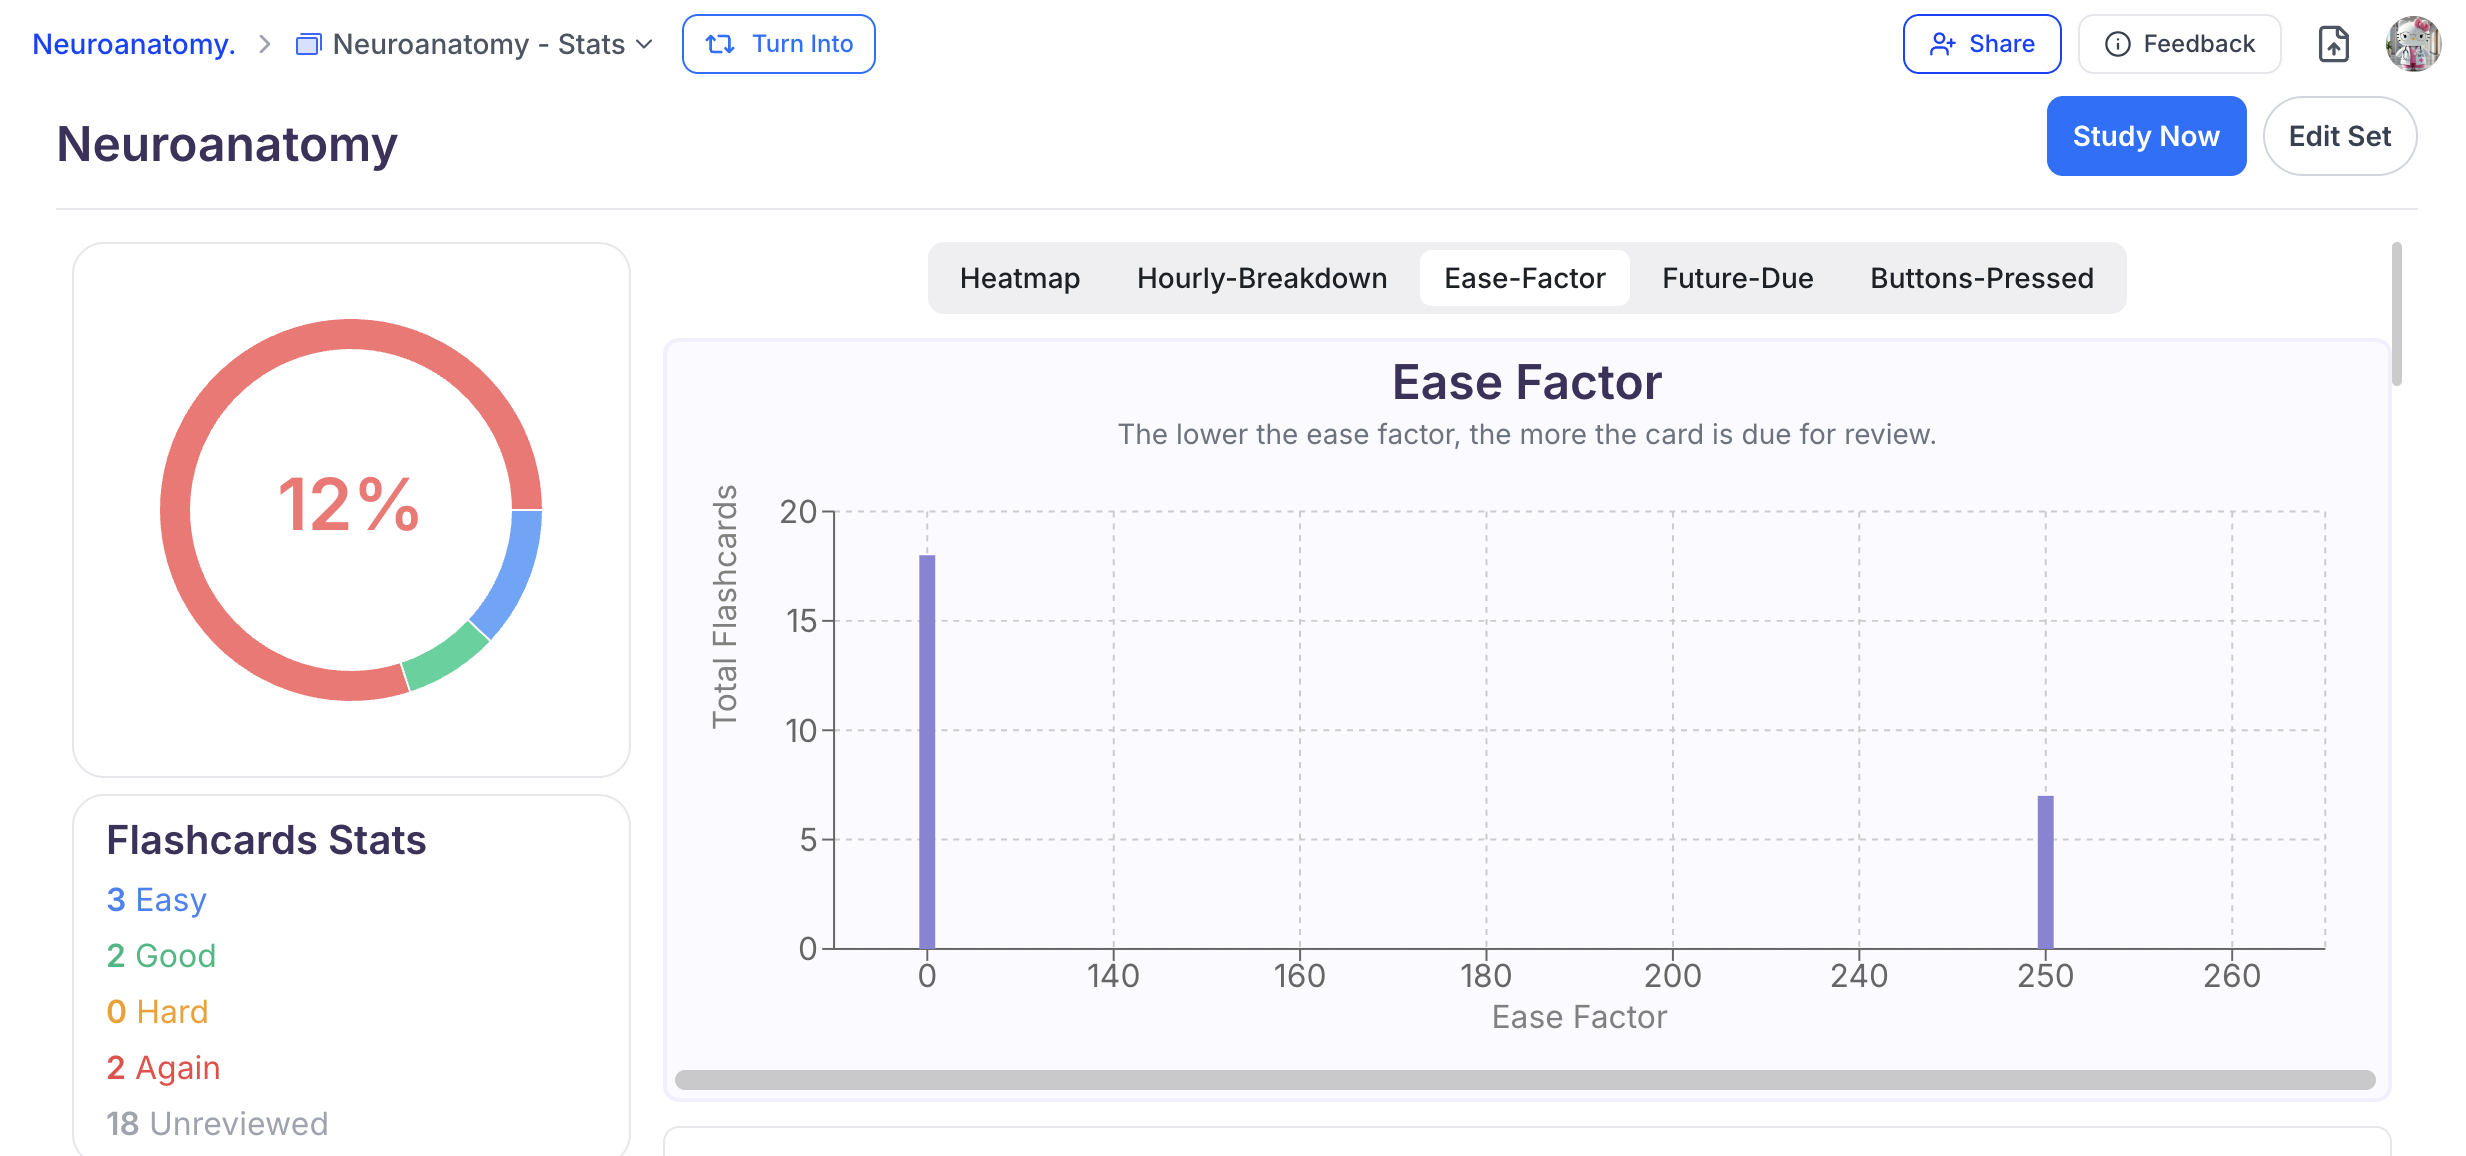
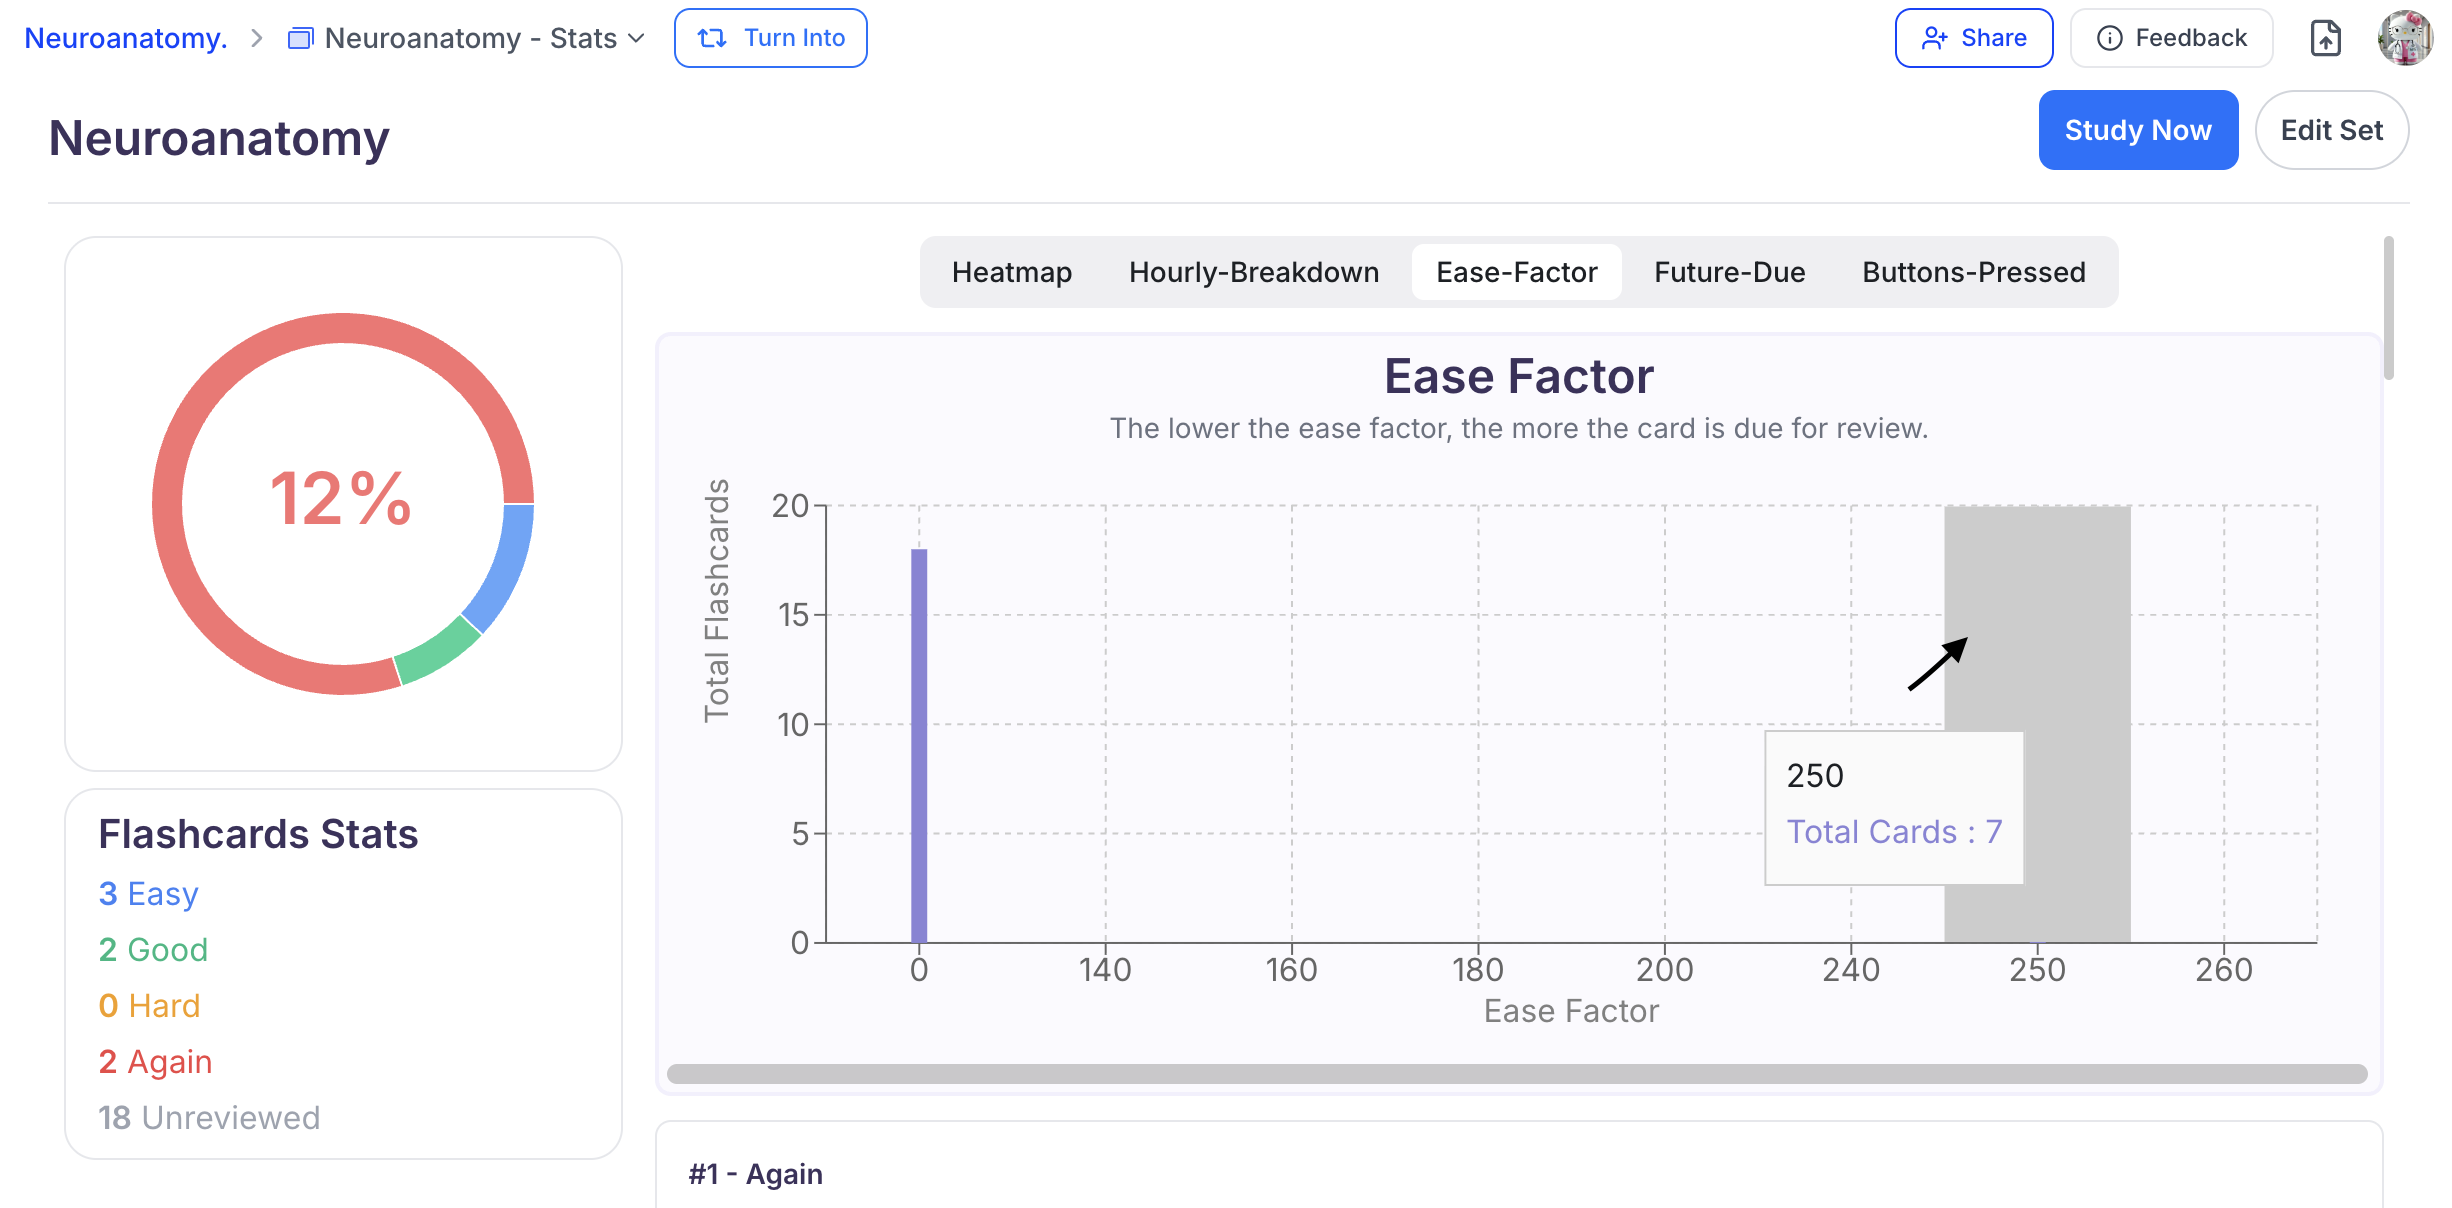
The Ease-Factor graph shows how easy or difficult your flashcards are over time based on your performance and ratings during reviews.
-
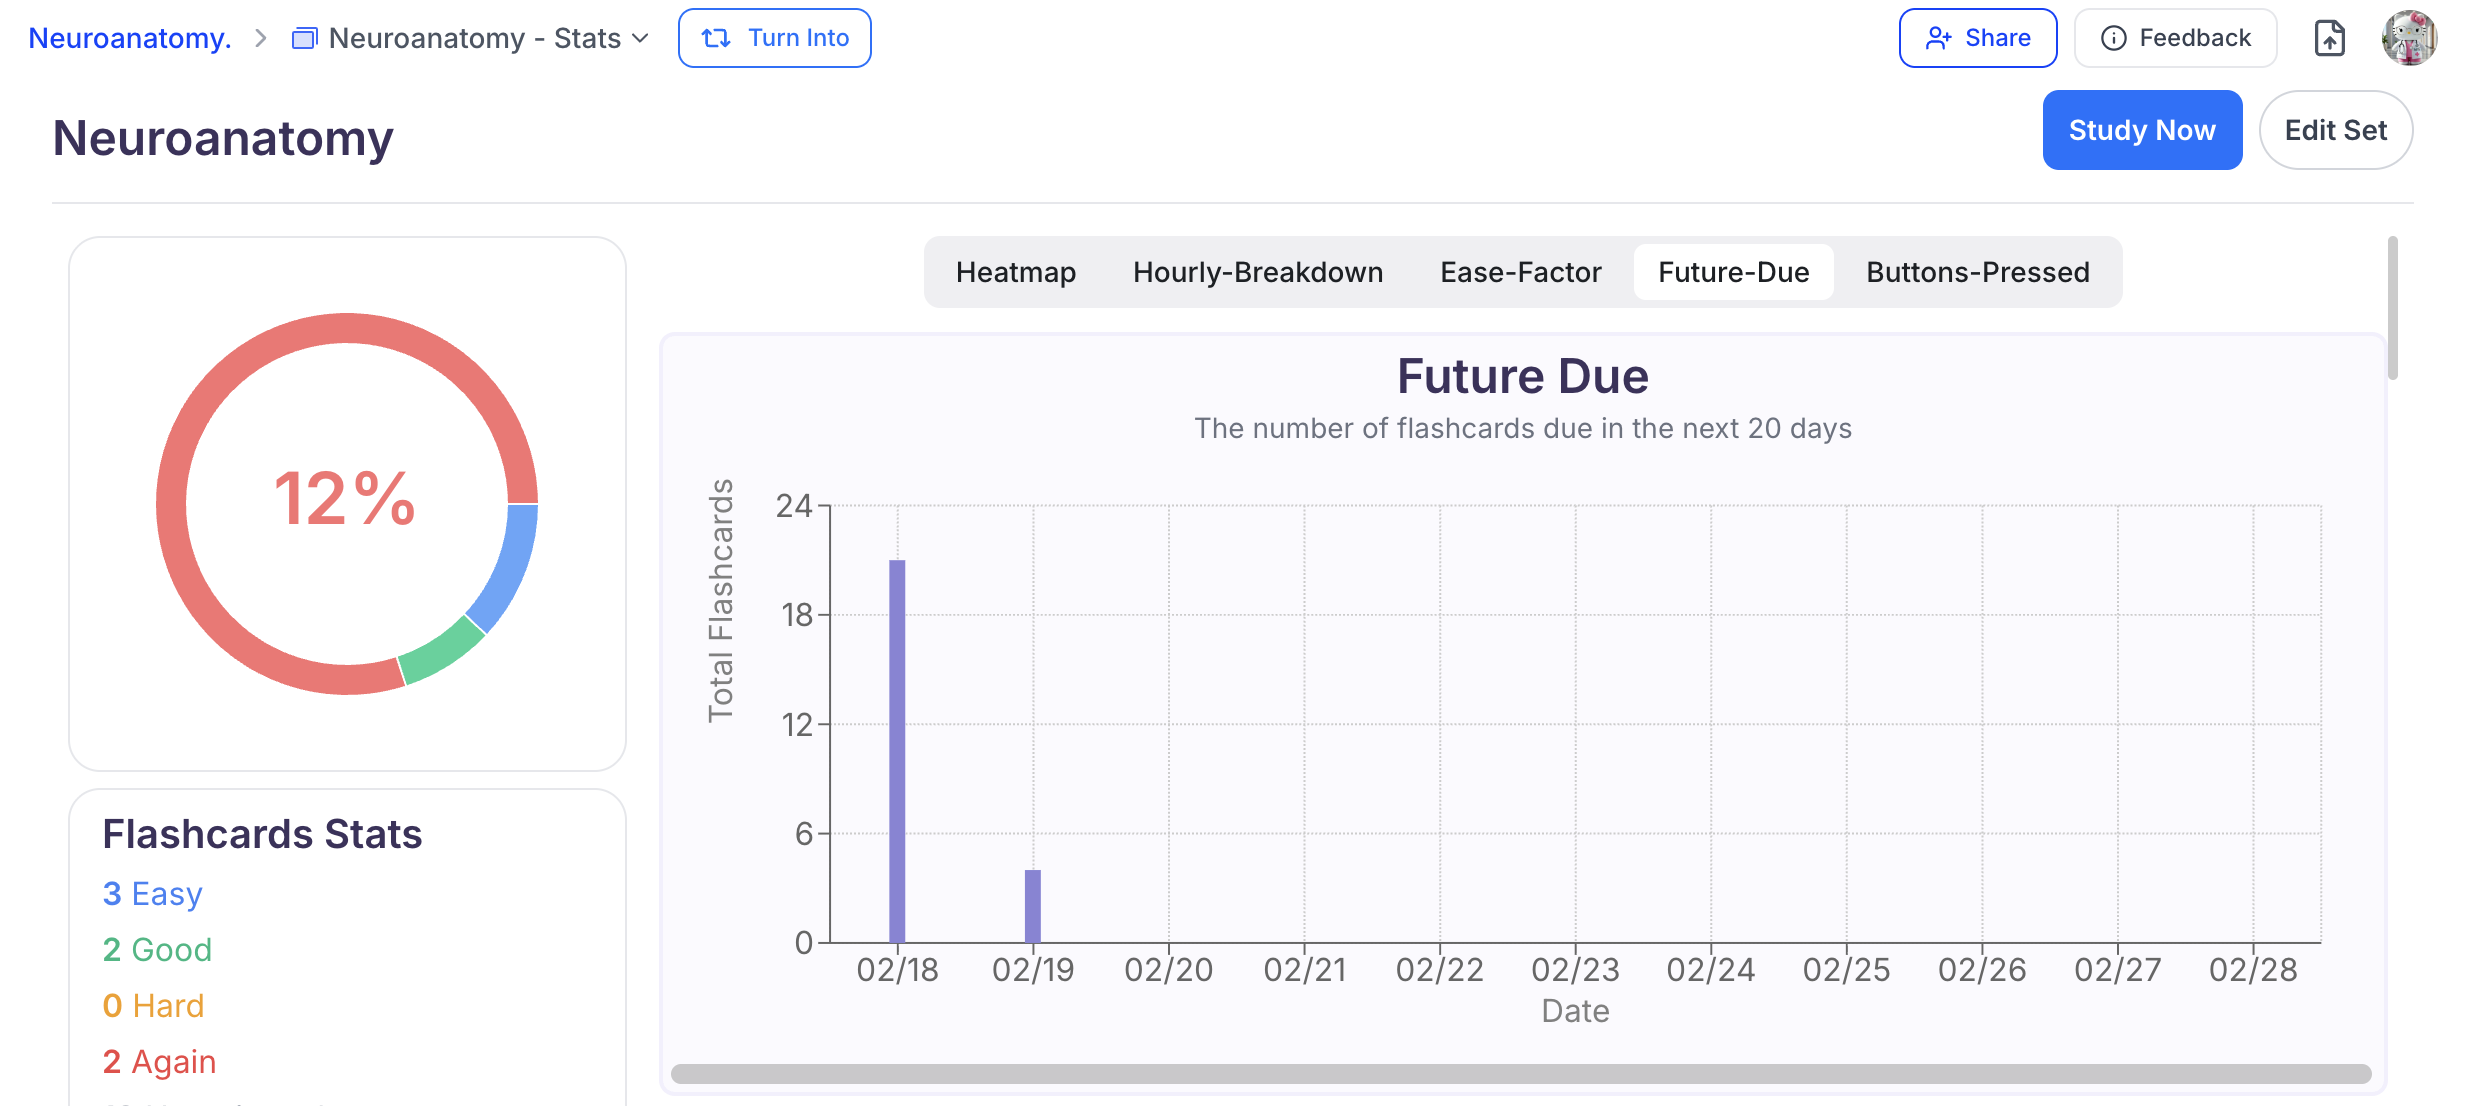
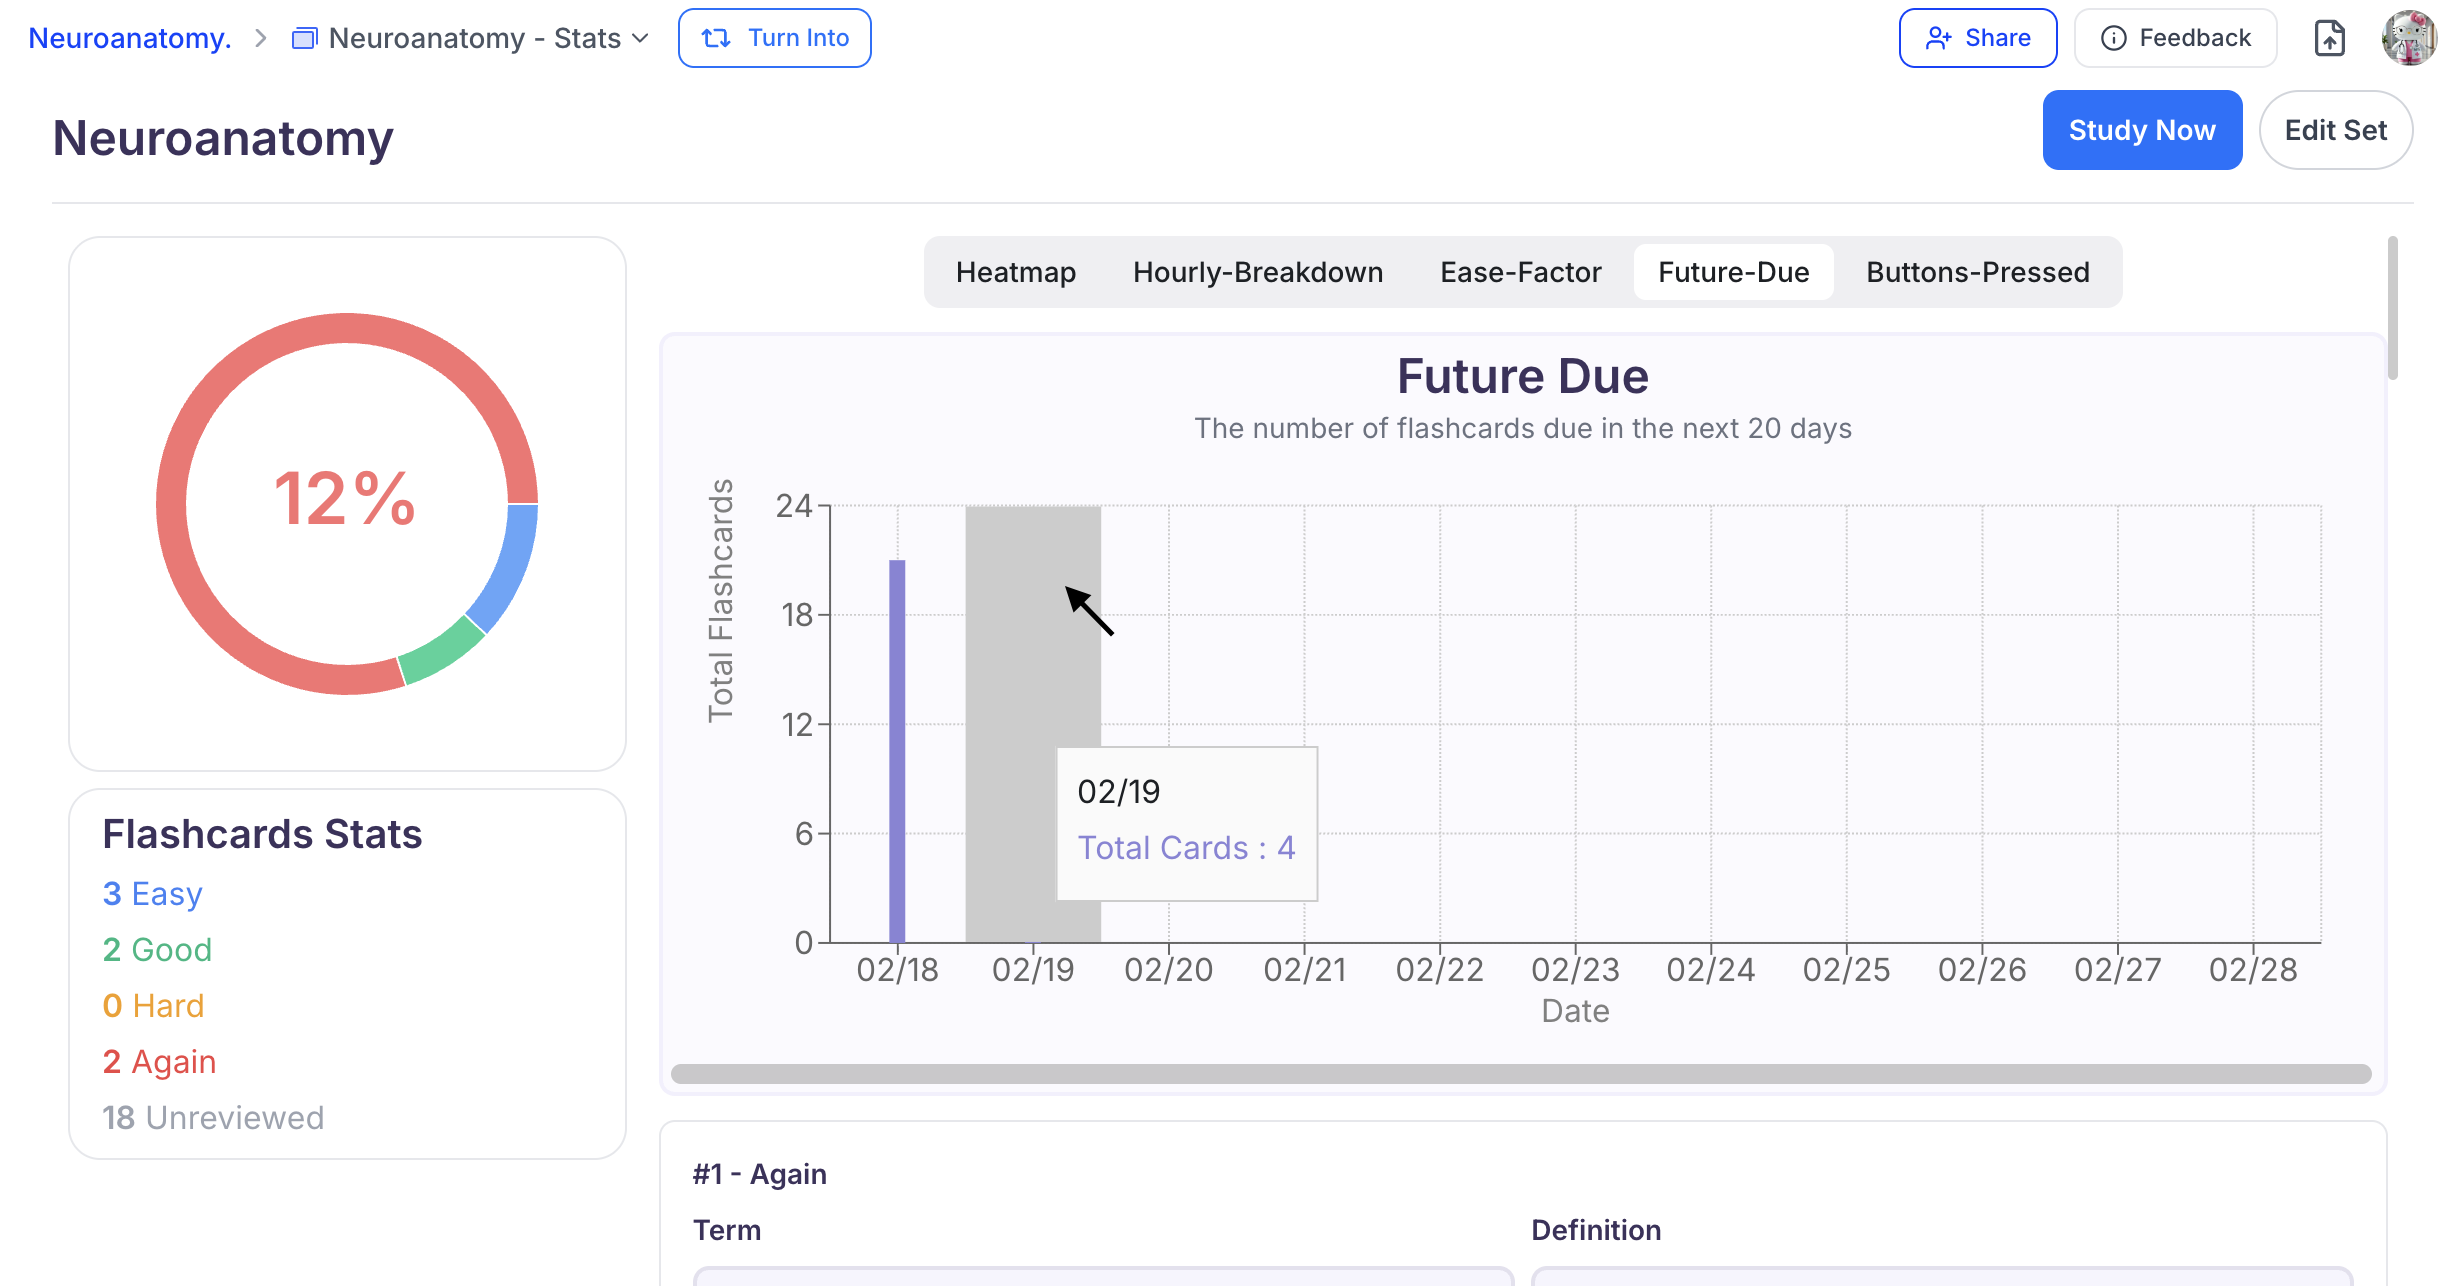
The Future-Due graph shows how many flashcards are coming up for review over the next 20 days.
-
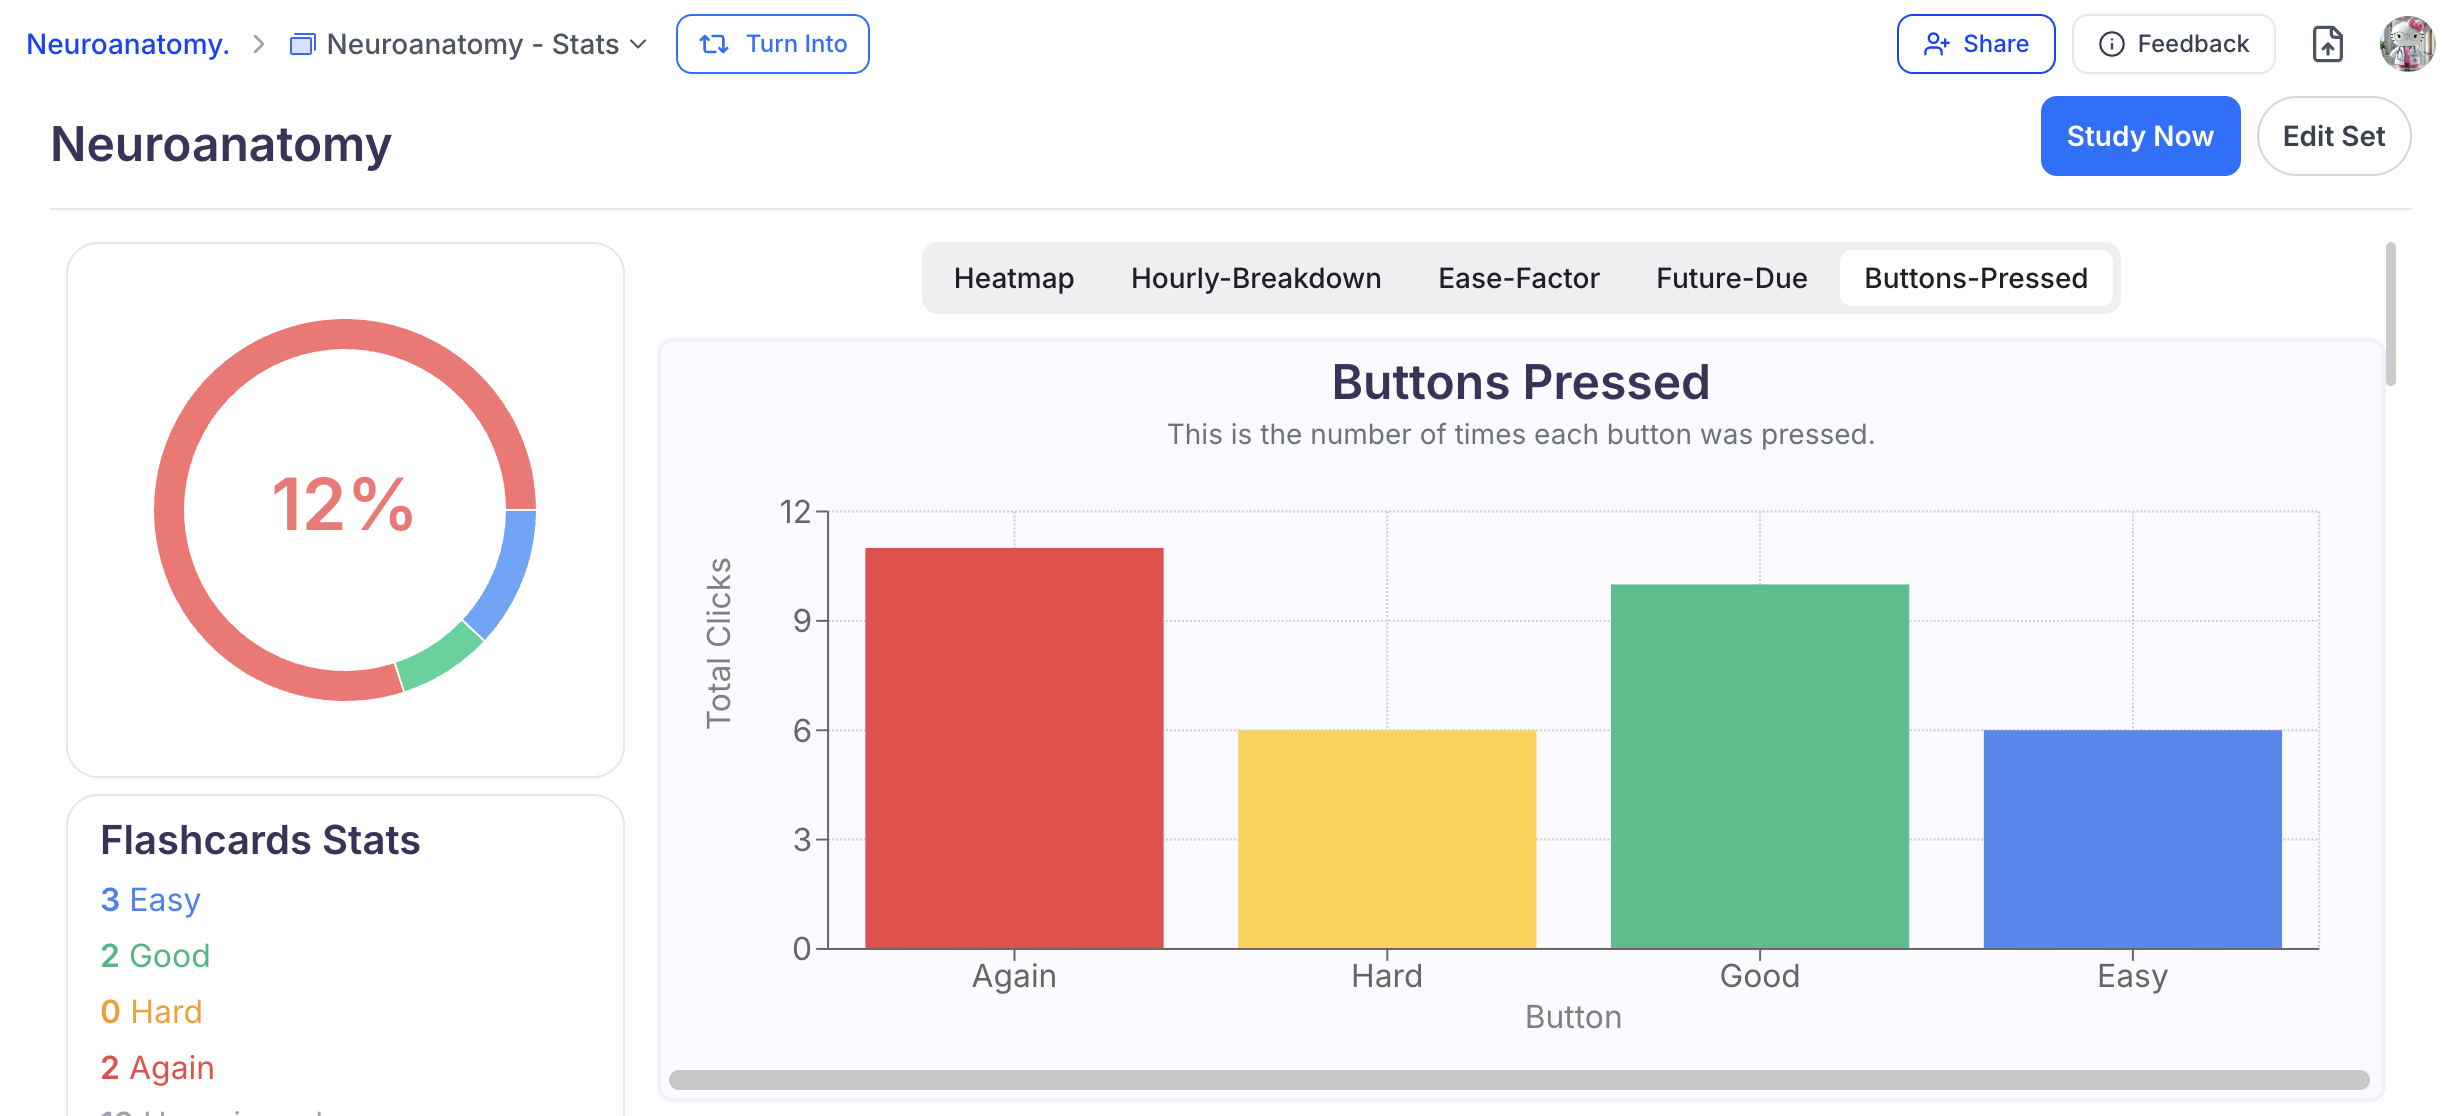
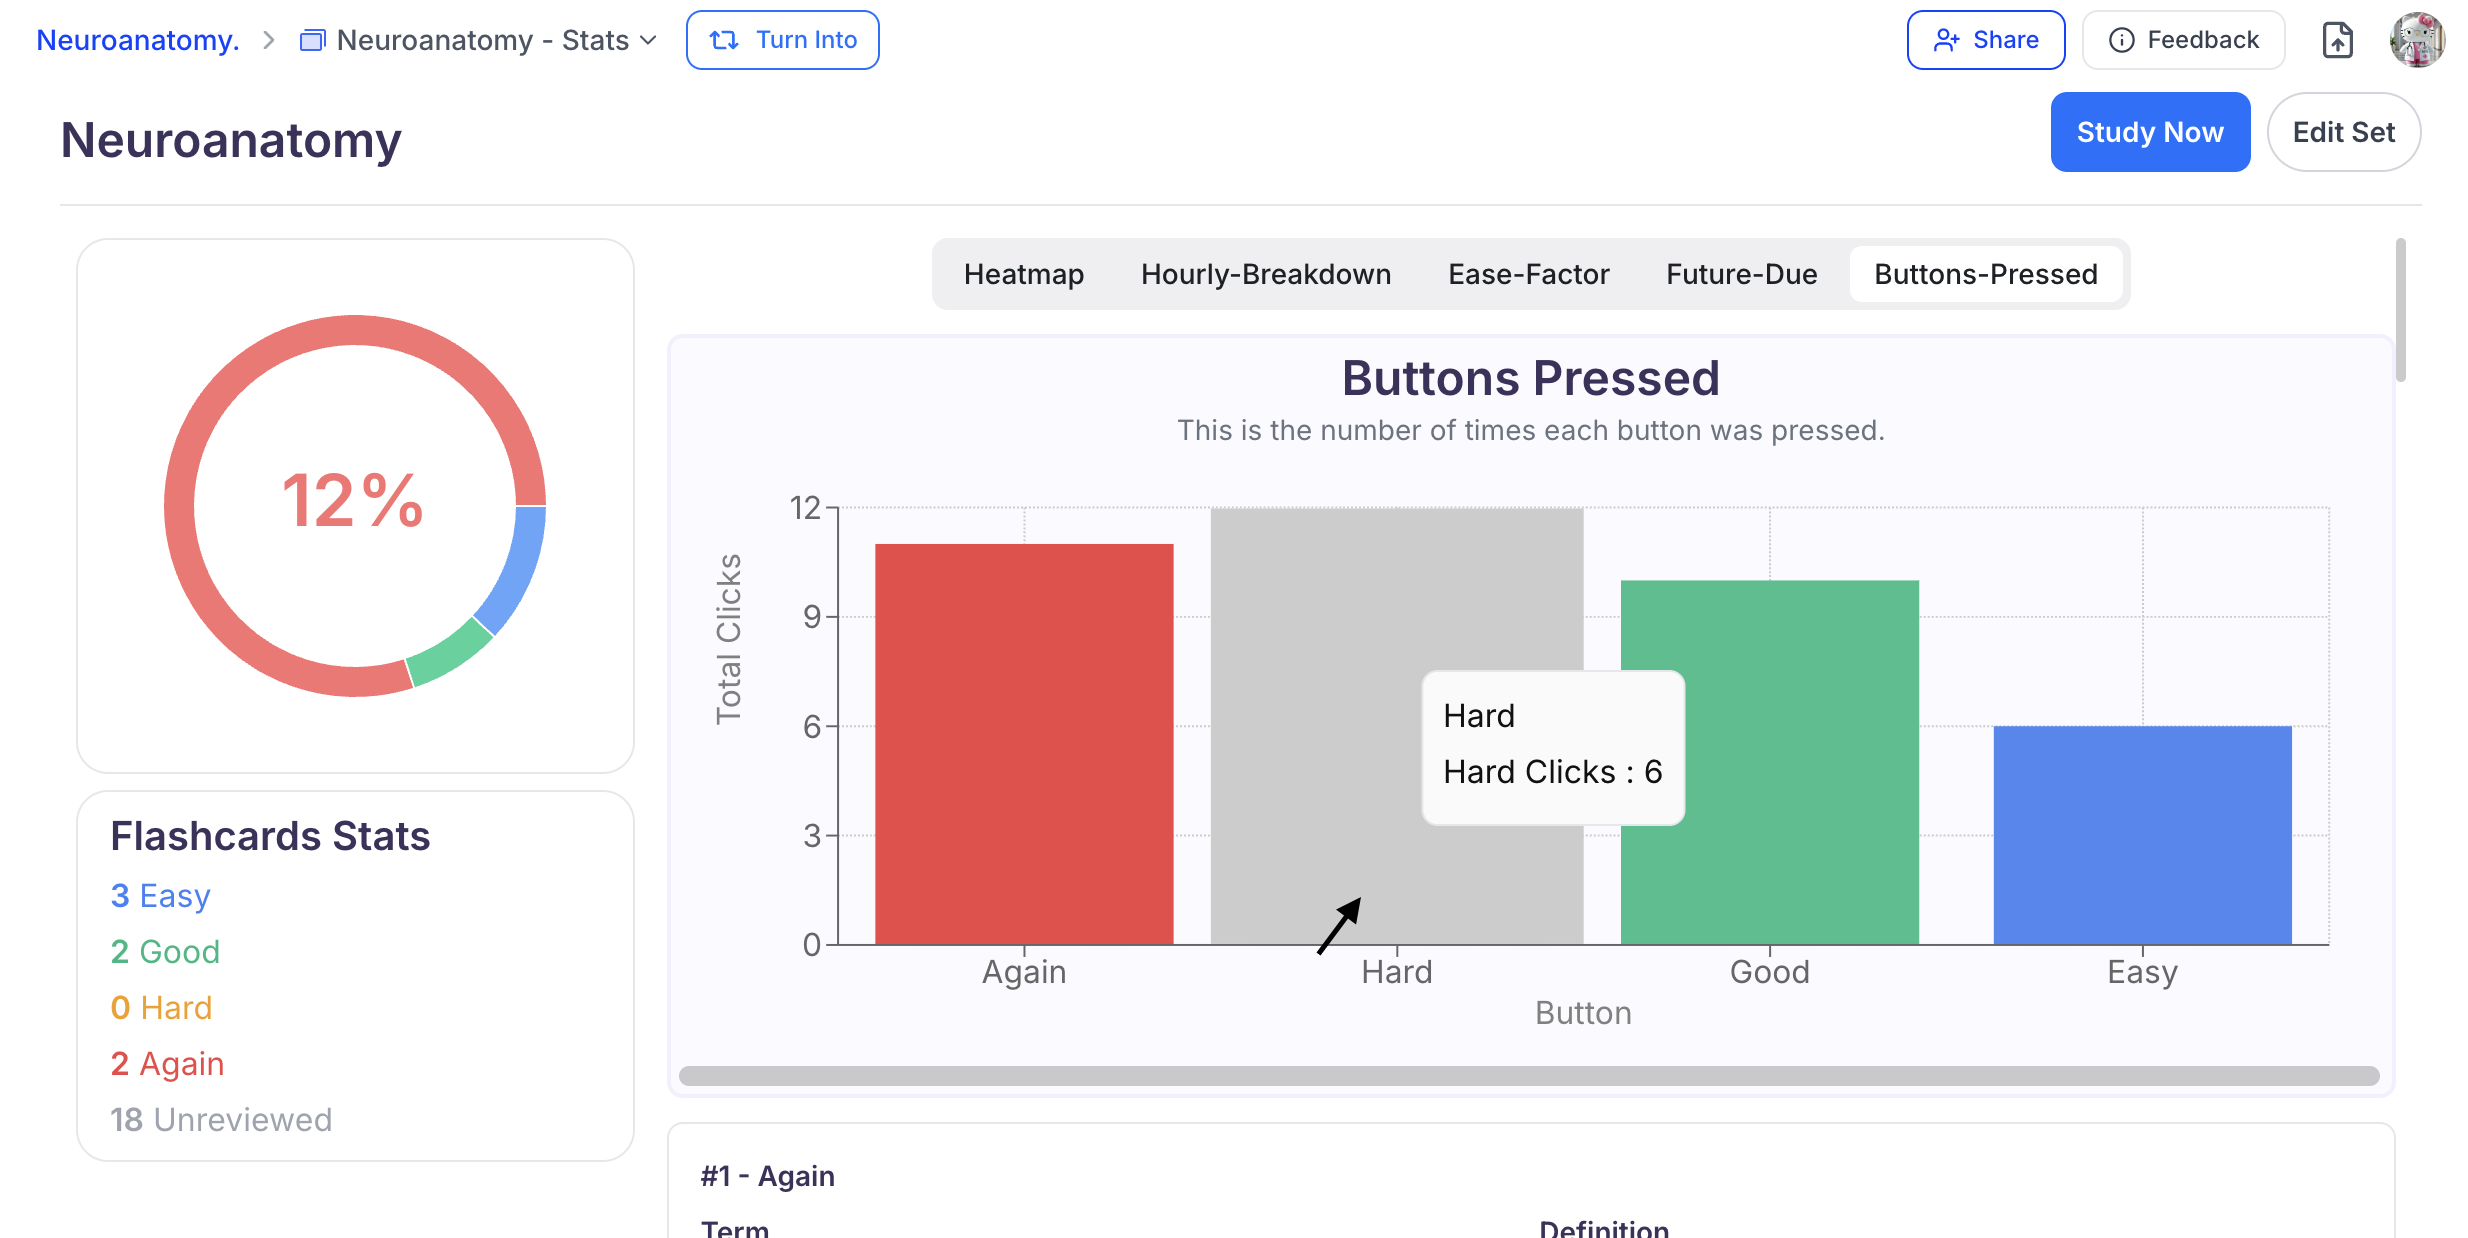
The Buttons-Pressed graph shows the total number of times each ease button was selected.
-
Each flashcard includes a Card Progress bar with shaded segments for each confidence rating button selection. Hover over a shaded section to view the ease rating and date it was recorded.
Sharing Your Flashcards
-
Click the downward arrow next to your flashcard set name, then select Share.

-
Copy the link by clicking directly on the URL under Share link, or select Copy Link from the bottom left corner. You can now share the copied link.

-
To share directly through supported apps:

- Select the WhatsApp icon to share via WhatsApp.
- Select the Telegram icon to share via Telegram.
- Select the Text icon to share through your preferred messaging app.
Flashcard Study Tips
Here are some effective ways to use your flashcards:- Spaced Repetition: Review cards at increasing intervals to improve long-term retention
- Active Recall: Test yourself by viewing the term first, then attempt to recall the definition
- Interleaving: Mix up different types of content rather than focusing on one topic at a time
- Customize Your Cards: Add images, diagrams, or additional context to enhance your learning
-
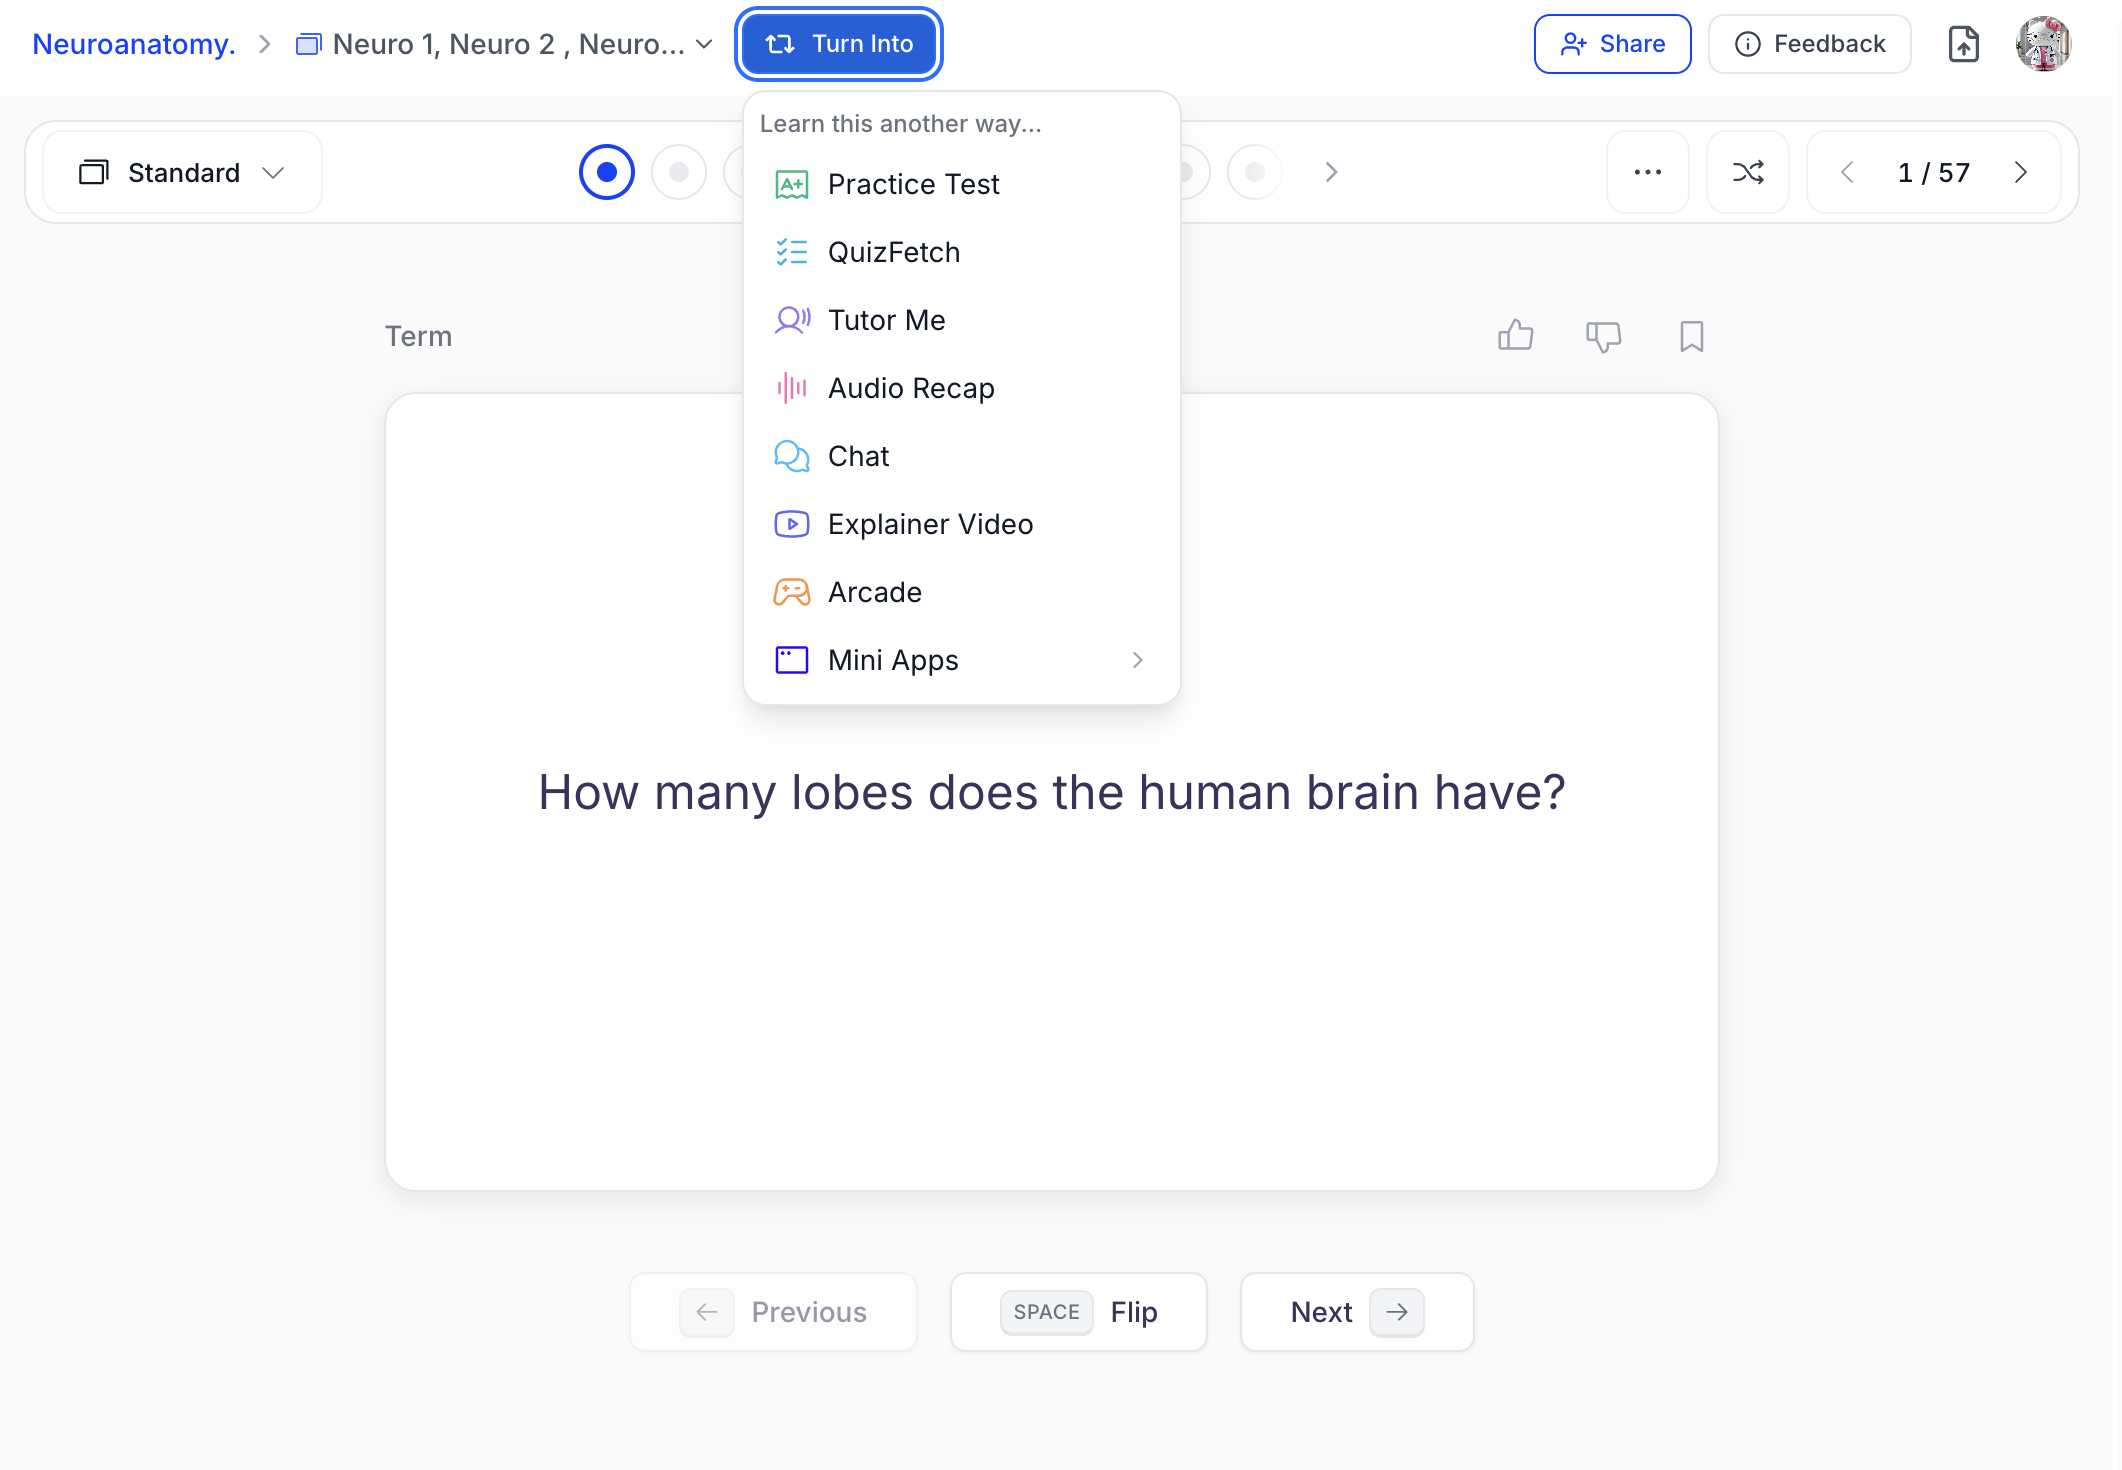
Integration with Other Tools: Your flashcards can be used to generate practice tests, quizzes, and other study materials. You can generate study materials from within each feature section or directly from your flashcards by selecting Turn Into above the flashcard set and choosing your desired study tool
Related Features
Once you’ve created flashcards, you might want to:- Take a practice test to assess your knowledge
- Create notes for more comprehensive study materials
- Try QuizFetch for a fun, interactive way to test your knowledge